Dunning & Reminders
Overview
Dunning is the process of automated follow-ups for late, overdue, or declined payments. Common "follow-ups" include emails to the customer letting them know they are overdue or charging the payment method on file for the customer automatically to pay overdue invoices. You can also use this feature to cancel or suspend customer's subscriptions. set custom fields on objects, and send webhooks or text messages (SMS). We recommend everyone take advantage of dunning and reminders! This will make a huge difference in your accounts receivable numbers, or what amount of money people owe your business.
ChargeOver only duns invoices that are Unpaid or Overdue. All other invoices will not be dunned.
Enable dunning
- Go to your Settings and select
Features , thenMore Features from the left side menu - Search for "Dunning and Reminders" and click
Get Started - To enable Dunning and Reminders, you will want to choose
Yes from the drop down menu
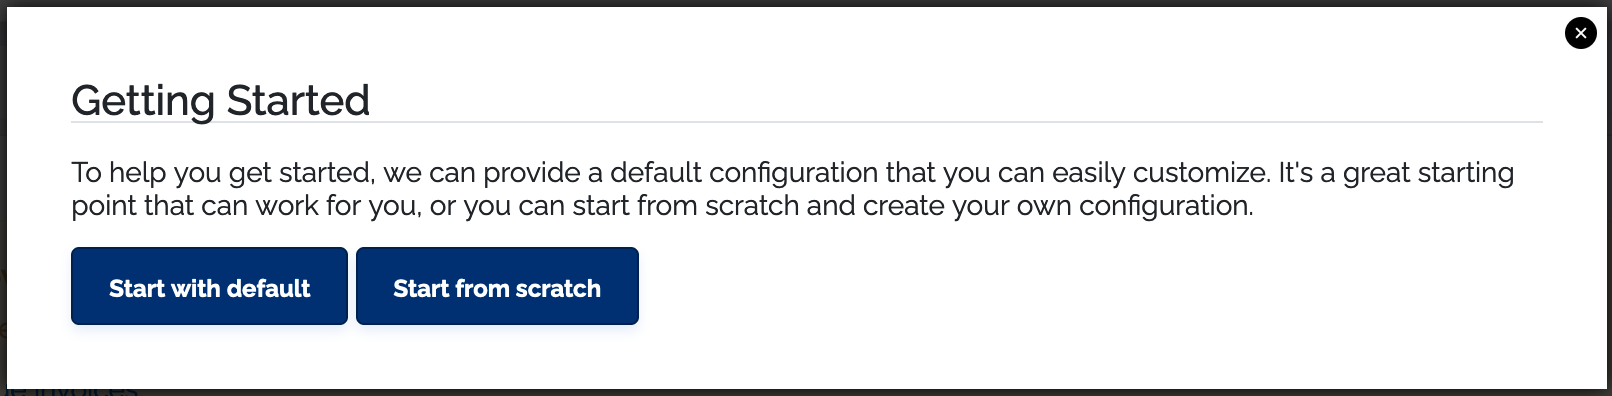
Once you have enabled this feature, you will be prompted to start from scratch and create your own dunning groups, or you will be prompted to use our default dunning settings.
Using the default dunning groups
So what are you working with if you choose to use our default dunning groups?
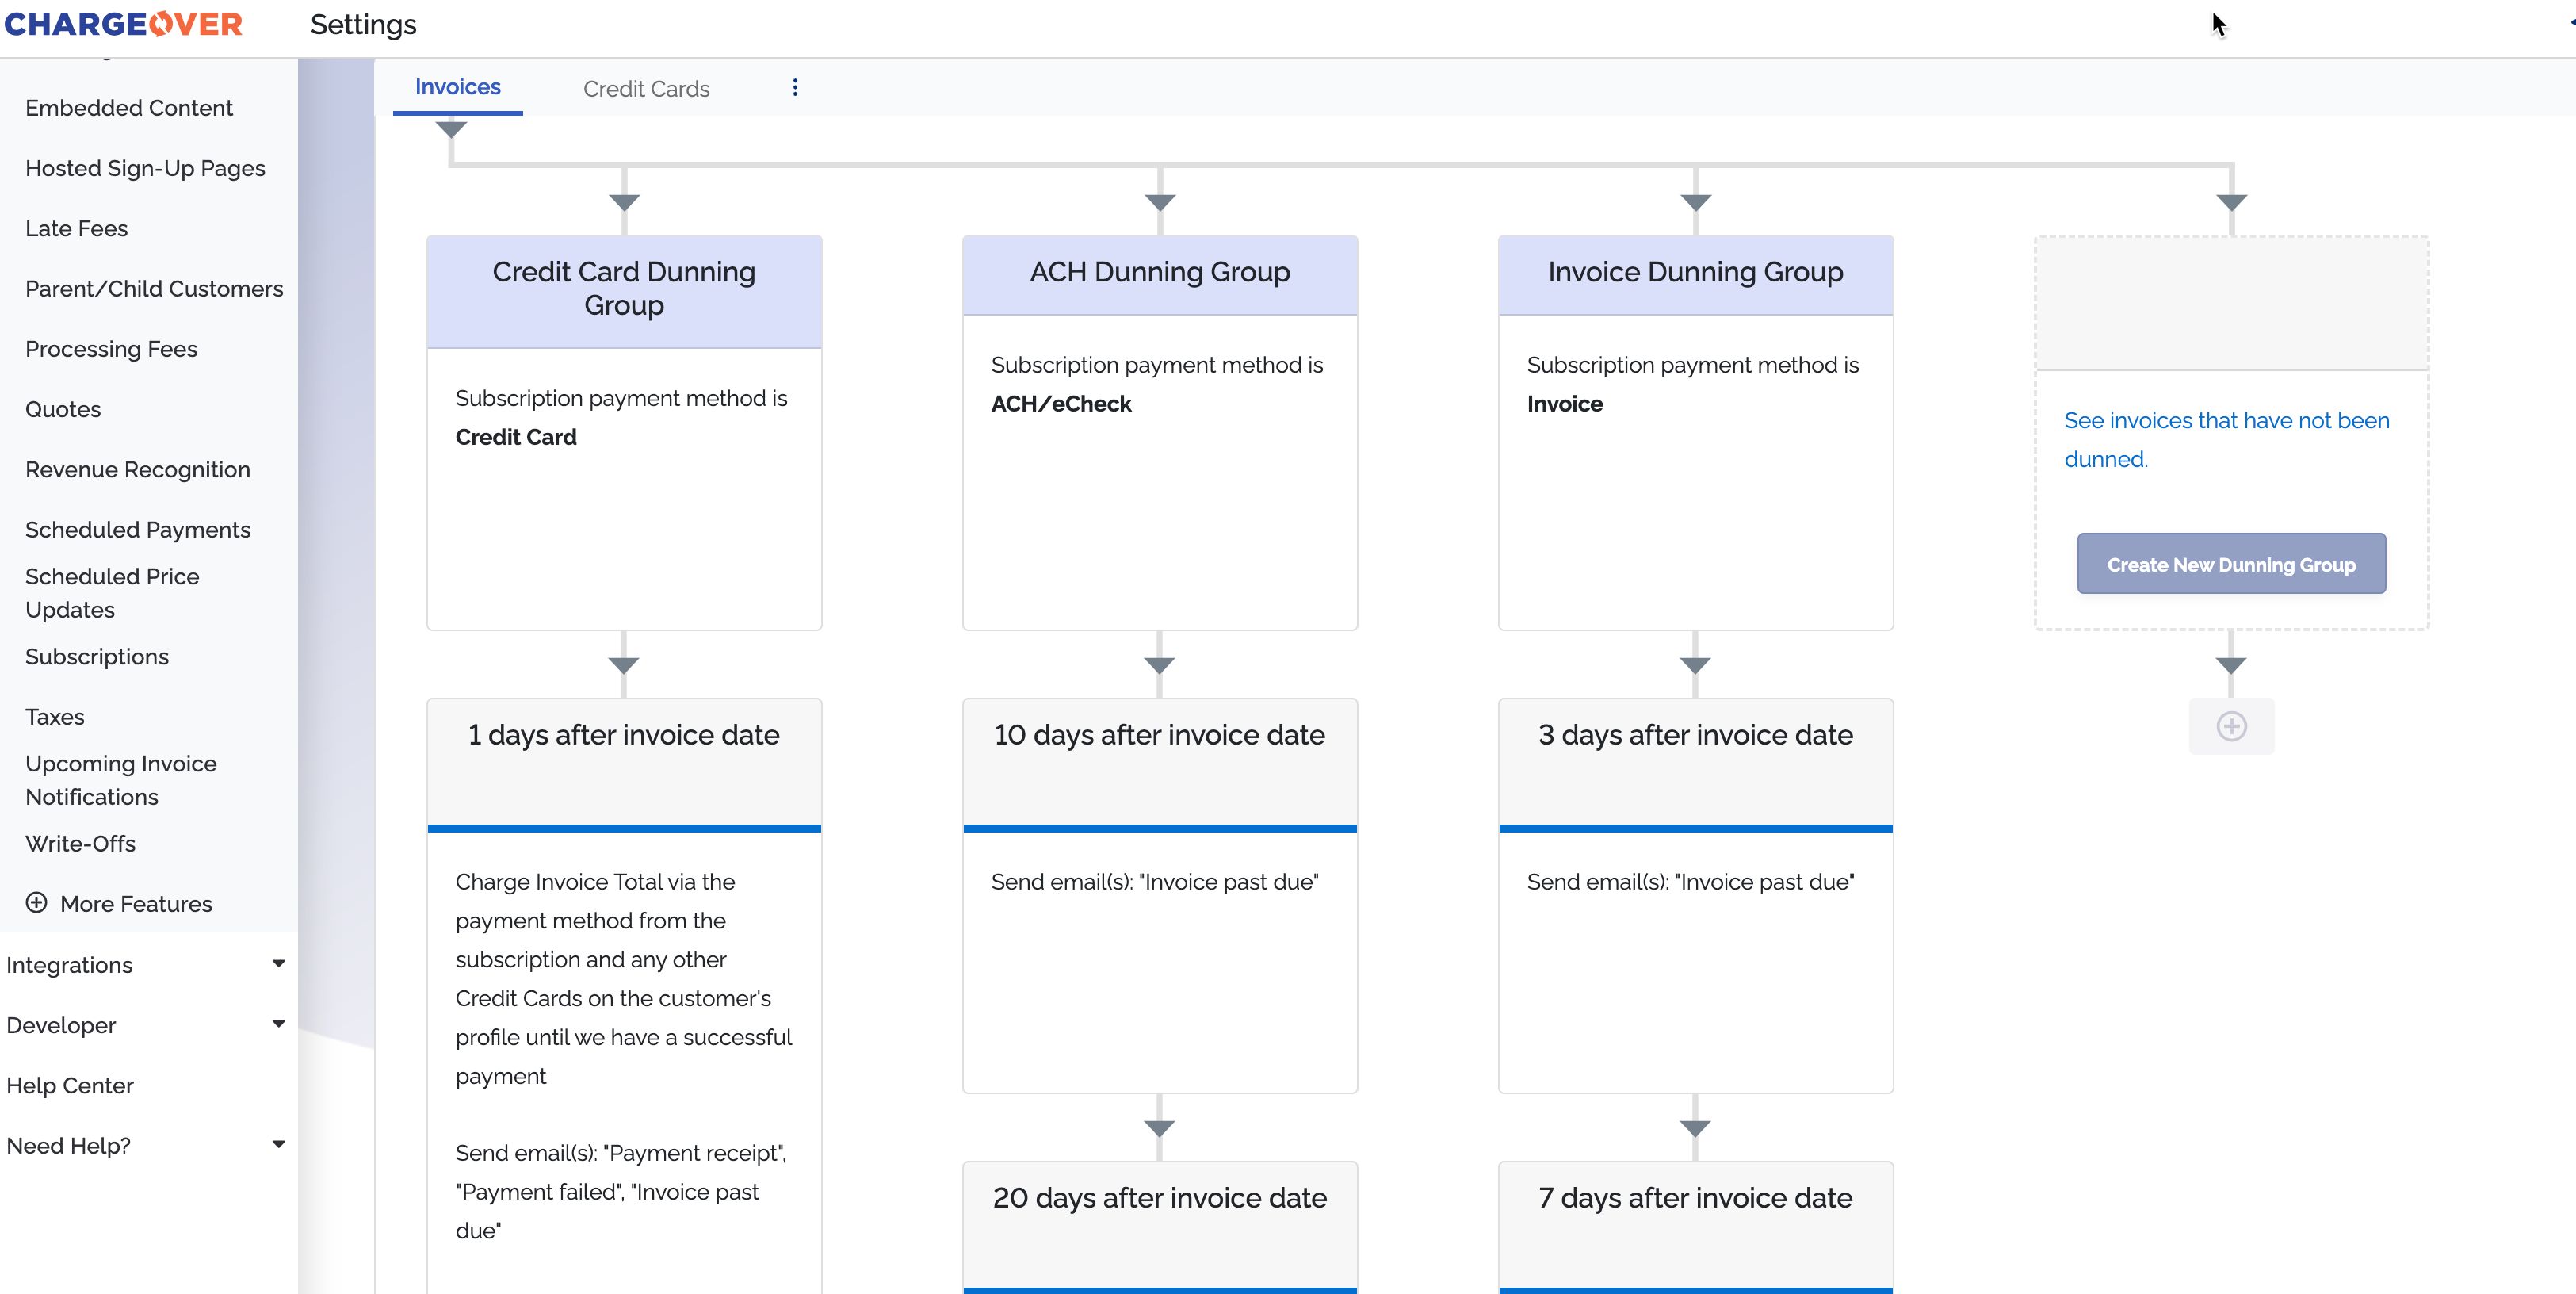
For one, you immediately get three dunning groups that will most likely touch all of your overdue or unpaid invoices at some point. This is because each of these dunning groups are based off of what payment method the subscription is using to auto-pay its invoices. The first dunning group is for any subscription based invoices that have a credit card attached as a pay method, the second dunning group is for any that have an ACH as the pay method and the last group is for all the other invoices that come from a subscription where the invoices are NOT being auto-paid.
If you are processing payments with tokenized payment methods, then you would have to set up another dunning group in your dunning settings, to accomodate any subscriptions that might be using those tokens as pay methods.
The second thing we want you to take note of is the dunning rules of these default dunning groups. They are set up to send reminders after an invoice date. This means that if we are looking at the Credit Card Dunning Group and an invoice is created on June 20th, a day after that day, on June 21st, an automated charge will be attempted on the invoice if for some reason the first payment attempt fails. Our default setting for every ChargeOver account is that auto-pay is turned on and will run a payment automatically if a subscription has a payment method attached to it.
If you want your dunning groups to go off of when an invoice actually reaches an overdue status instead of being based on the invoice date, then we recommend you choose the start from scratch option and create your dunning groups manually. This allows for more immediate and precise customization.
Creating your dunning groups from scratch
If you are creating your dunning groups from scratch, you will need to select the object, field and comparison.

Choosing criteria
When you set up criteria, you will choose an object and field first, before selecting a comparison. For any objects that are not an invoice, the comparison action will be applied on the invoice's related object, like a subscription, payment or quote.
For example, if you choose to set up a dunning rule based on a subscription custom field, the invoice will only be included if the subscription that generated it has that custom field value.
Supported objects include
- Customers
- Subscriptions
- Invoices
- Invoice schedules
Each object will have a varying list of fields that you can choose from. Once you have decided which object and field you are going to filter with, you need to choose a comparison. The available comparisons will depend on which object or field you select.
Supported comparisons
- Is
- Is not
- In list
- Not In list
- Does exist
- Does not exist
- Is the first invoice for subscription
- Renewal invoice (2nd, 3rd, etc.) for subscription
After choosing a comparison, you must enter or select the value for that comparison. The value would be something like a specific brand name or term, for example.
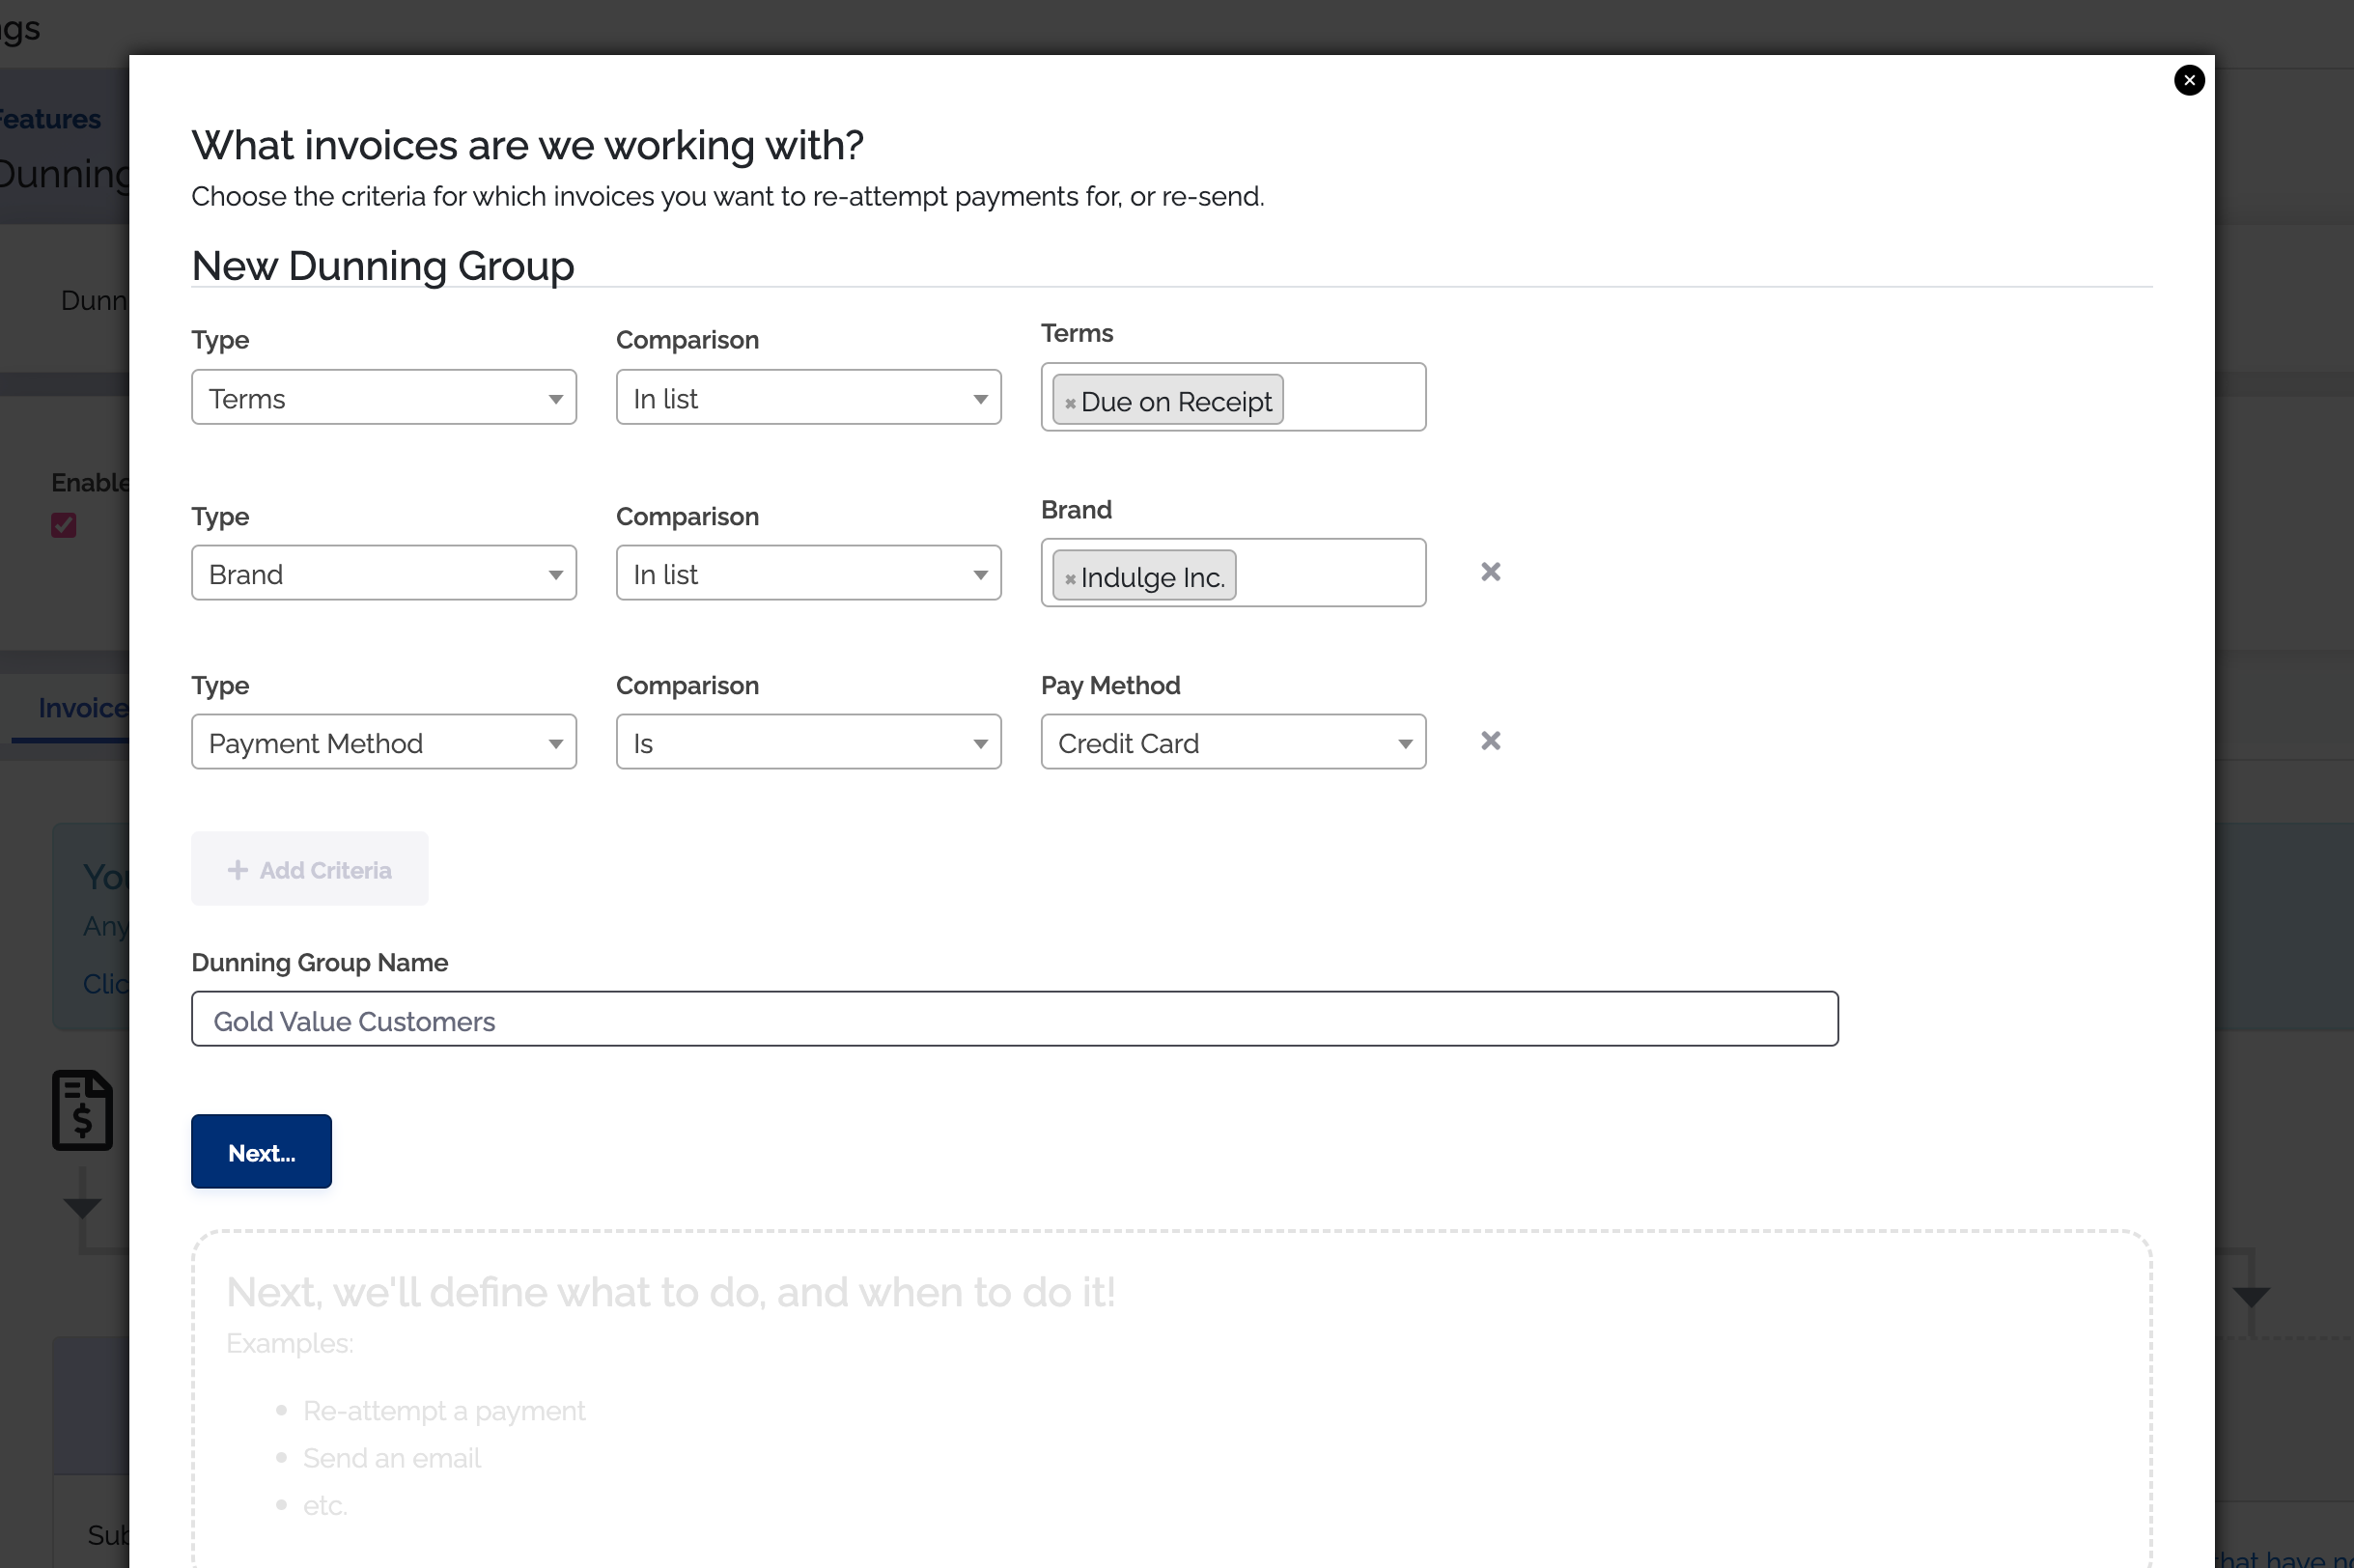
You can add up to three sets of criteria for each dunning group. An example is below.
It is important to note that any changes made to dunning groups will take affect on the next scheduled nightly event process. A nightly event process is when your invoices are created and
your subscriptions on auto-pay will run payments. You can check when your nightly processes run by going to your Need Help? tab and clicking the System Status tab.
During our nightly processes, ChargeOver looks for invoices that meet the criteria for each of the dunning groups, starting from left to right. If you have an invoice that could match multiple dunning groups and you want it to match dunning group two instead of one, you'll need to keep this in mind when setting up your dunning groups from scratch.
Name your dunning group
After choosing your criteria, you'll want to choose a name for your dunning group. ChargeOver will automatically create a dunning name for you that you can either use or delete, based off of the criteria you chose. If you are choosing your own dunning group name, make sure it is something that is easily understood by you and your team. That way, when an invoice has been dunned with that group later, you can easily pinpoint which dunning group the invoice is using.
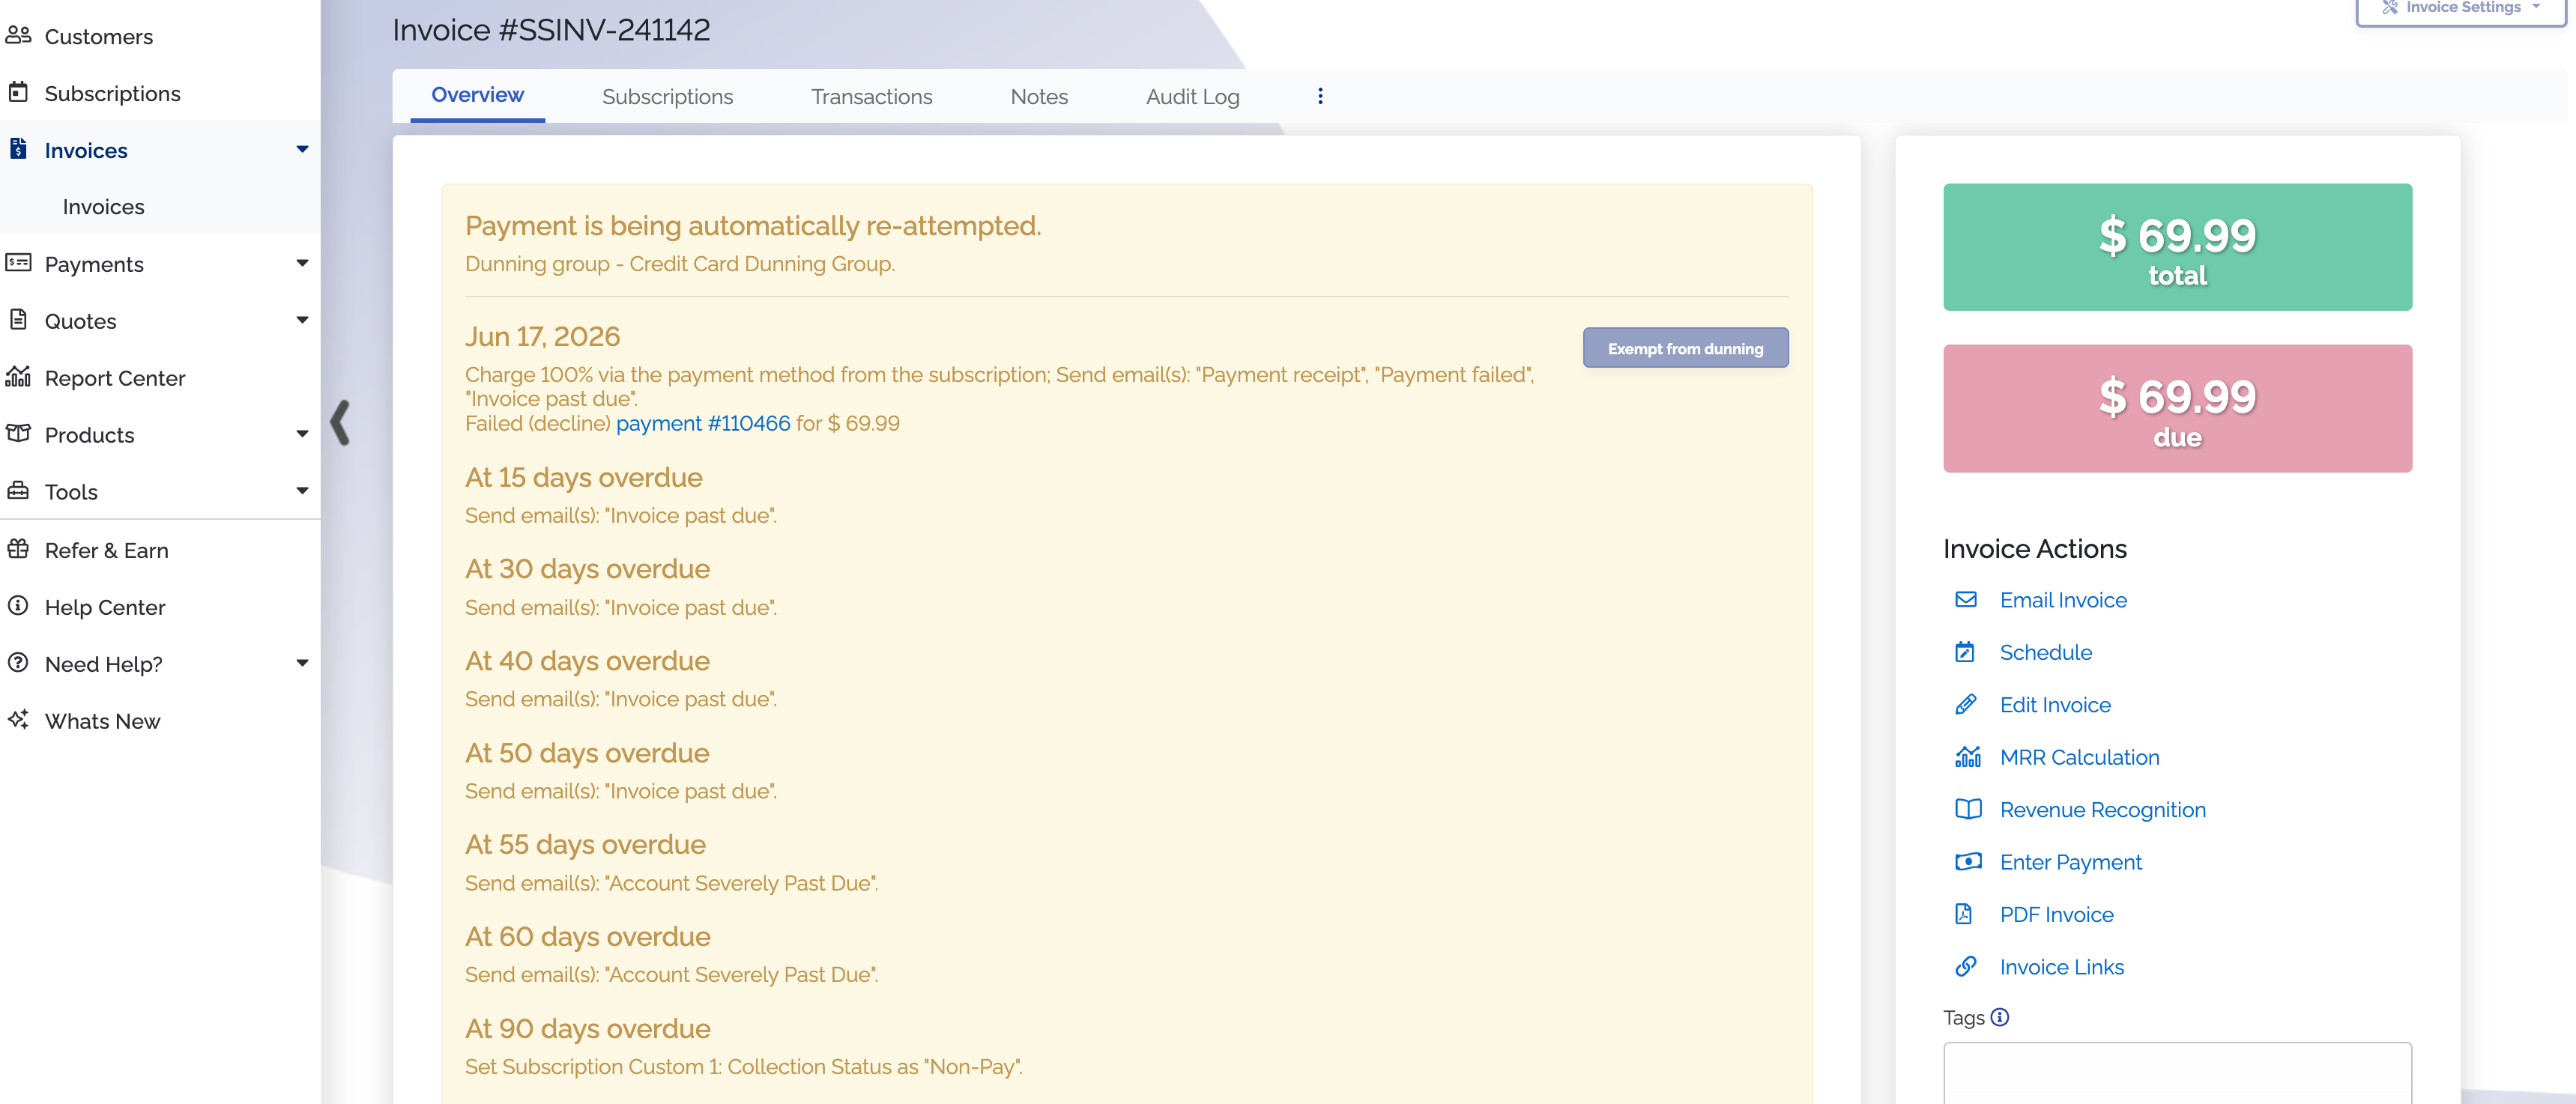
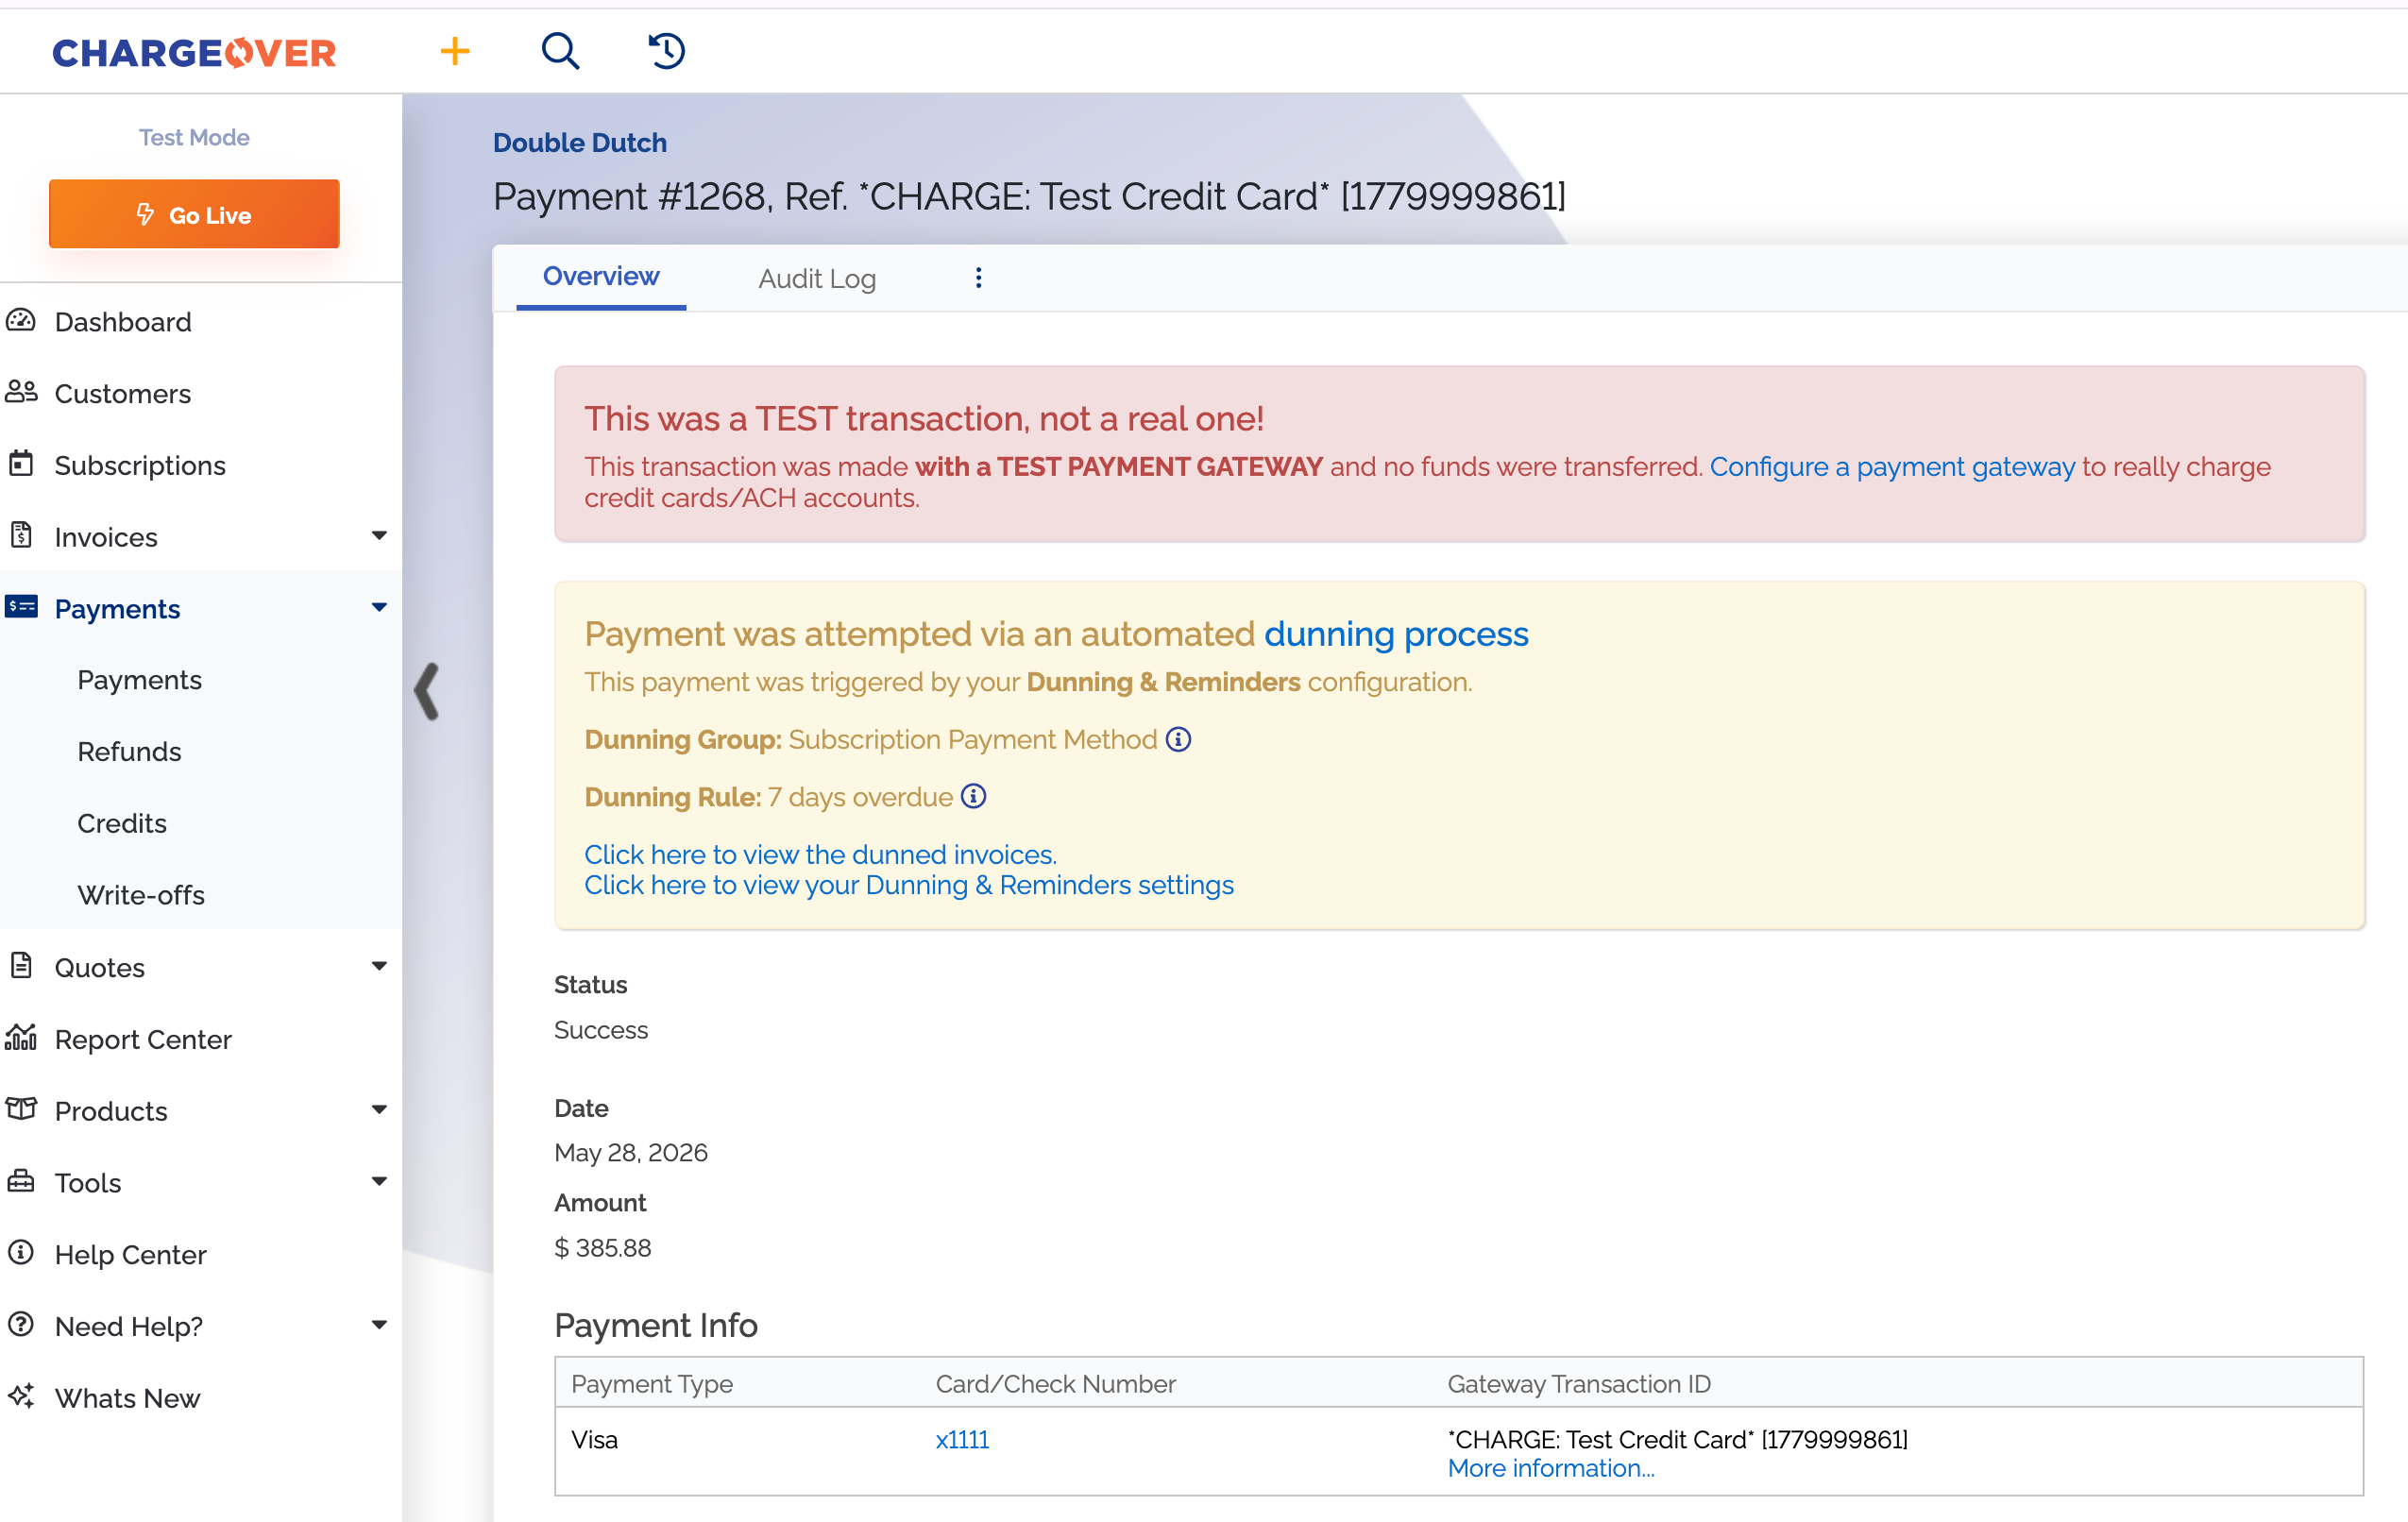
Likewise, whenever a payment is the result of the dunning and reminders process, we will show a message on the transaction details page that will indicate which rule was responsible for the payment. Below is an example of what a dunning banner can look like on a transaction tied to an invoice that was dunned. This invoice was automatically retried for payment through the listed dunning group.
Set up your dunning rules
After you have chosen your dunning groups criteria and name, you can start setting up your dunning rules! They consist of a timing component and an action component and will determine what action will occur when an invoice meets the criteria you have set for that dunning group. For example, you may decide you want an email to be sent out to your customers reminding them that they are overdue.
If you want to do this, we recommend you look into creating a customized email template to be used in your dunning rules. Be sure to mark the type of your email as customer statement, invoice due, invoice past due, partial payment declined, partial payment due, partial payment past due, payment failed, payment receipt, as this will allow you to see the email template as an option when setting up your dunning rules.
When should my dunning rules occur?
When choosing the timing of a dunning rule, it's important to remember that you are selecting the number of days based around a specific event in your invoicing timeline. Every time you select a number of days, it will be in respect to that selected timeline.
Invoice timing options include:
- After invoice date
- Before invoice due
- After invoice due
- After scheduled payment date
- After scheduled payment due
Invoice timing options broken down and explained:
- After invoice date: This indicates that an action will happen however many days after the date on the invoice. This date is usually the invoice creation date, however, this date is editable if you turn on the setting for it

-
Before invoice date: This indicates that an action will happen however many days before an invoices chosen date.
-
After invoice due: This indicates an action will occur however many days after the invoices due date. So when an invoice's status hits overdue, the action would happen however many days after that overdue status appeared on the invoice. You can check the audit log of the invoice if you want to double check exactly when an invoice went overdue.
-
After scheduled payment date: This indicates that an action will happen however many days after a scheduled payment date on an invoice. You can set scheduled payments on invoices with our scheduled payments feature or our payment schedules feature. While these two features are related, they do not do the exact same thing.
-
After scheduled payment due: This indicates that an action will happen however many days after a scheduled payment is past due on an invoice. So if you have five scheduled payments set up on a one-time invoice, and the cusomer missed the second payment, an action could be sent off of the time the due date for that payment was missed or overdue.
So, what would be an example of how to set up invoice timing correctly for your use case?
Say you want an email to be sent to a customer right before an invoice becomes due. And then you want to snd another email to them after their credit card fails twice over a
7 day time span. From the timing options above, you would select before invoice due as the timing for your first dunning rule. And then you would select after invoice due for your second dunning rule.
From there, you would neeed to choose your actions, which are detailed out below.
What actions should my dunning rules trigger?
Every dunning rule contains at least one action and these actions are what make events happen in ChargeOver. Our supported actions include the following:
- Attempting a payment
- Sending an email
- Setting a custom field
- Canceling a subscription
- Suspending a subscription
- Sending a webhook
- Sending a text message
It is important to remember that any changes made to dunning rules will take affect on the next scheduled nightly event process. A nightly event process is when your invoices are created and
your subscriptions on auto-pay will run payments. You can check when your nightly processes run by going to your Need Help? tab and clicking the System Status tab.
Examples of dunning set-ups
Typical use-case
Below is an example showing how you could set up your dunning groups to capture all of your subscriptions that are set to auto-pay with a credit card and ACH pay method.
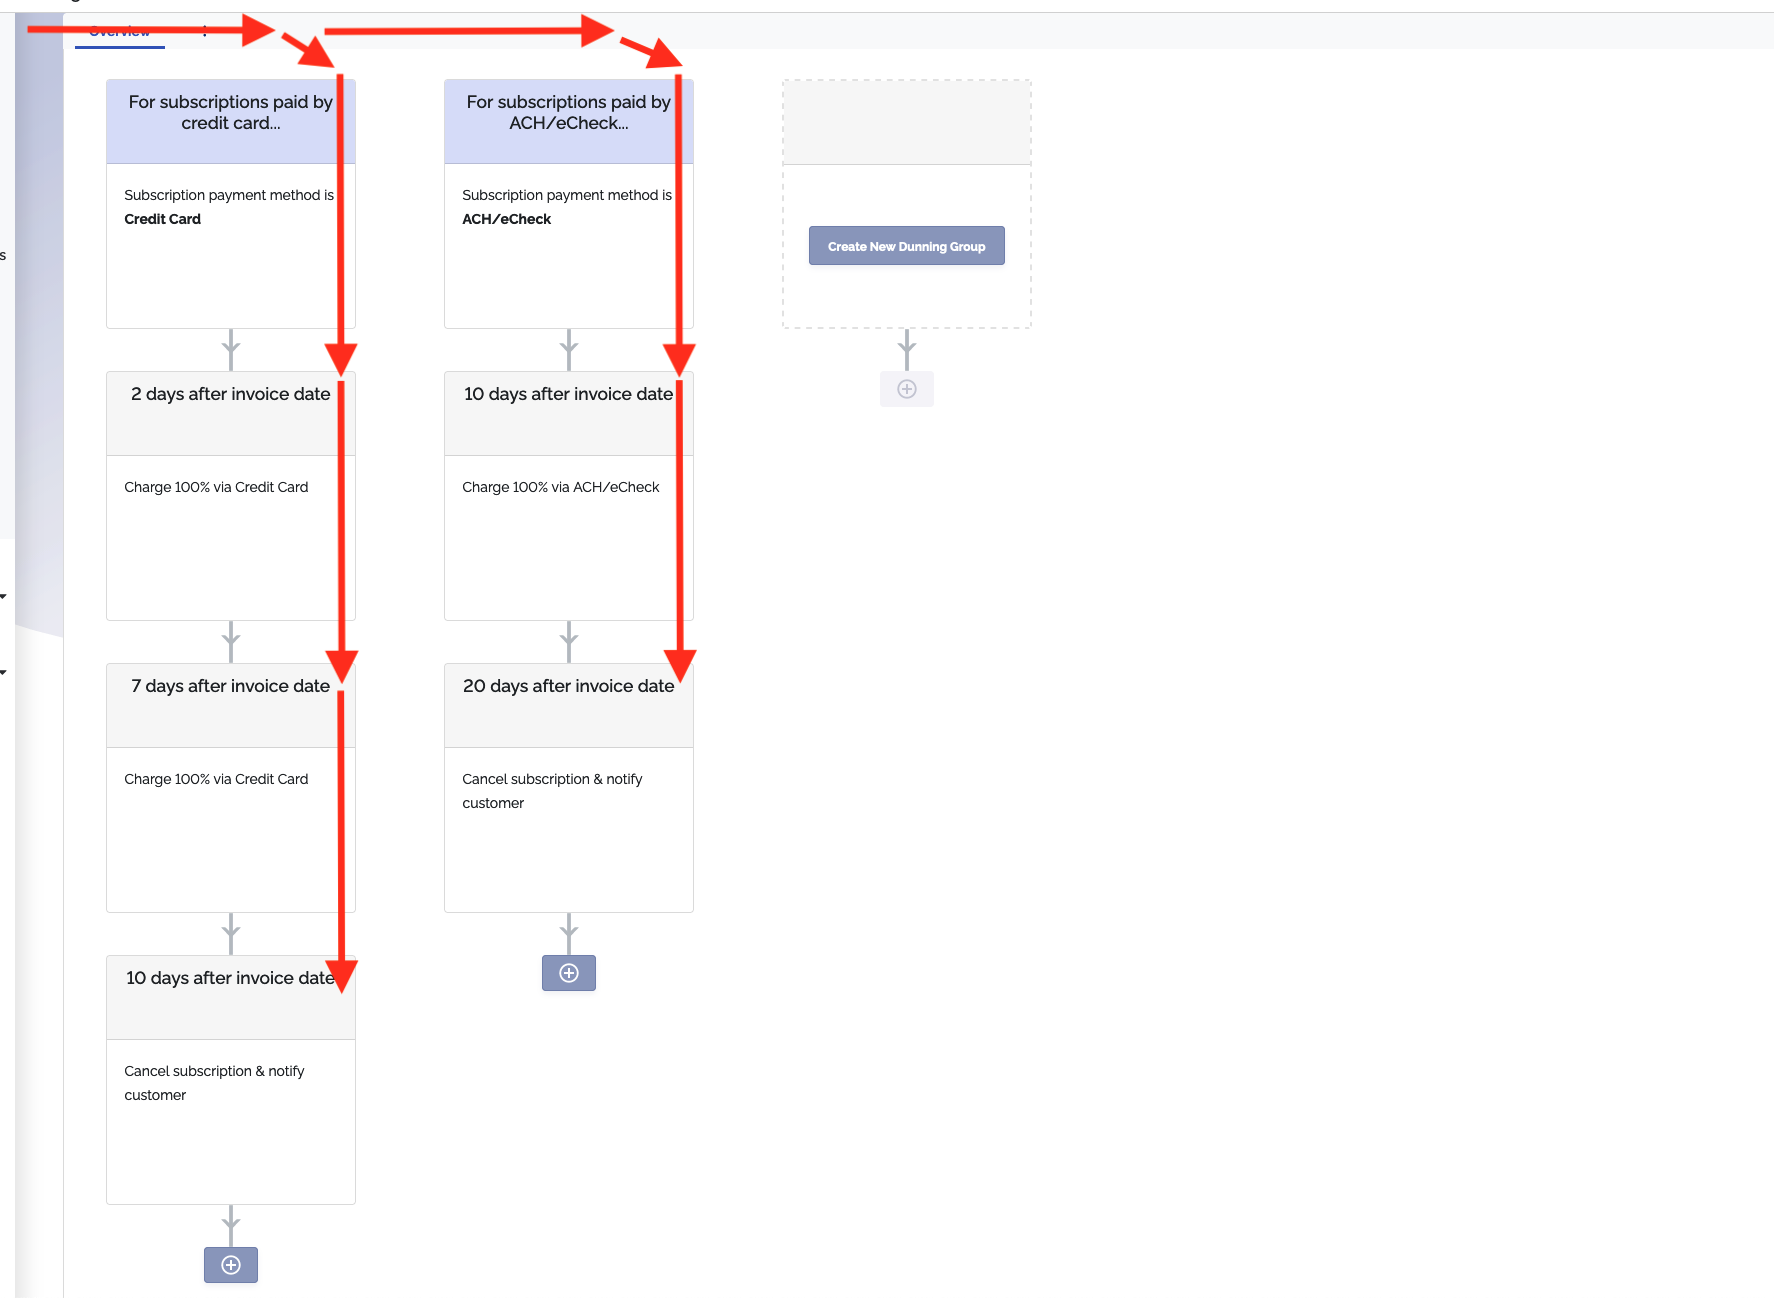
This example shows that when an invoice is generated from a subscription, with the payment method set as a credit card, it will use the first dunning group.
The dunning rules are as follows:
- Two days after the invoice date, ChargeOver will attempt a payment on the subscriptions payment method for the full balance due
- Seven days after the invoice date, ChargeOver will attempt a payment on the subscriptions payment method for the full balance due
- Ten days after the invoice date, ChargeOver will then cancel the subscription.
If the invoice is created from a subscription with the payment method set as ACH, it would fall into the second dunning group.
The dunning rules are as follows:
- Ten days after the invoice date, ChargeOver will attempt a payment on the subscription payment method for the full balance due
- Twenty days after the invoice date, ChargeOver will cancel the subscription automatically
Creating a subscription renewal reminder
- Go to your Settings then the
Features tab. Select Dunning & Reminders from the list - Click
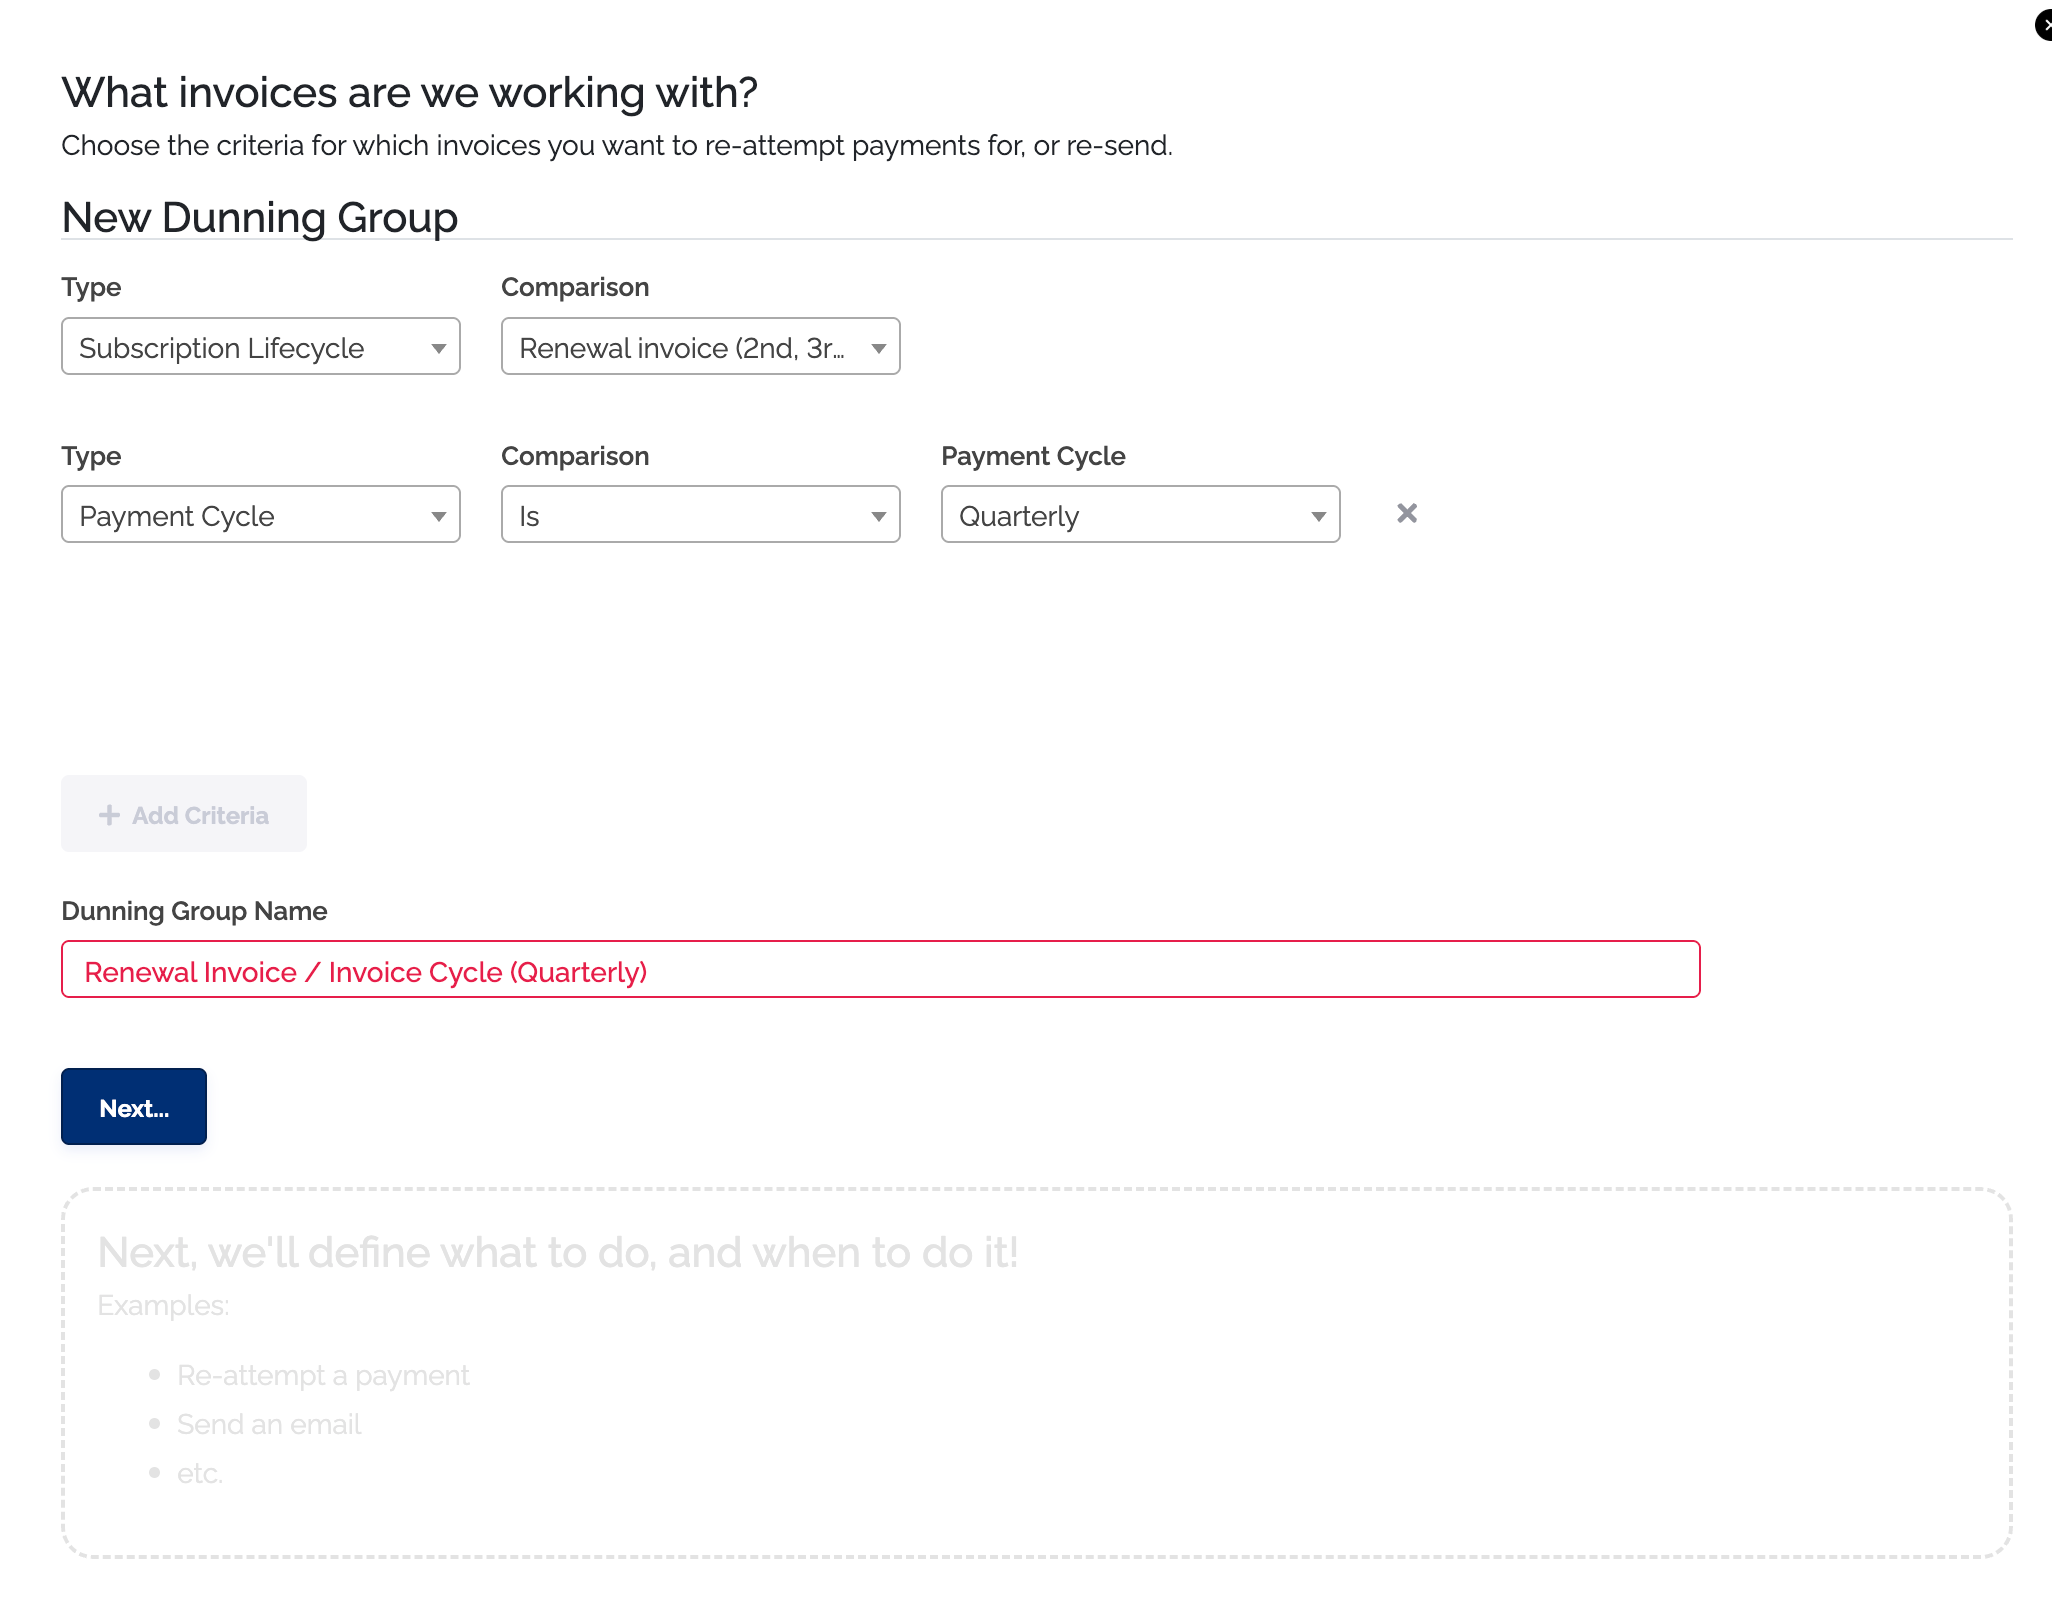
Create New Dunning Group - On the first screen set the type as
subscription life cycle, and the comparison asrenewal invoice - Then below that set the type as
payment cycle is, the comparison asquarterly, create a name for your dunning and then clickNext
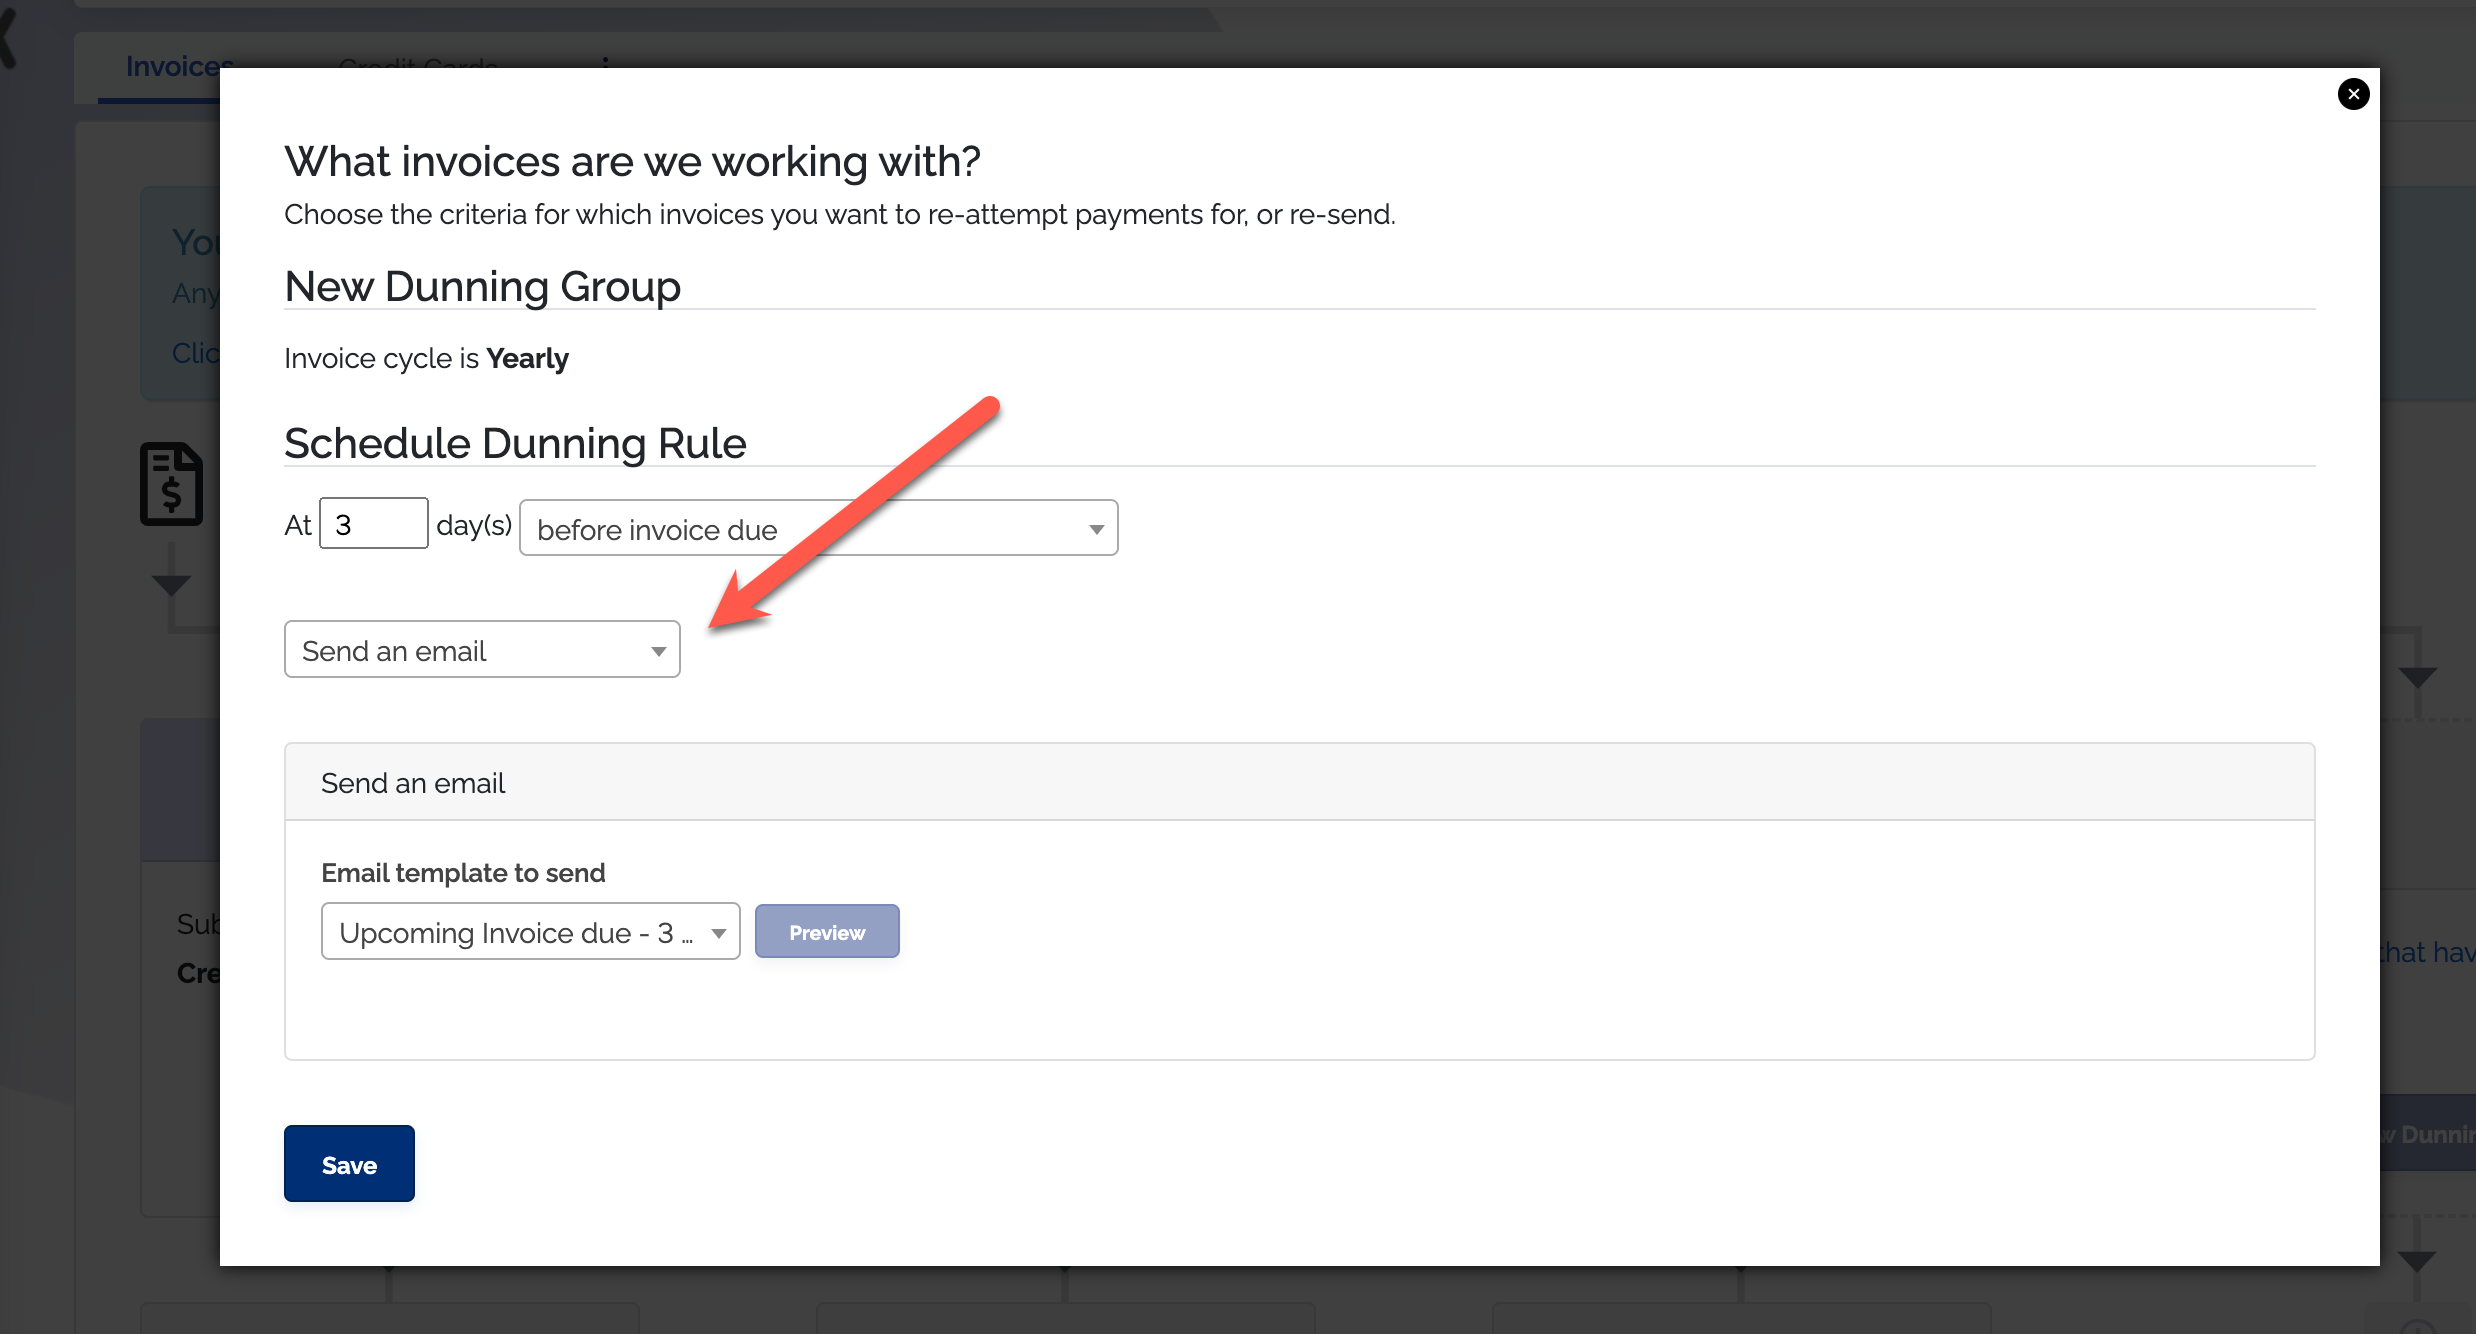
- On the next screen set
At = 60or the amount of time before the subscription renews that you want the reminder sent out, and then in the dropdown selectbefore invoice is due - In the next drop down select
send an email - Finally choose the email template you want to use for this dunning group
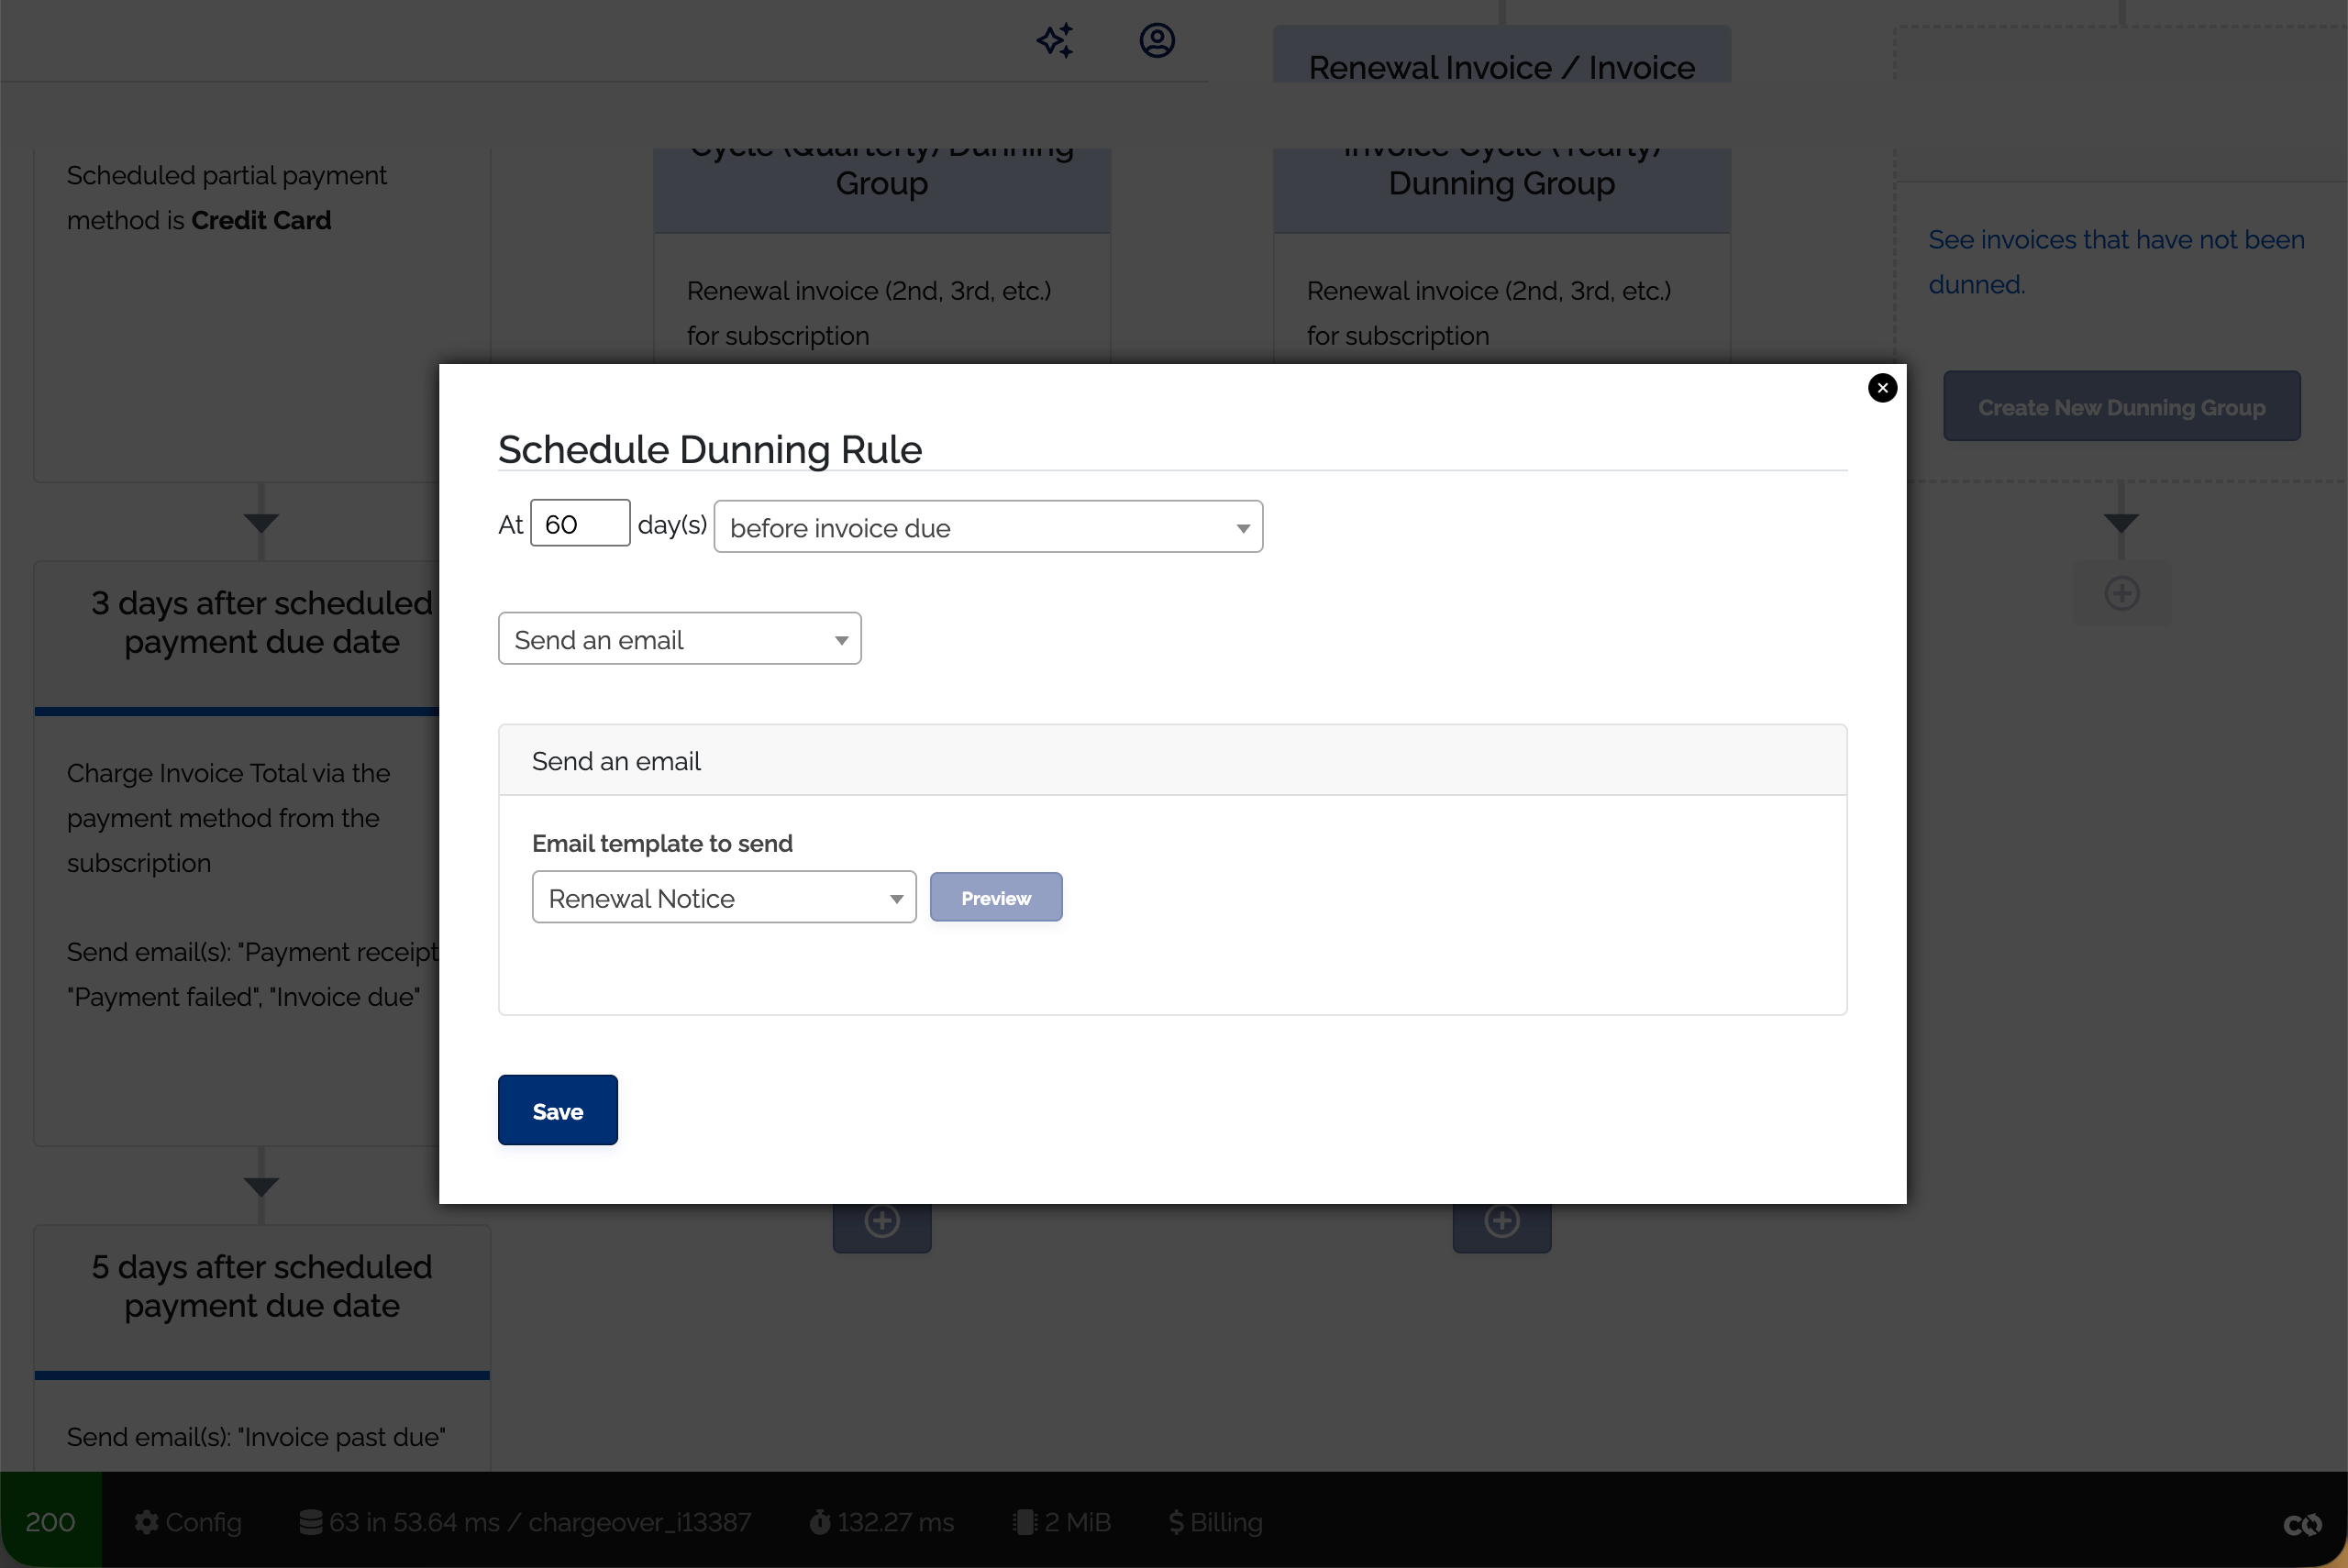
Keep in mind
As a reminder, invoices that are unpaid or overdue will fall into a dunning group based on how the criteria for the group is defined. During our nightly processes, ChargeOver looks for invoices that meet the criteria for each of the dunning groups, from left to right.
If we have determined that the invoice meets a dunning group criteria, we check to see if we need to take action based on the timing of the dunning rules. If not, we move on to check the next dunning group and rules, otherwise, we will take the action that was configured.
Once we dun an invoice, that invoice will continue to follow the dunning rules in the group until it is paid off or until it reaches the end of the dunning group.
Invoices can meet multiple criteria
Since we have so many options for criteria, it is possible that you have an invoice that could potentially follow multiple dunning groups.
How this is determined
- Dunning group priority is displayed from left to right
- Assuming an invoice meets multiple criteria, the earliest scheduled action will determine which dunning group the invoice follows
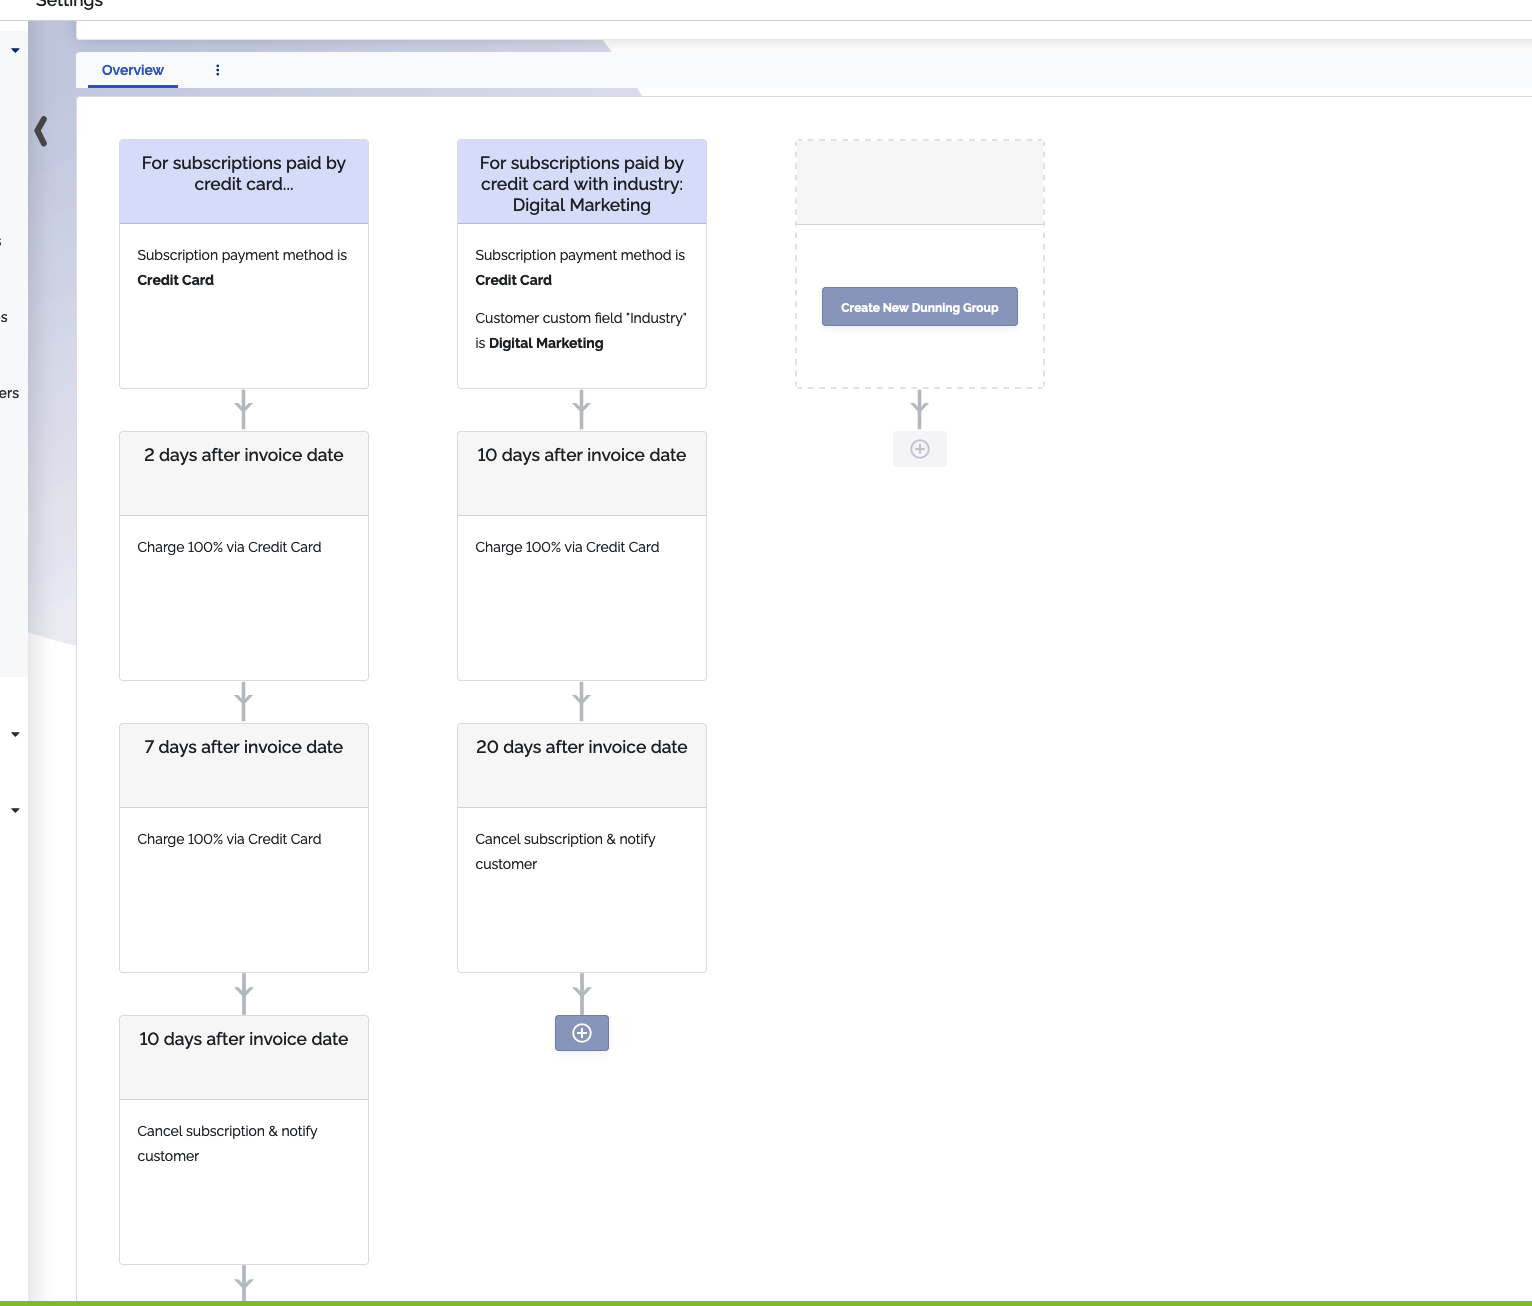
As you can see, if an invoice was generated from a subscription with a credit
card payment method and the associated customer's Industry custom field is set
as Digital Marketing, this invioce could potentially meet the criteria for
both dunning groups.
Based on the ordering of the dunning groups and the schedule of the dunning actions, the invoice would end up following the first dunning group.
Making changes to objects
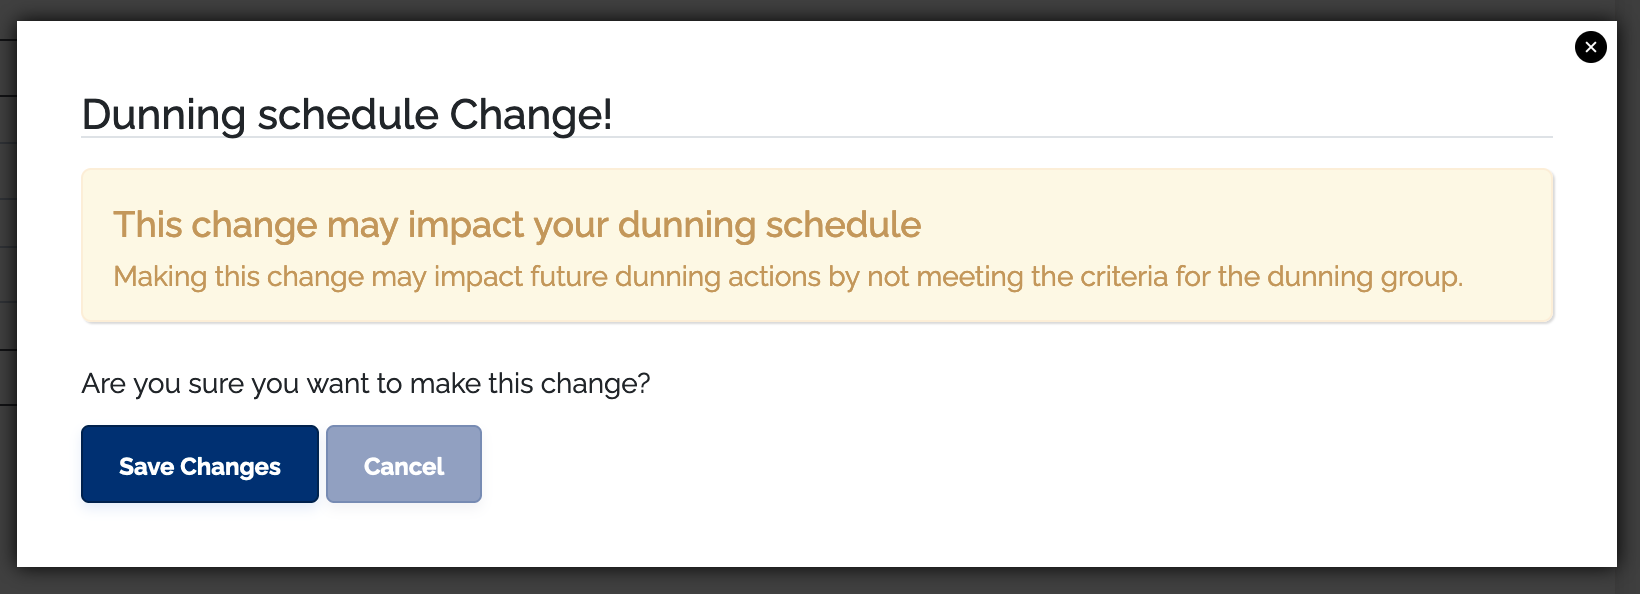
When you make changes to ChargeOver customers, subscriptions, or invoices, it is important to consider how it might affect your automated processes. Changes made to objects related to open or unpaid invoices may affect how those invoices get dunned.
If the object you are updating has a related open or unpaid invoice that has already been dunned, we will display a messaged notifying you that you may be impacting dunning behavior.
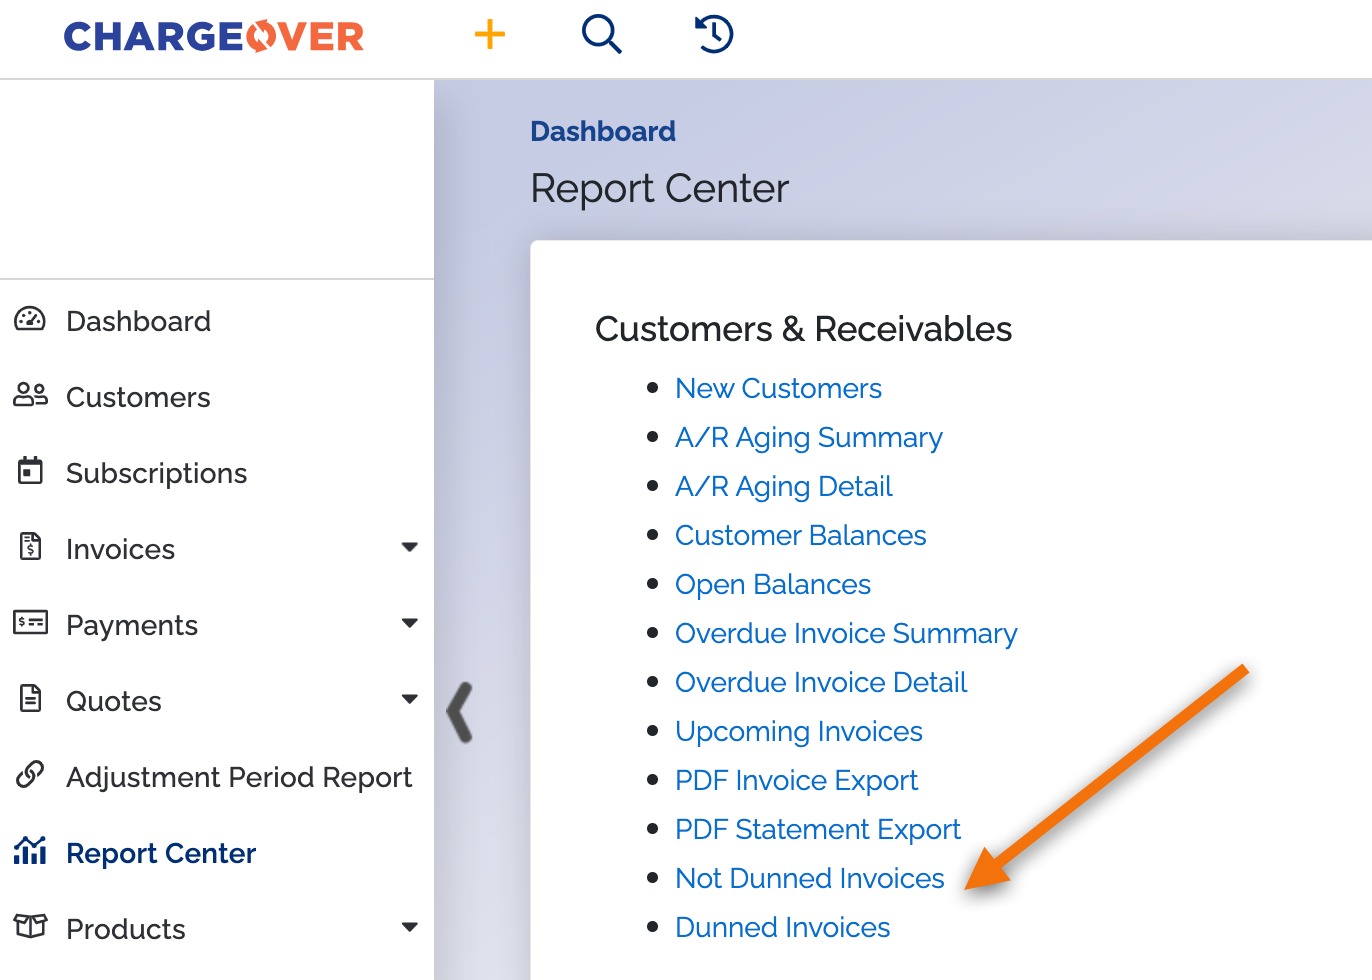
There are two reports in your Report Center that can be found under Customers and Receivables. The reports are called "Not Dunned Invoices" and "Dunned Invoices." You can check here to see what invoices have been touched by your dunning groups, so that you never accidentally forget to dun an invoice!
Exempt a customer from dunning
If you would like to avoid having a customer fall into a dunning group, you can exempt them from dunning.
- Go to the customer
- Click their edit tab
- Click more advanced options...
- You will see a checkbox next to the words 'exempt from dunning.' Select the checkbox
- Click
Save
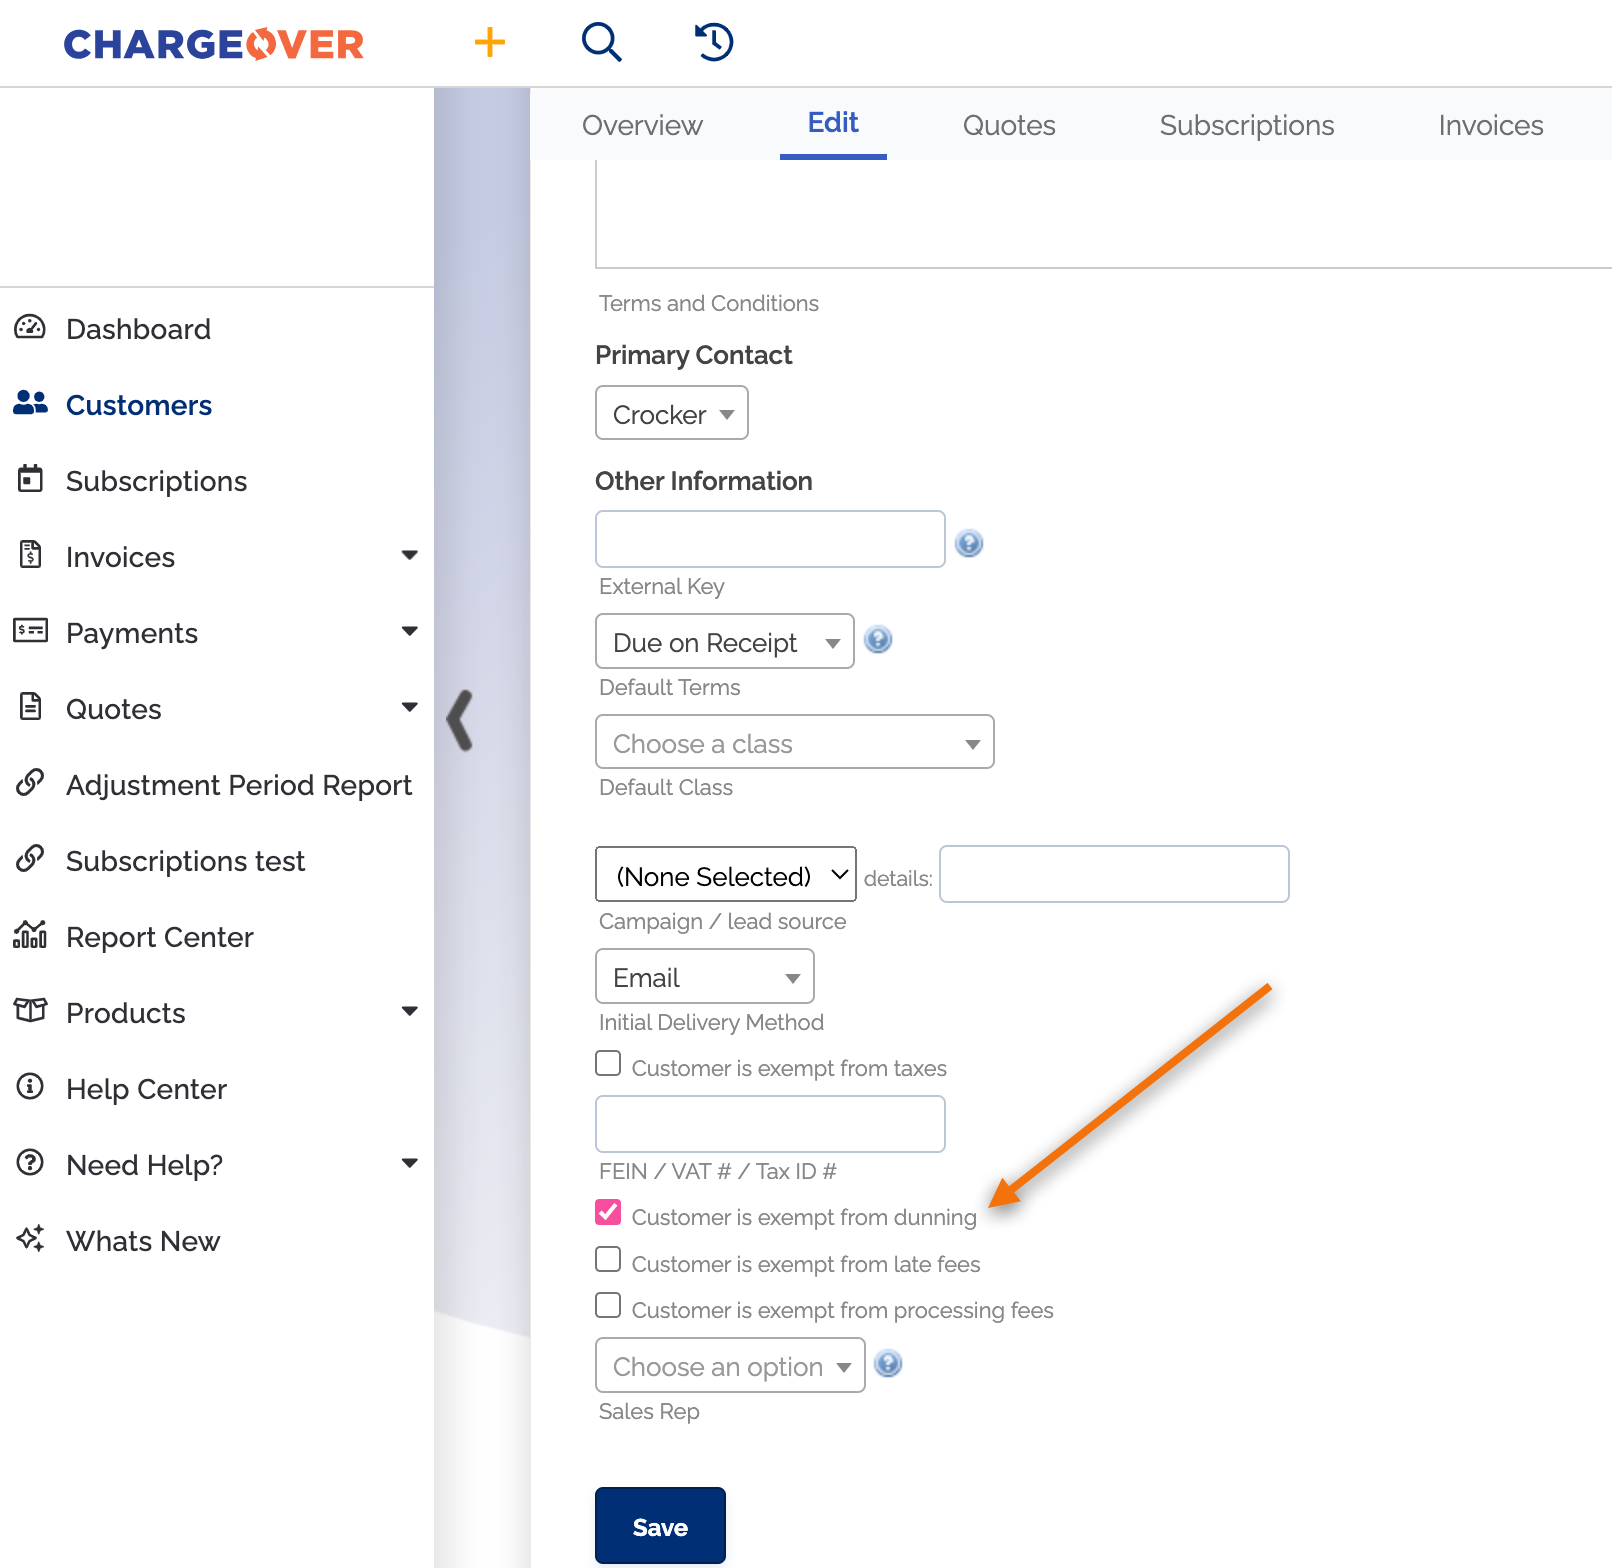
Any new subscriptions or invoices that are created for this customer will now be exempt from dunning. If you want an existing invoice to be exempt from dunning, you can do so by following the steps below.
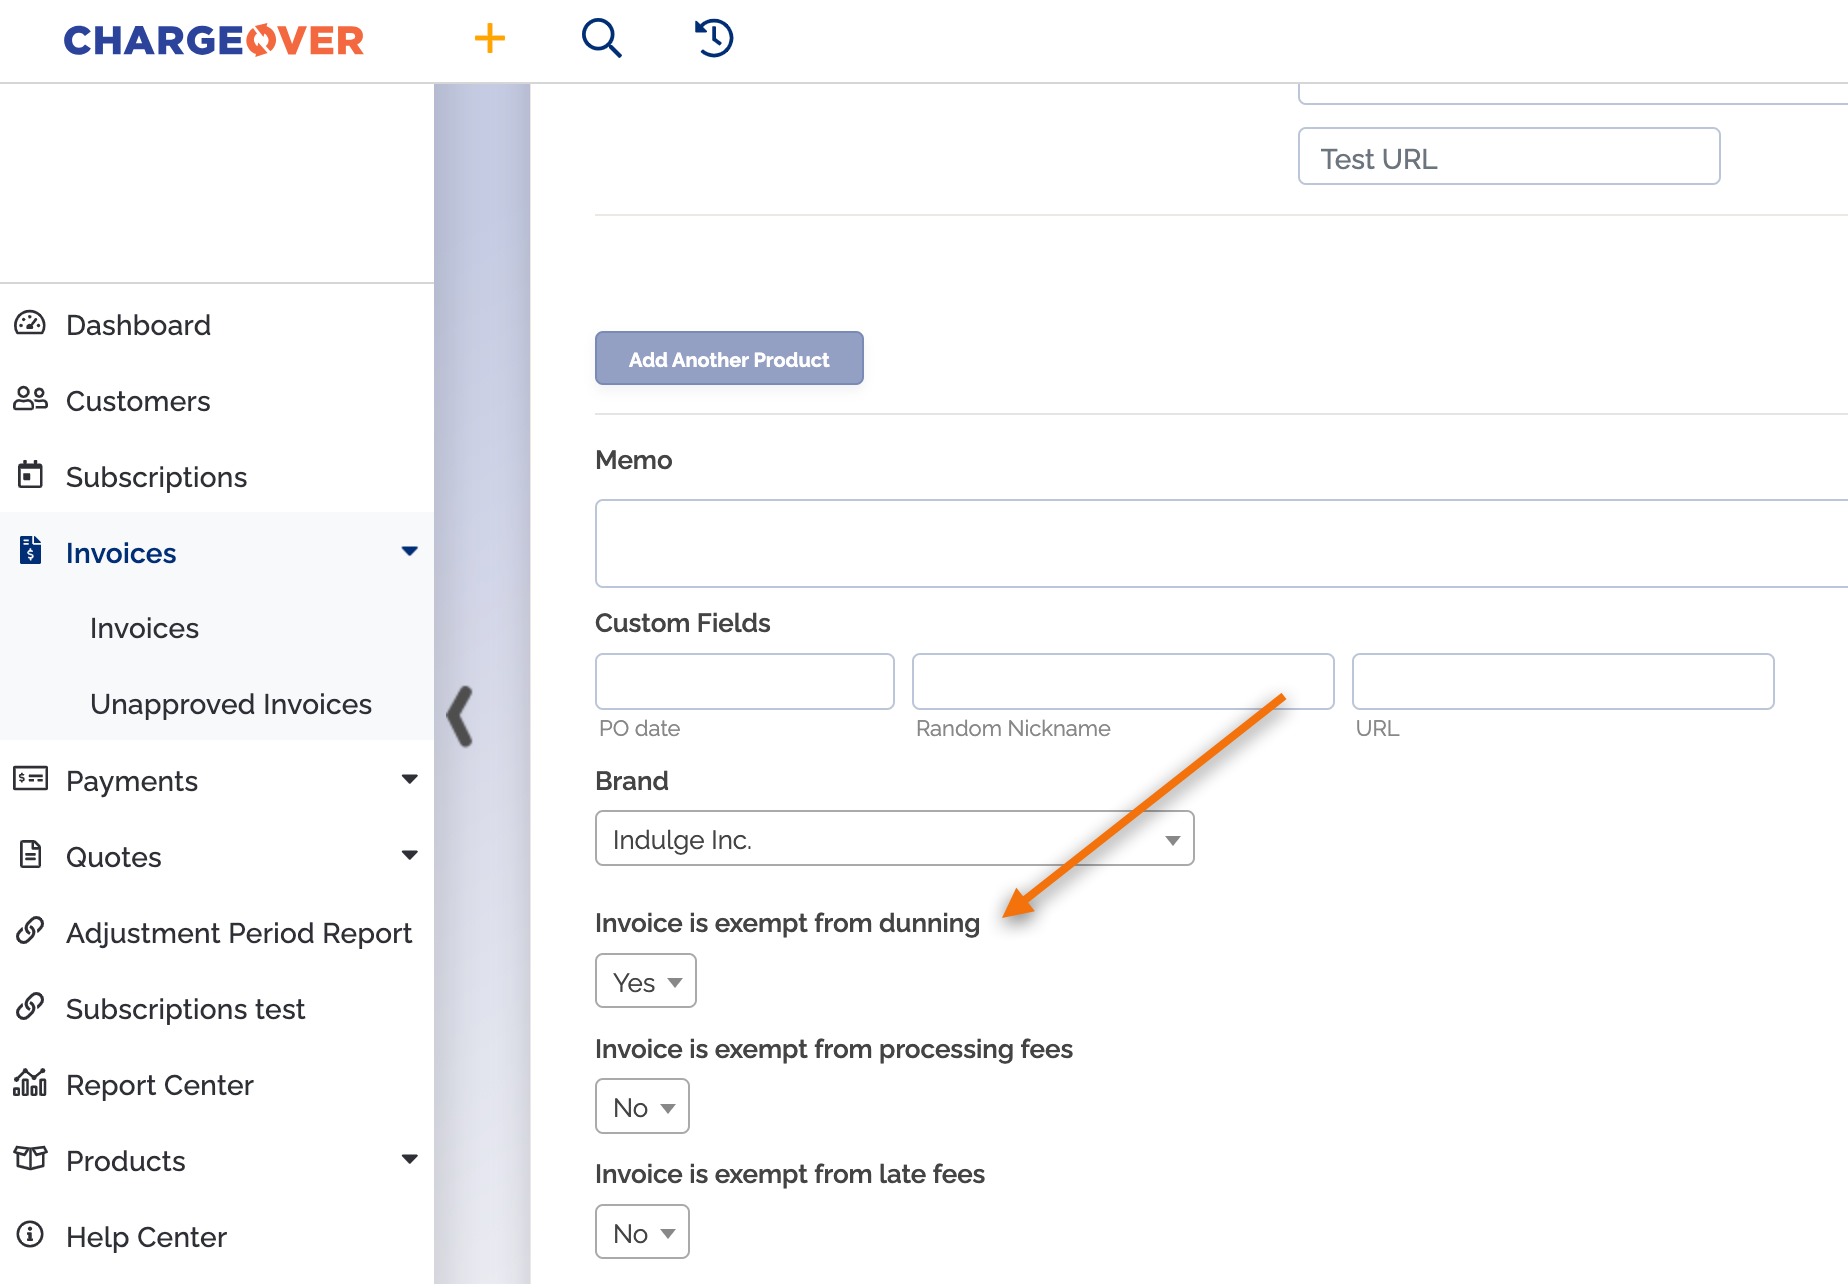
Exempt an invoice from dunning
If you would like to avoid having a customers existing invoice fall into a dunning group, you can exempt it from dunning.
- Go to the invoice
- Click the edit invoice option under invoice actions on the right handside of your screen
- Click more advanced options...
- Change the dropdown to Yes for 'invoice is exempt from dunning'
- Click
Save
Disable or delete dunning group
You can disable or delete dunning groups by hovering over the dunning group name and selecting the
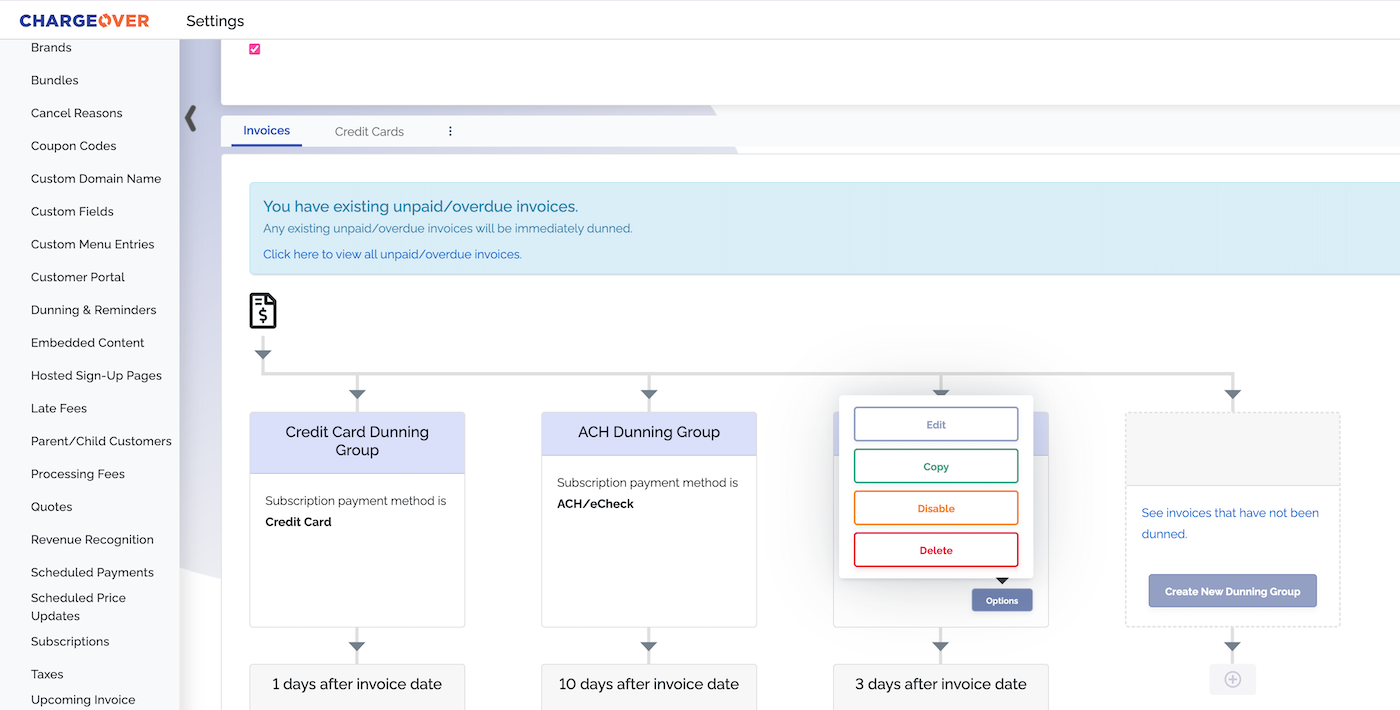
Disabled dunning groups will never be used as a part of ChargeOver's dunning process until you enable them again, but they will still appear in the dunning and reminders settings.
Deleted dunning groups will never be used as a part of ChargeOver's dunning process again and they will not appear in the dunning and reminders settings.
Credit card expiration notices
ChargeOver can automatically send notices before and after a credit card expires, ensuring your customers have time to update their payment method.
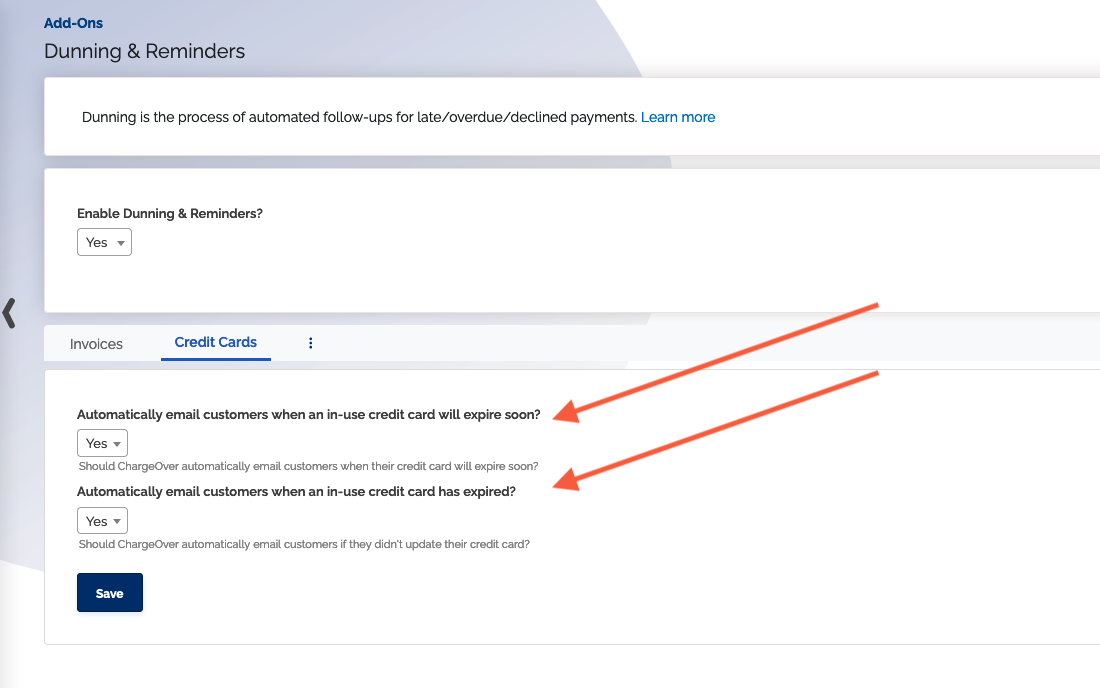
Credit cards that will expire soon
ChargeOver sends a notice 30 days in advance of the credit card expiration date.
- All
Billing-type contacts for a customer will be sent the email - By default only credit cards attached to an active subscription are sent the email. (Need to change this?)
Credit cards that have expired
ChargeOver sends a notice 1 day after the credit card has expired.
- All
Billing-type contacts for a customer will be sent the email - By default only credit cards attached to an active subscription are sent the email. (Need to change this?)