Products
Overview
If you’re going to invoice or charge customers on a subscription or recurring basis, the first thing we have to do is set up the Products that we charge our customers for.
A Product stores information about what you’re selling, and how much you charge your customers for it. Products are sometimes referred to as line items in ChargeOver. They appear on subscriptions, invoices and quotes and can be created at any point.
Create a new product
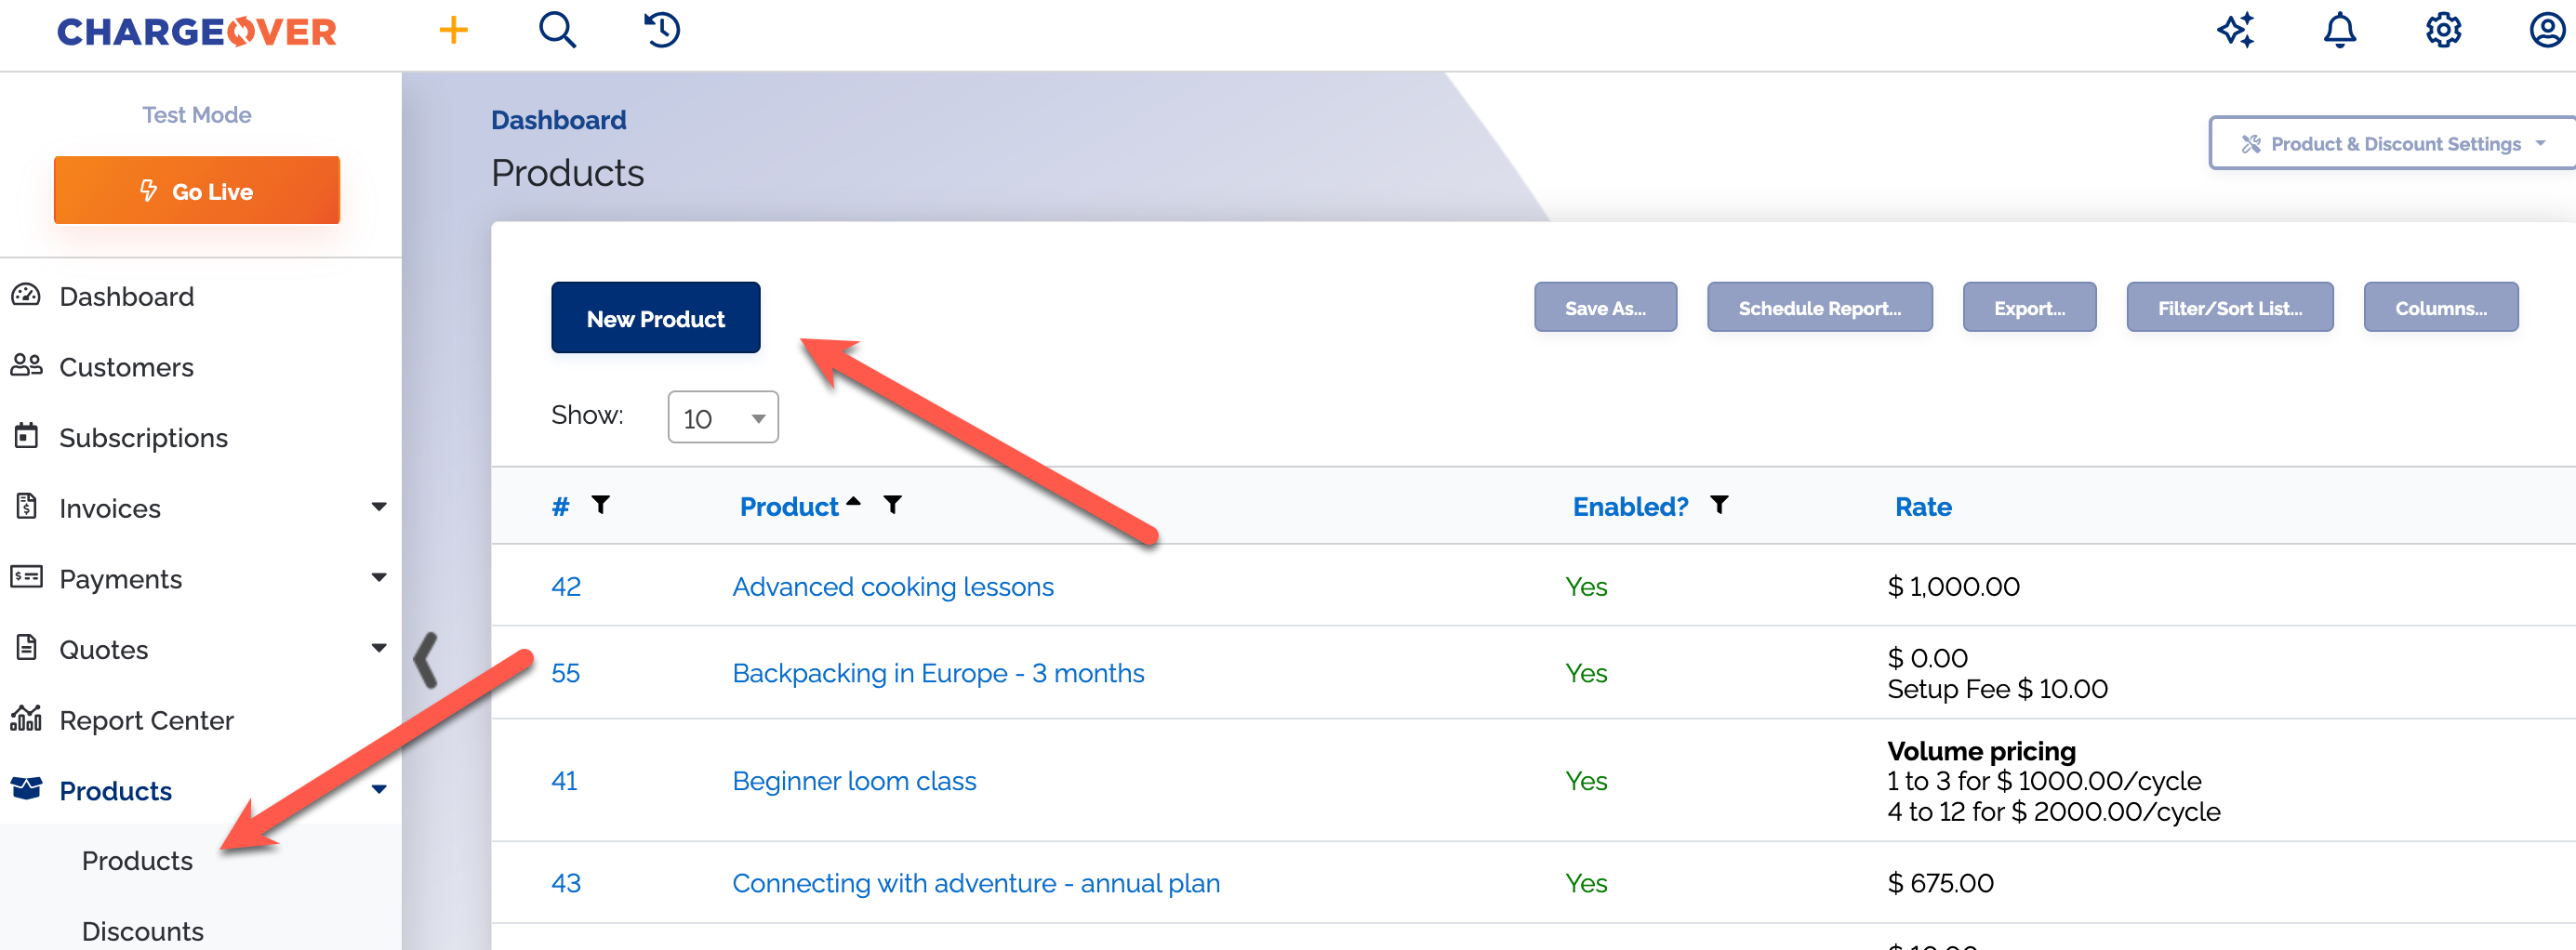
To get started, you can create a new product.
- Click
Products on the left menu and selectProducts again from the dropdown - Once you’re there, click the blue
New Product button
Creating a plan is relatively painless. You will choose a name for your product, a short description, and a pricing plan.
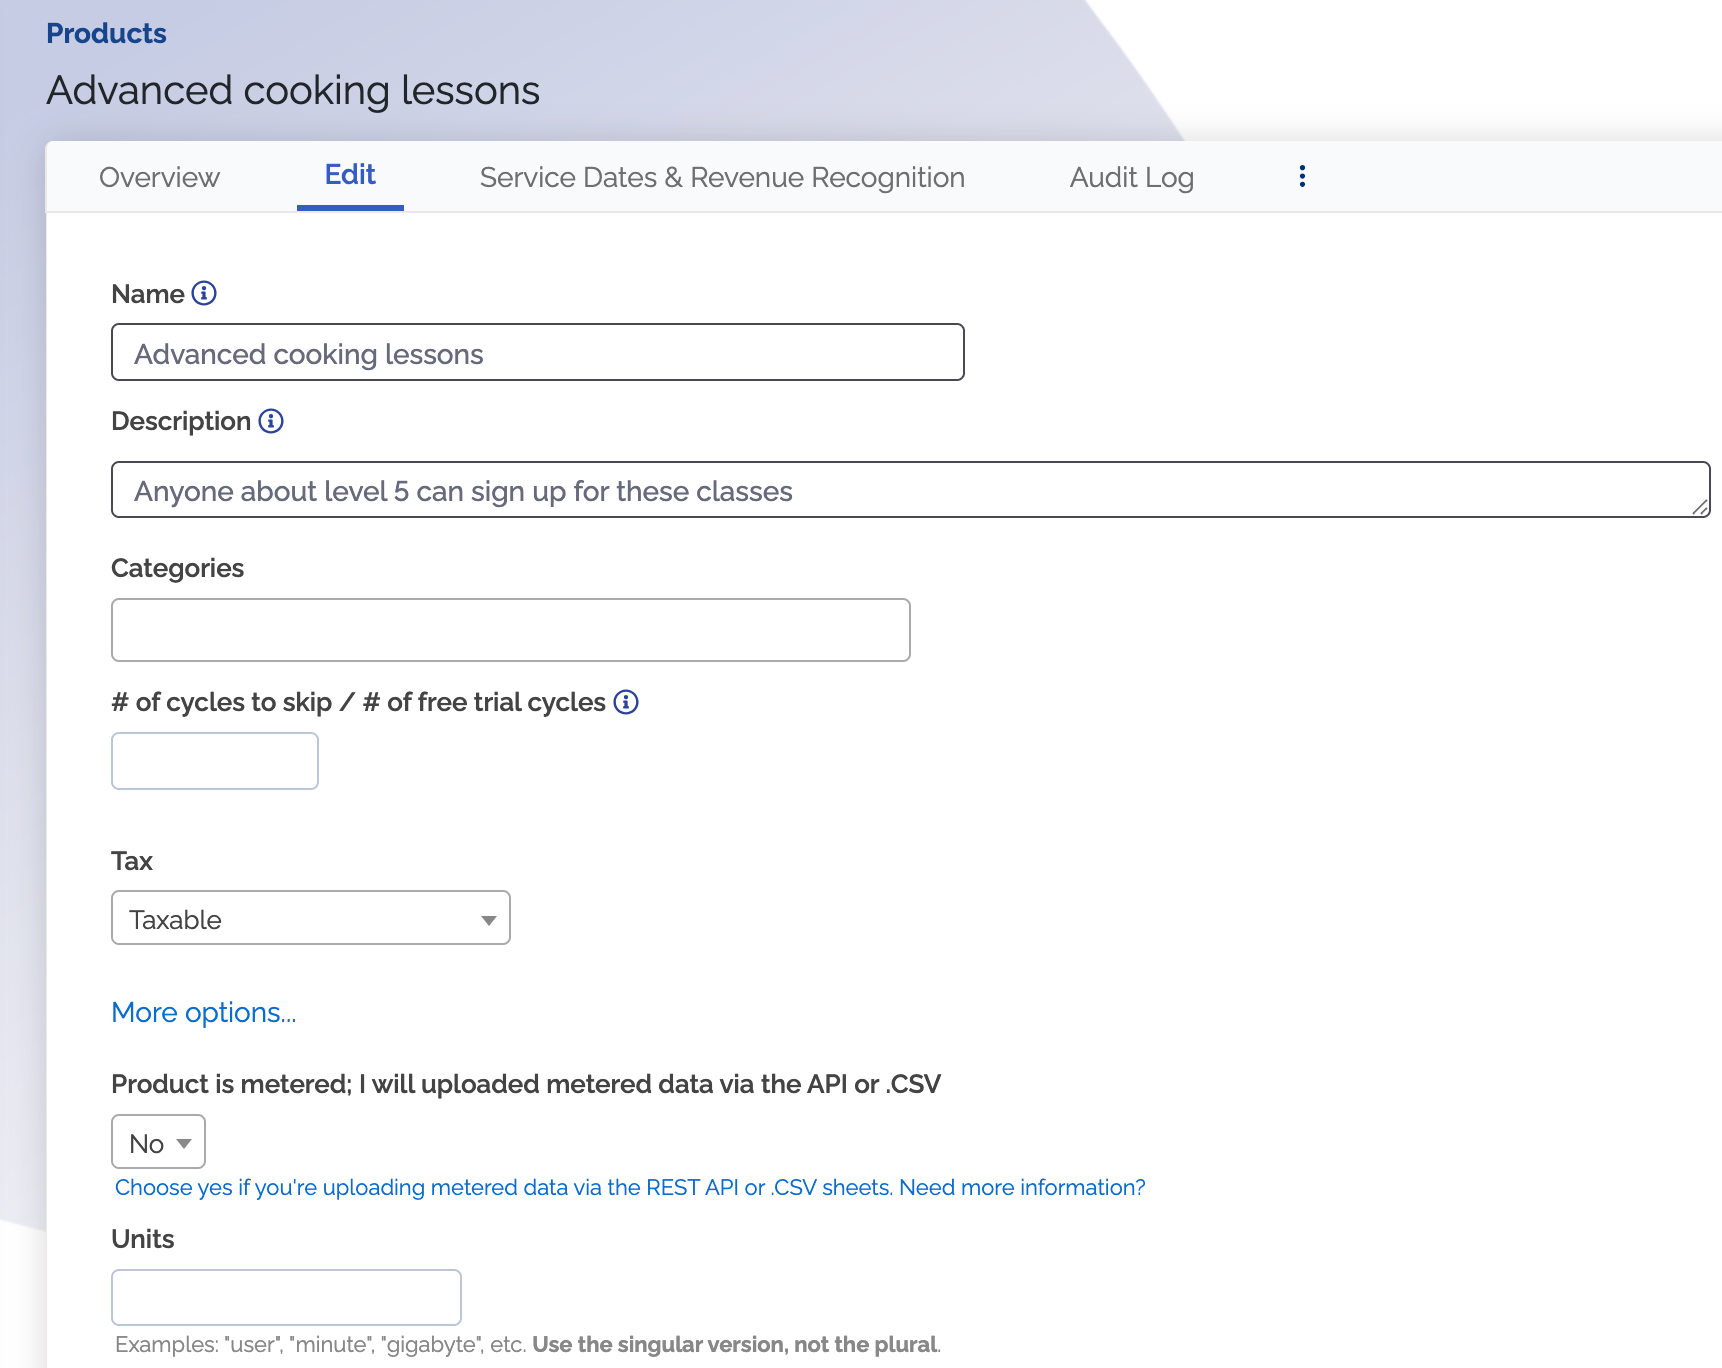
The example below shows a flat-rate plan of one thousand dollars every month.
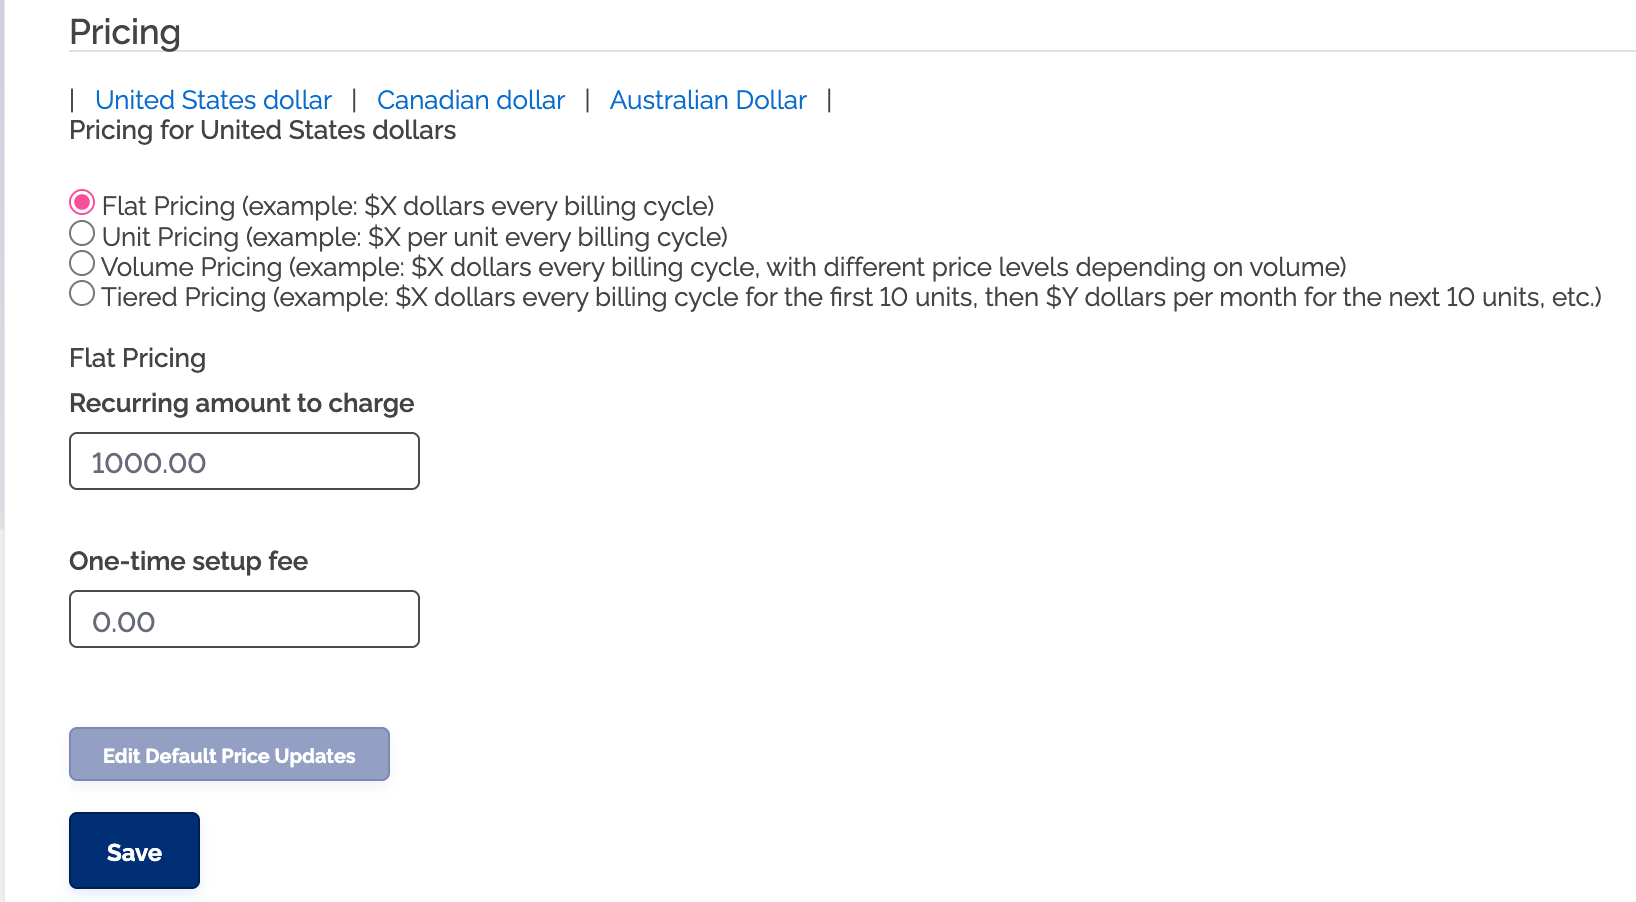
Once you create your Products, you can re-use them over and over again for each customer and even customize the pricing on a per-customer basis too!
Pricing ChargeOver supports
ChargeOver supports several different, flexible pricing schemes. In this section we will explore the differences between flat, unit, tiered, and volume pricing.
Flat pricing
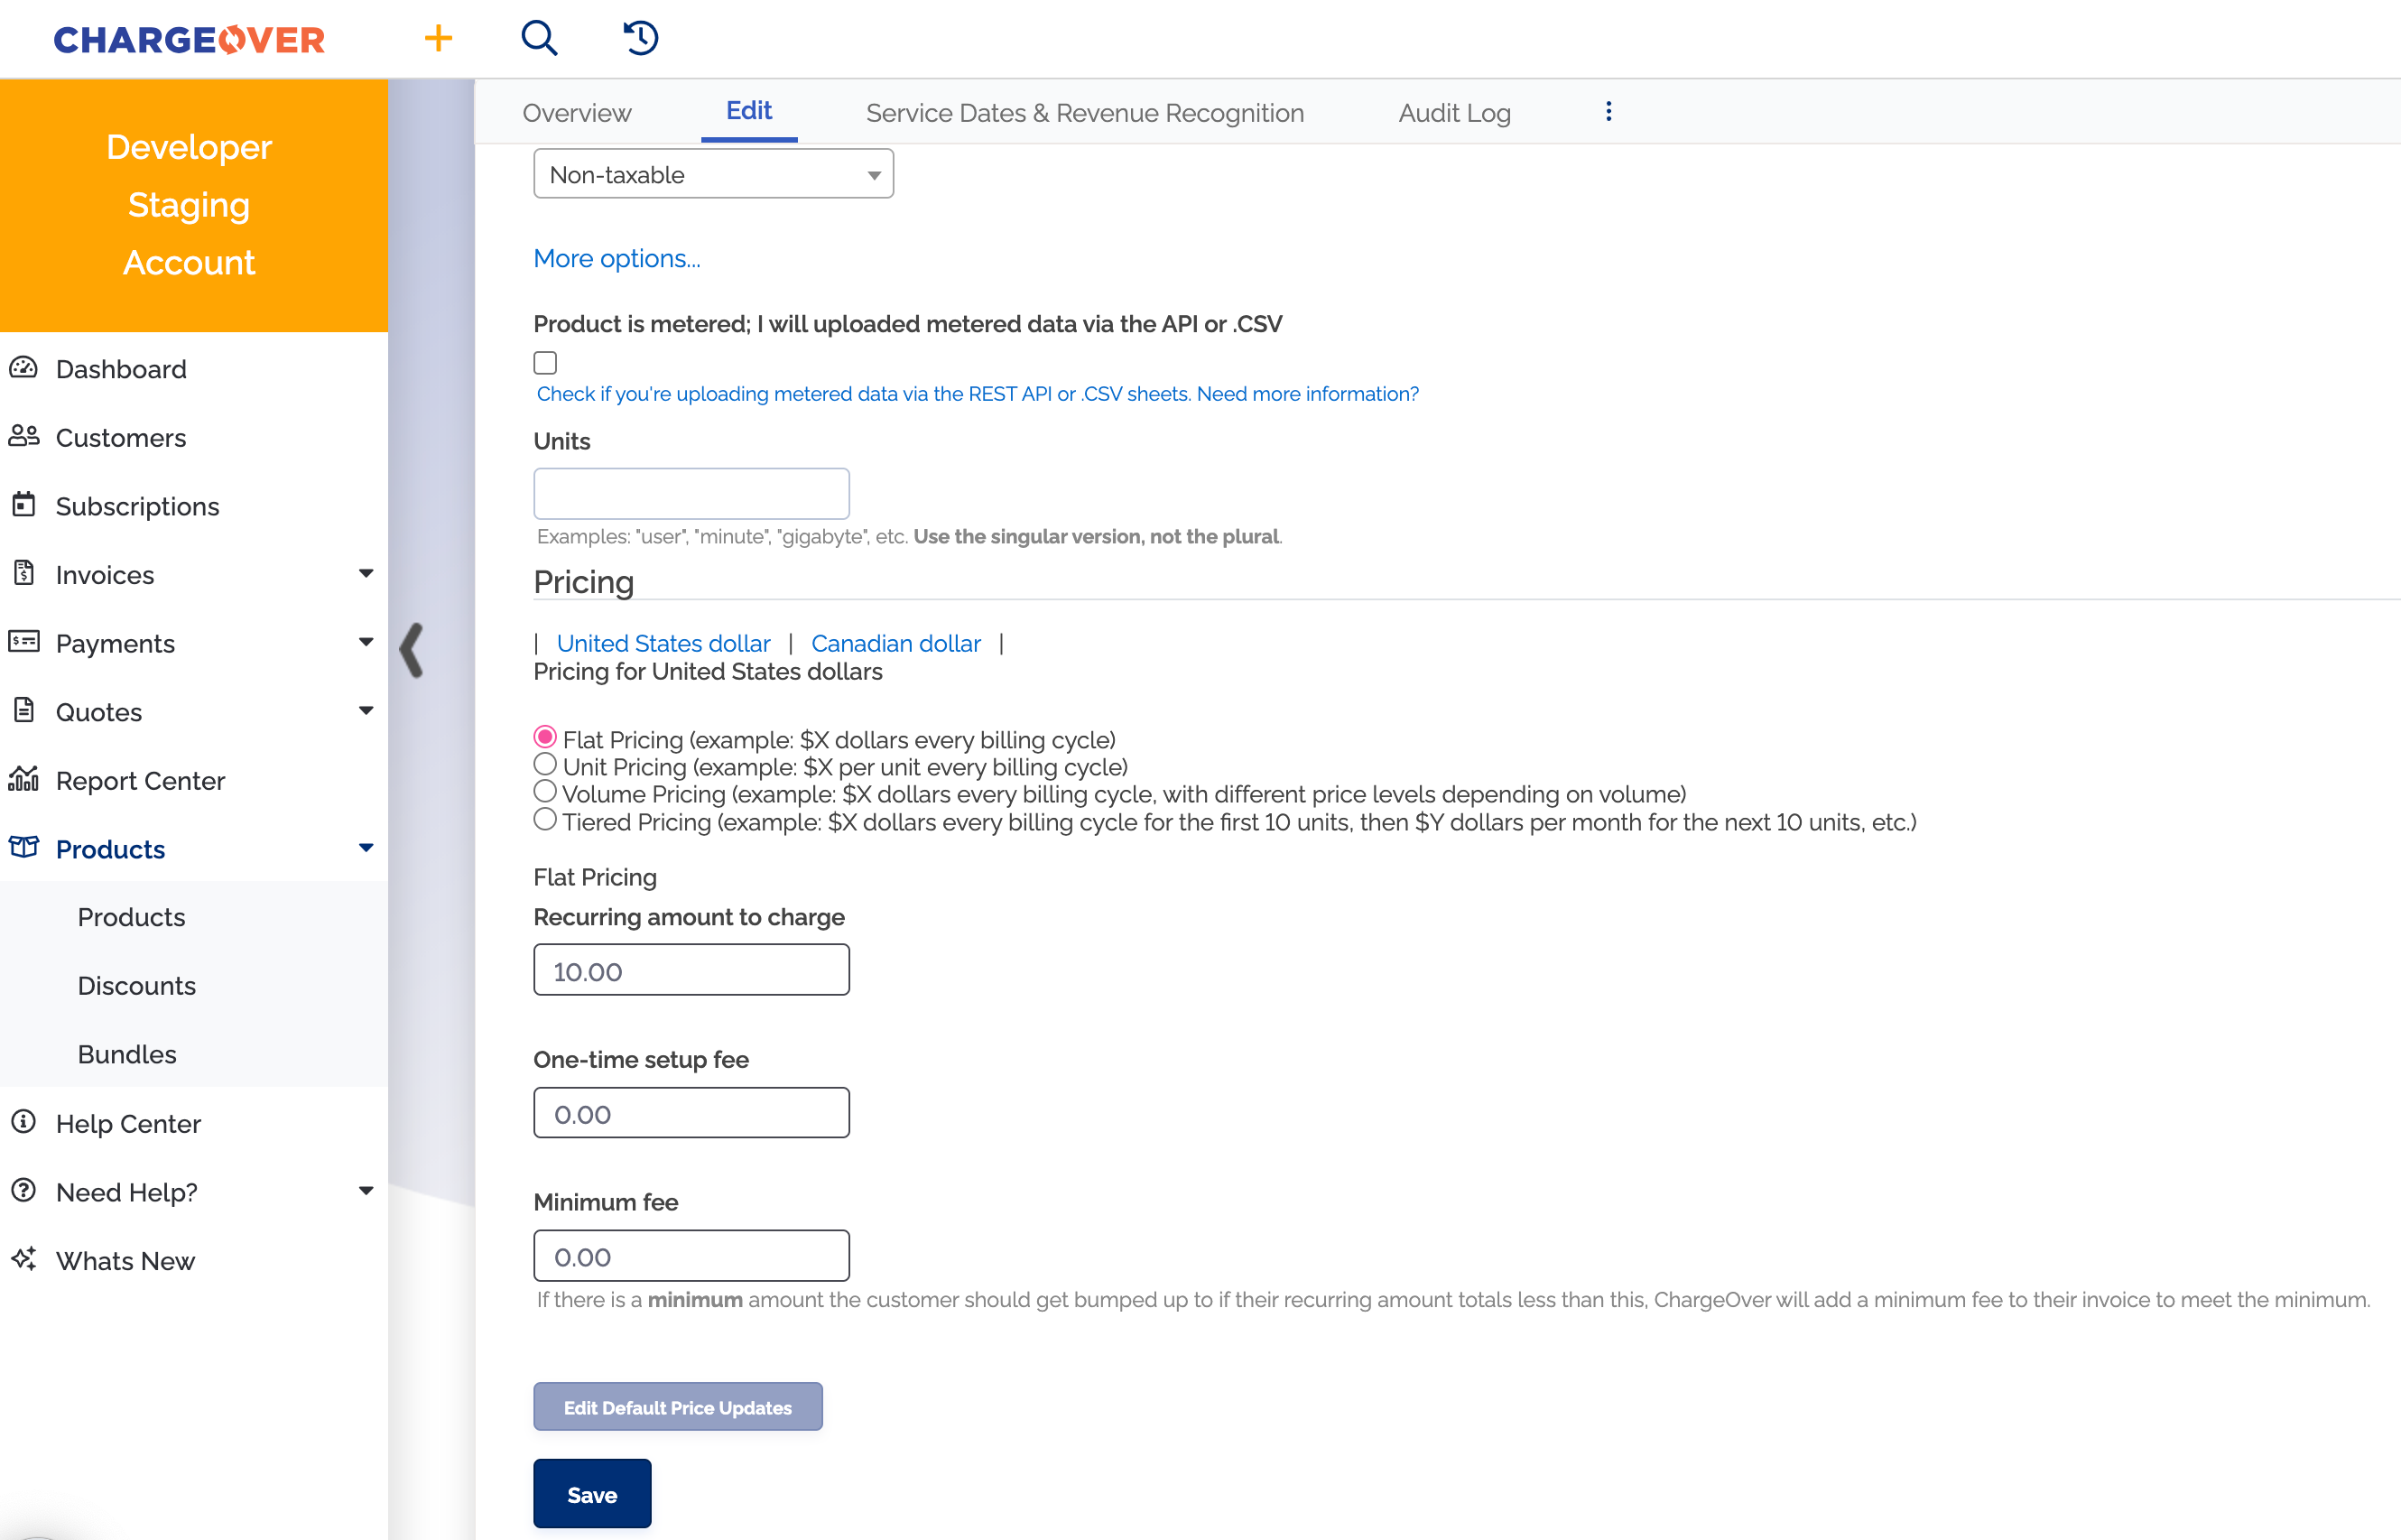
Flat pricing is the most simple way of pricing your services and products. Flat pricing is just what it sounds like – a flat rate that is charged for a product or service each billing cycle. An example would be $10 a month.
This is what the pricing set up should look like:
Unit pricing
Unit pricing is used when you need to charge a per-unit rate for a service or product.
Some typical examples are below.
- $0.19 per minute
- $10 per gigabyte
- $50.00 per user license or account
The unit pricing model also supports multiple pricing levels. For example, you may wish to offer discounted pricing to customers who are purchasing a large volume of user licenses, or consuming a large number of minutes or gigabytes of data.
You can set up pricing levels like this.
- If you use between 1 and 10 licenses, the cost is $10 per license
- But if you use between 11 and 20 licenses, the cost is only $9 per license
- If you use more than 20 licenses, the cost goes down to only $8 per license
Using those price levels as an example, if your customer used 15 licenses, then the price is calculated from the middle price level, as 15 licenses x $9 per license = $135 total.
This is what the pricing set up should look like:

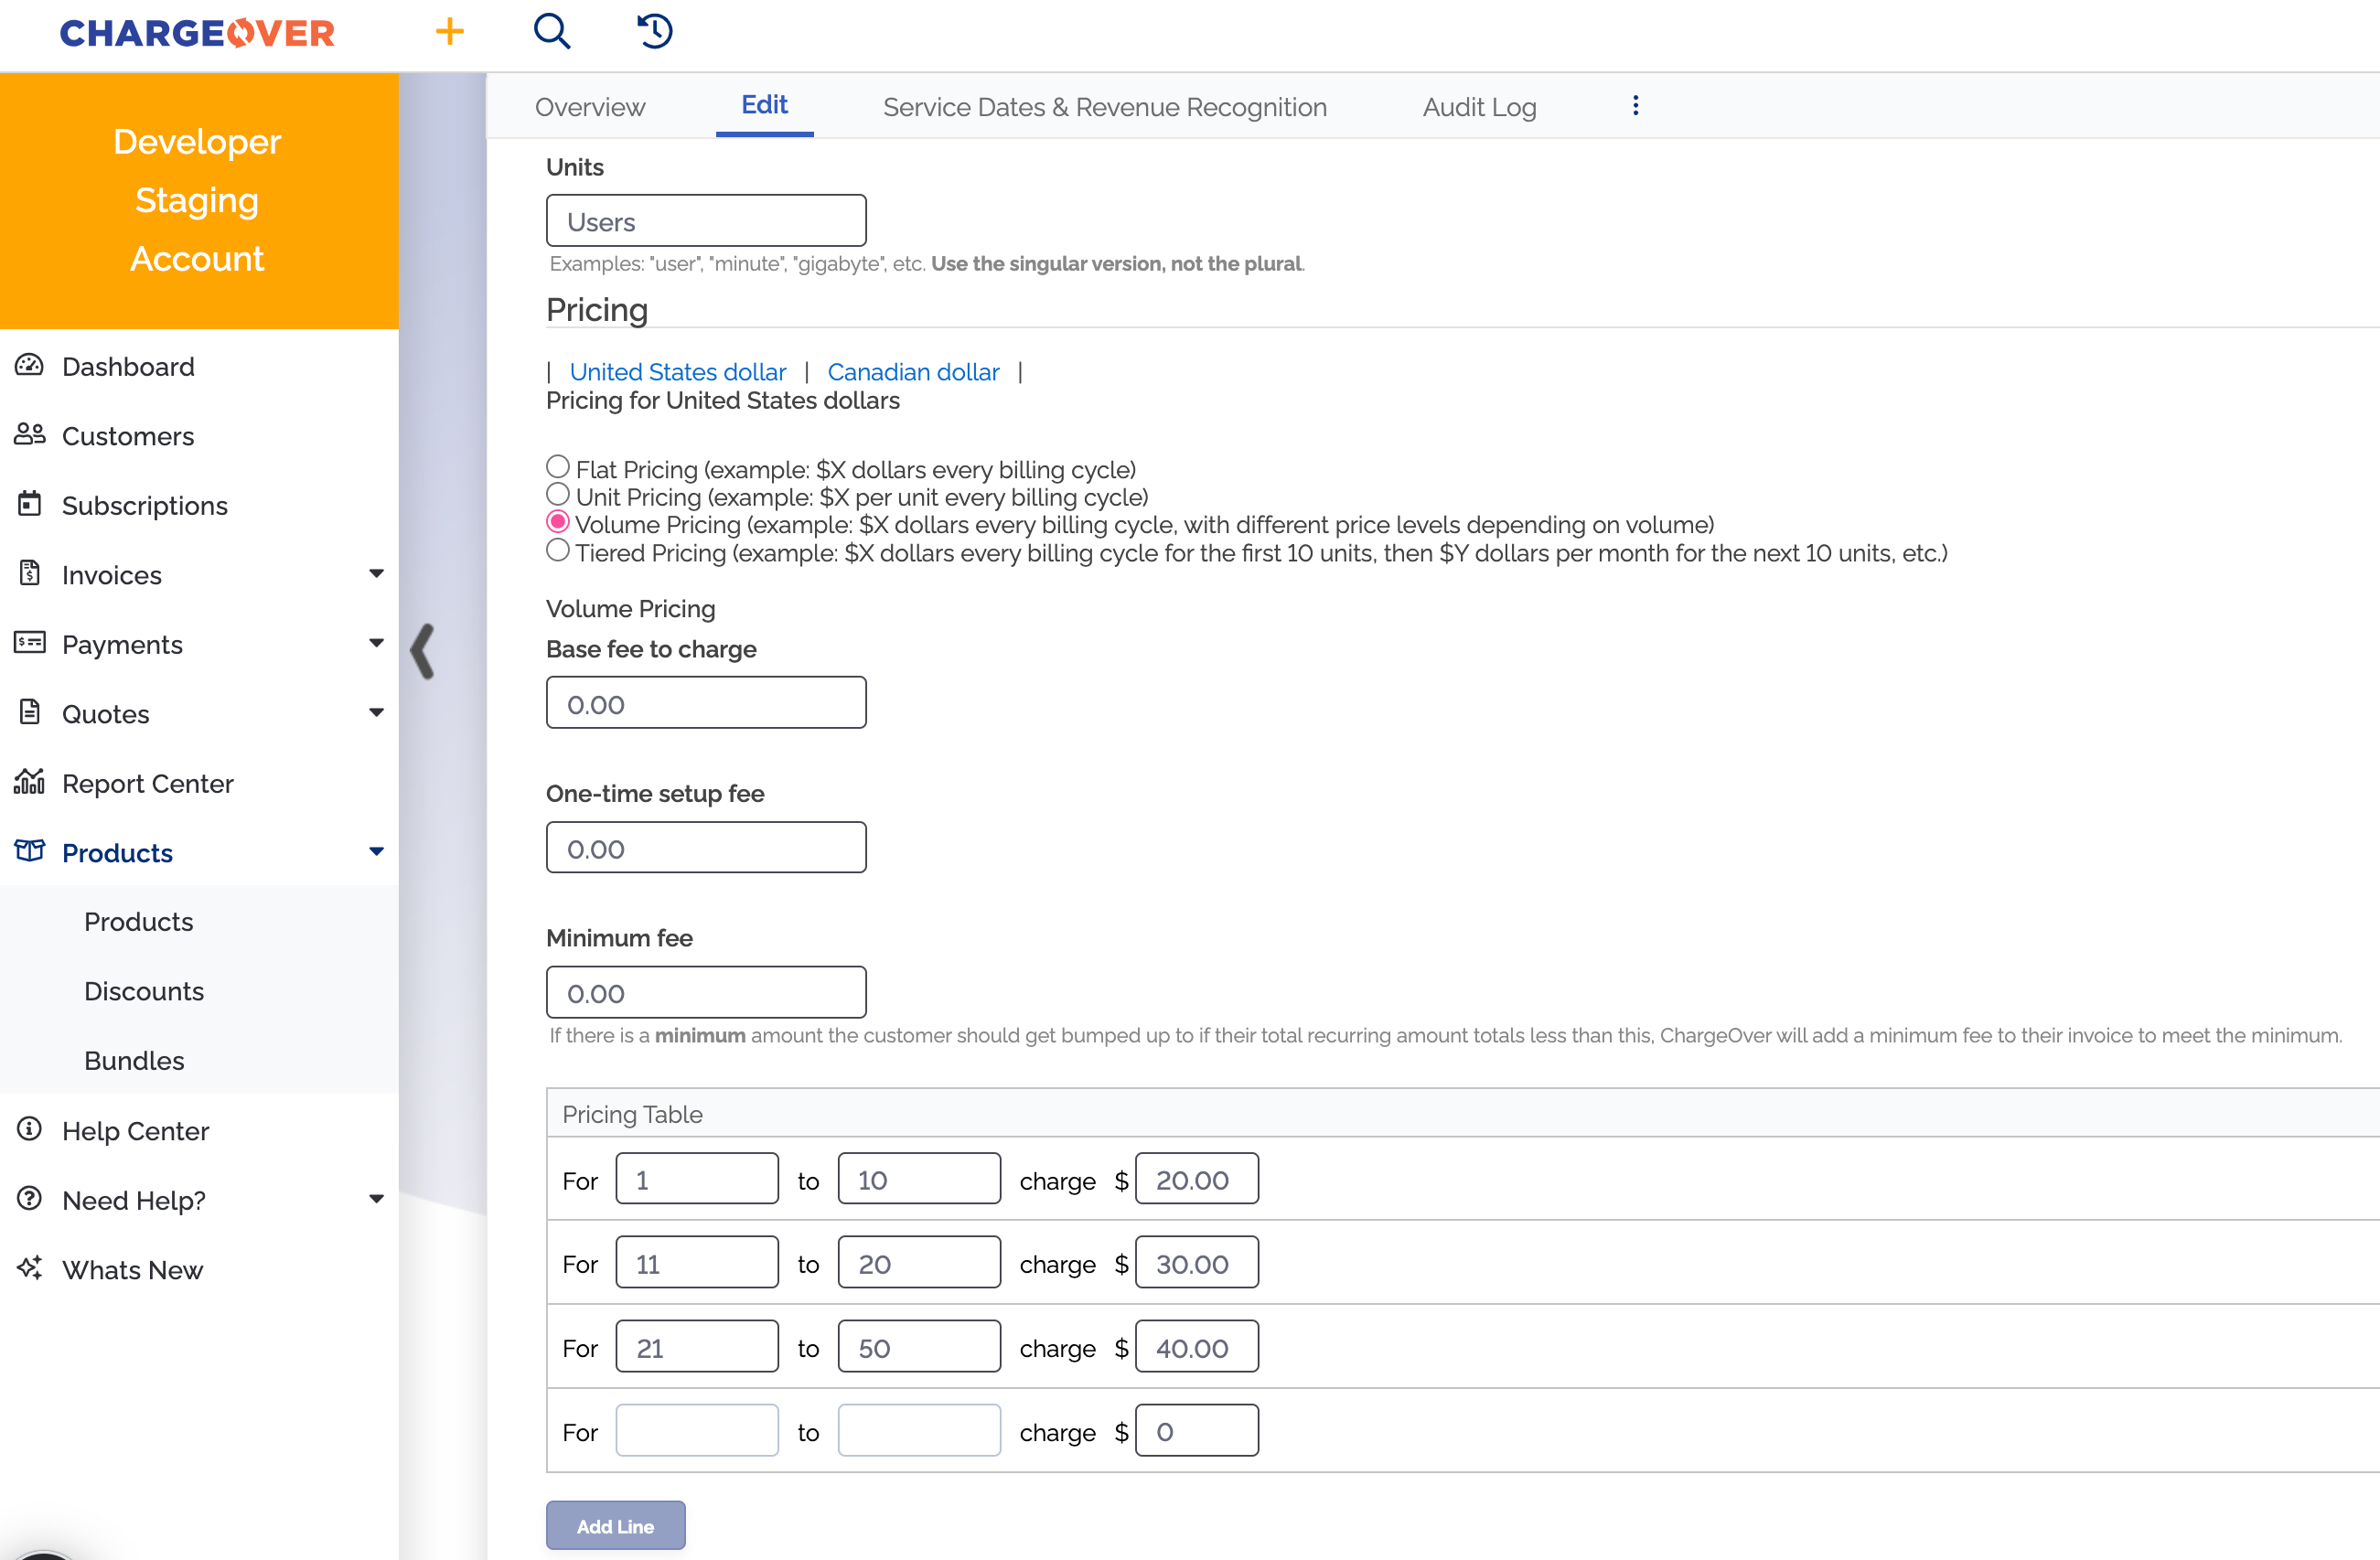
Volume pricing
Volume pricing is used when you need to charge a flat rate, but the flat rate charged depends on the quantity. The key here is to remember that the price isn’t multiplied by the quantity. Instead, the quantity determines the price level you’re at.
Some common examples are listed below.
- $10 for up to 200 minutes, $20 for up to 1000 minutes, or $30 for unlimited minutes
- $20 for up to 10 gigabytes of cloud storage, $40 for up to 50 gigabytes of cloud storage
- $20 for 10 up to users, $30 for up to 20 users, $40 for up to 50 users
Using those price levels as an example, if your customer had 20 users, then the pricing would drop into the middle tier. The pricing for this tier would then be $30.
This is what the pricing set up should look like for the users example:
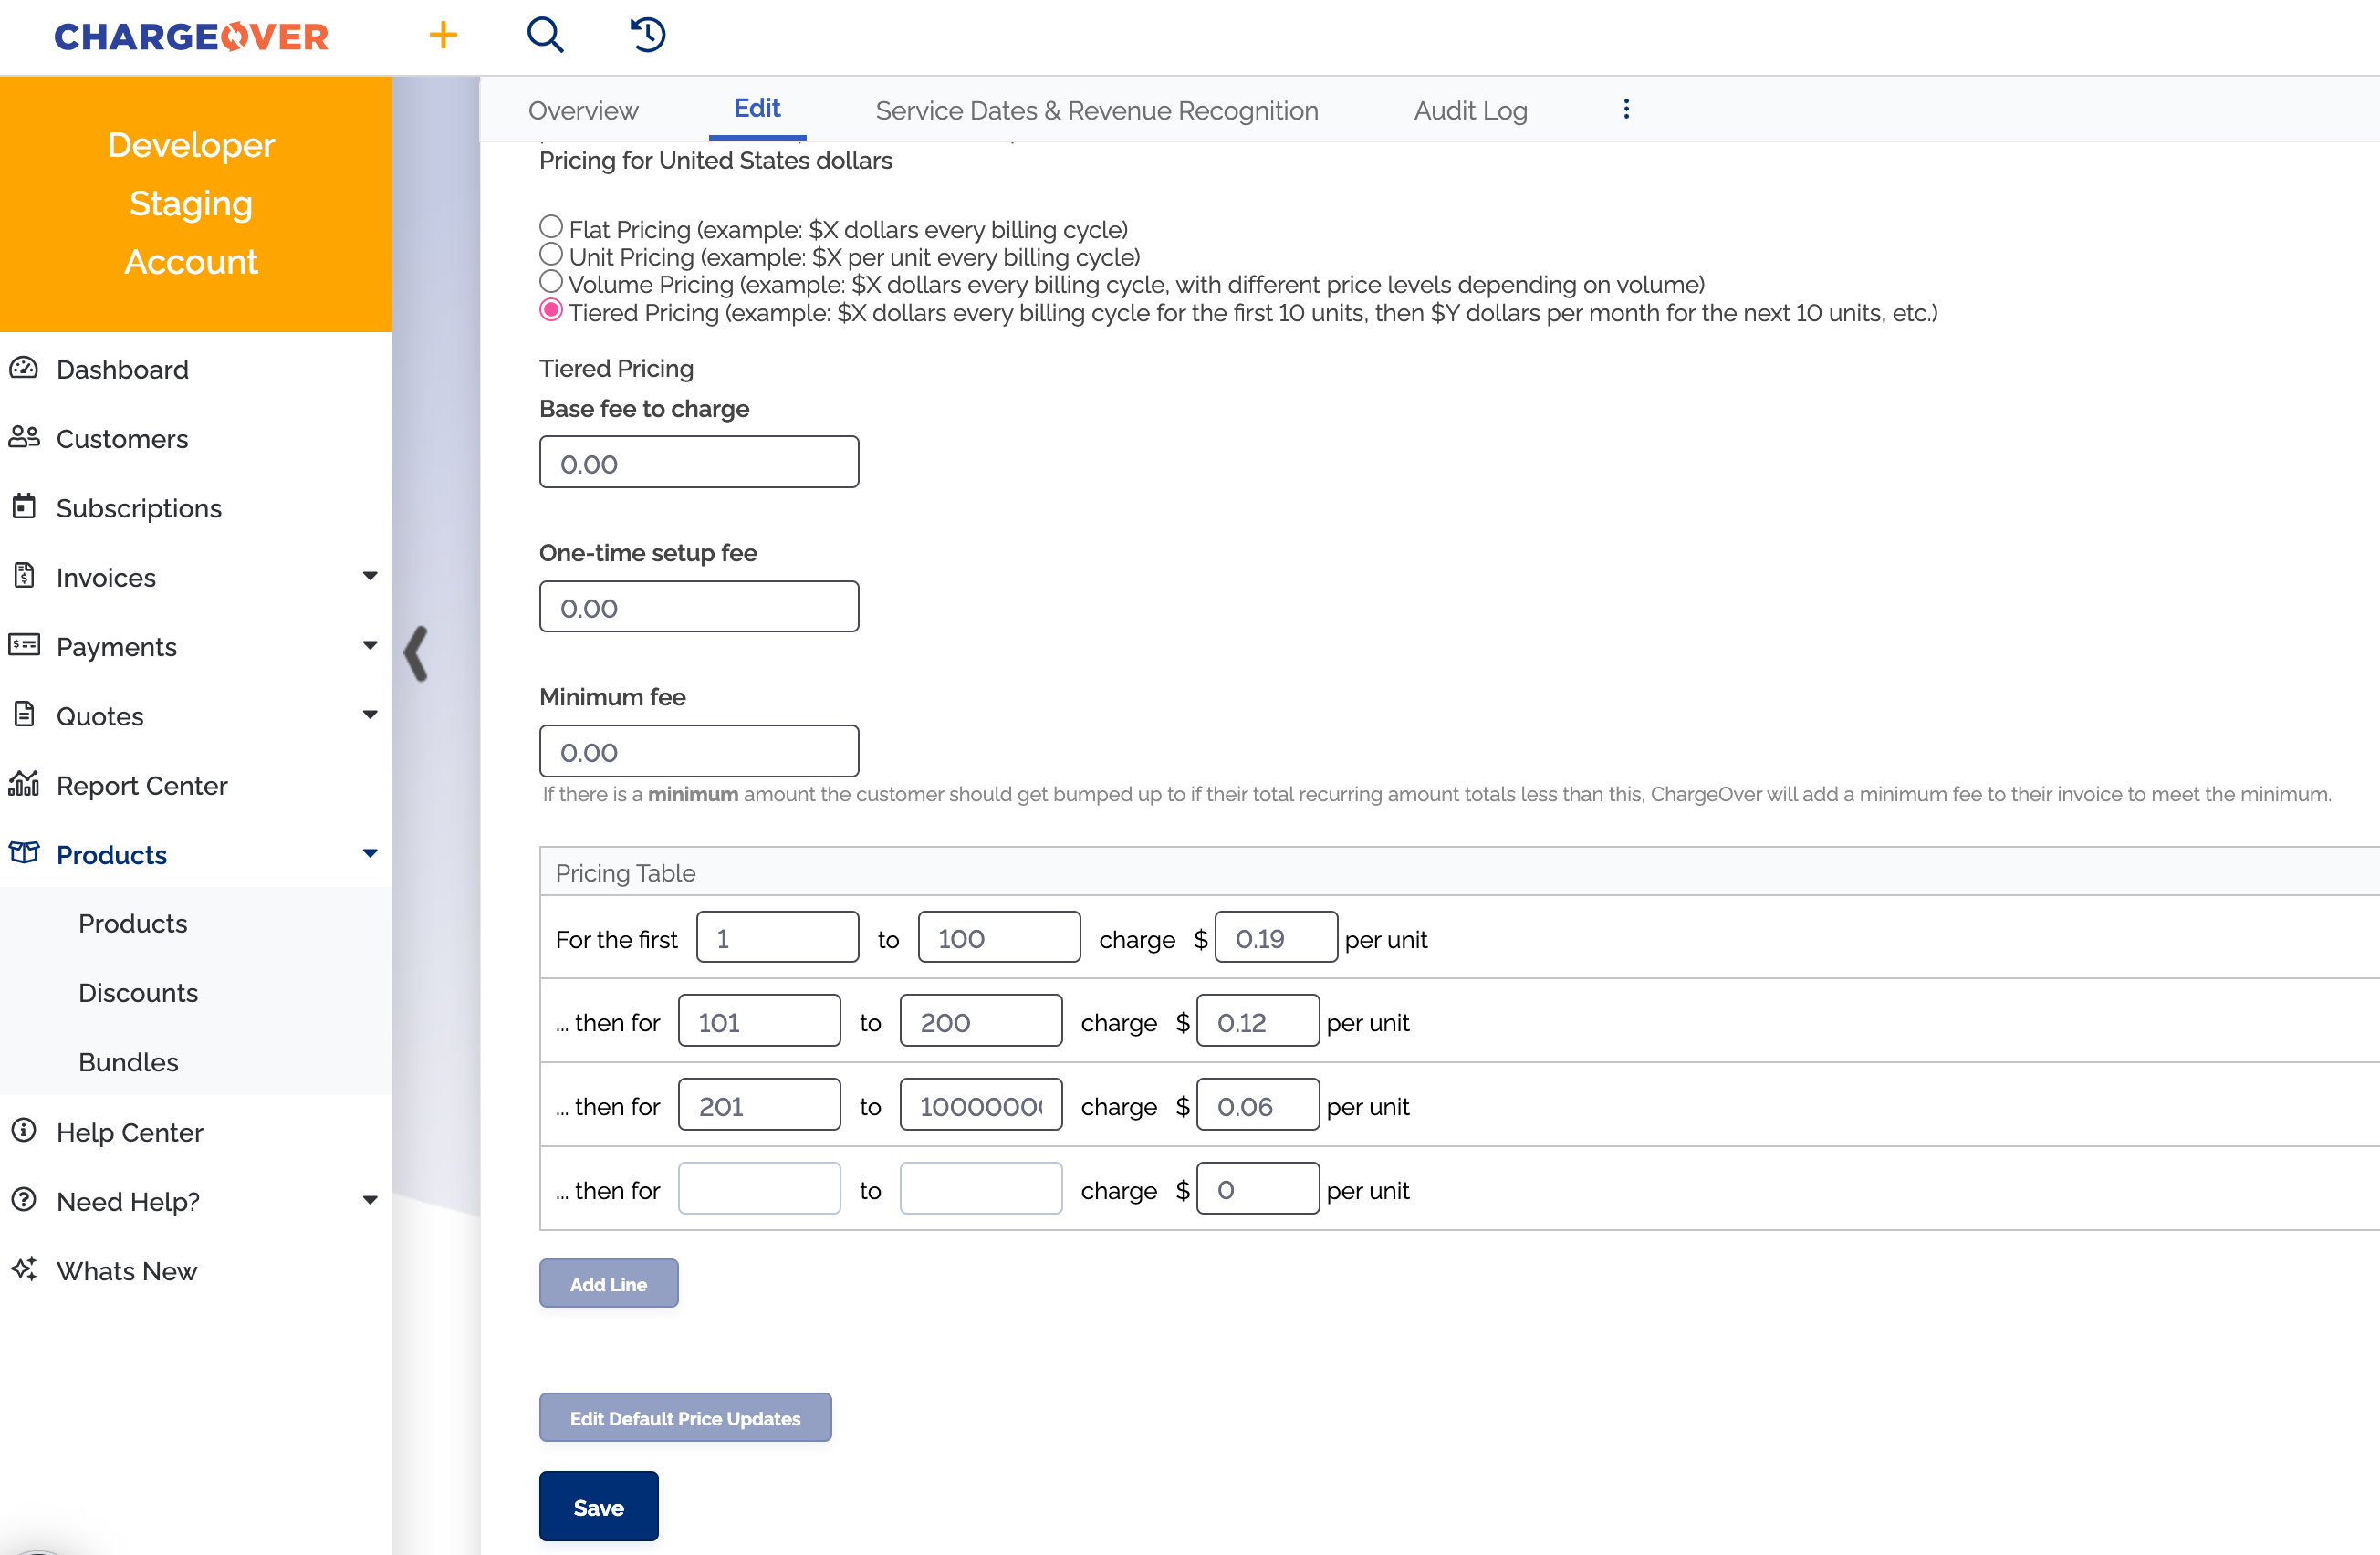
Tiered pricing
Tiered pricing is used when you’re charging per unit, just like unit pricing above, however, the rate for the first X units you buy is different from the rate for the next Y units you buy. With tiered pricing, the price levels or tiers compound, in contrast to unit pricing where only a single price level is used in the calculations.
Example one
John Doe’s Telephones offers pricing like this.
- For the first 100 minutes used, you’re charged $0.19 per minute
- For the next 100 minutes used, you’re charged $0.12 per minute (this is *on top of* the amount you’ve been charged for the first 100 minutes)
- For every minute after that, you’re charged $0.06 per minute (again, *on top of* the amount you’ve been charged for the first 100 minutes, and the next 100 minutes)
That is, if you’ve used only 50 minutes, you’re going to get charged 50 x $0.19 per minute = $9.50 total.
If you’ve used 150 minutes, you’re going to get charged 100 x $0.19 per minute = $19.50, for the first 100 minutes you used and 50 x $0.12 per minute = $6.00, for the next 50 minutes you used.
In the end, your grand total for 150 minutes is $19.50 + $6.00 = $25.50.
This is what the pricing set up should look like:
Example two
The in-laws are in town and they are big talkers. They used 350 minutes.
- 100 x $0.19 per minute = $19.50 (this is for the first 100 minutes you used)
- 100 x $0.12 per minute = $12.50 (this is for the next 100 minutes)
- 150 x $0.06 per minute = $9.00 (this is for the 150 minutes after those first two price levels)
The grand total for 350 minutes is $19.50 + $12.50 + $9.00 = $41.00
Edit the pricing of a product
To edit the pricing of a product, you will need to go to your Products tab. Find the product you want to edit and click it's name. Then click the edit tab. At the bottom, you will see the products pricing.
When you edit the products price here, the new pricing will only affect new subscriptions and invoices created moving forward. It will not affect any existing subscriptions.
To affect existing subscriptions when you are adjusting a products pricing, you can read on about editing the pricing of a product on all associated subscriptions.
Edit the pricing of a product on all associated subscriptions
ChargeOver's bulk subscription update tool allows you to update the pricing for all subscriptions for a certain product.
You will not be able to make pricing adjustments by percentages at this time. You will need to enter in a set amount for a pricing change.
Steps
- Go to
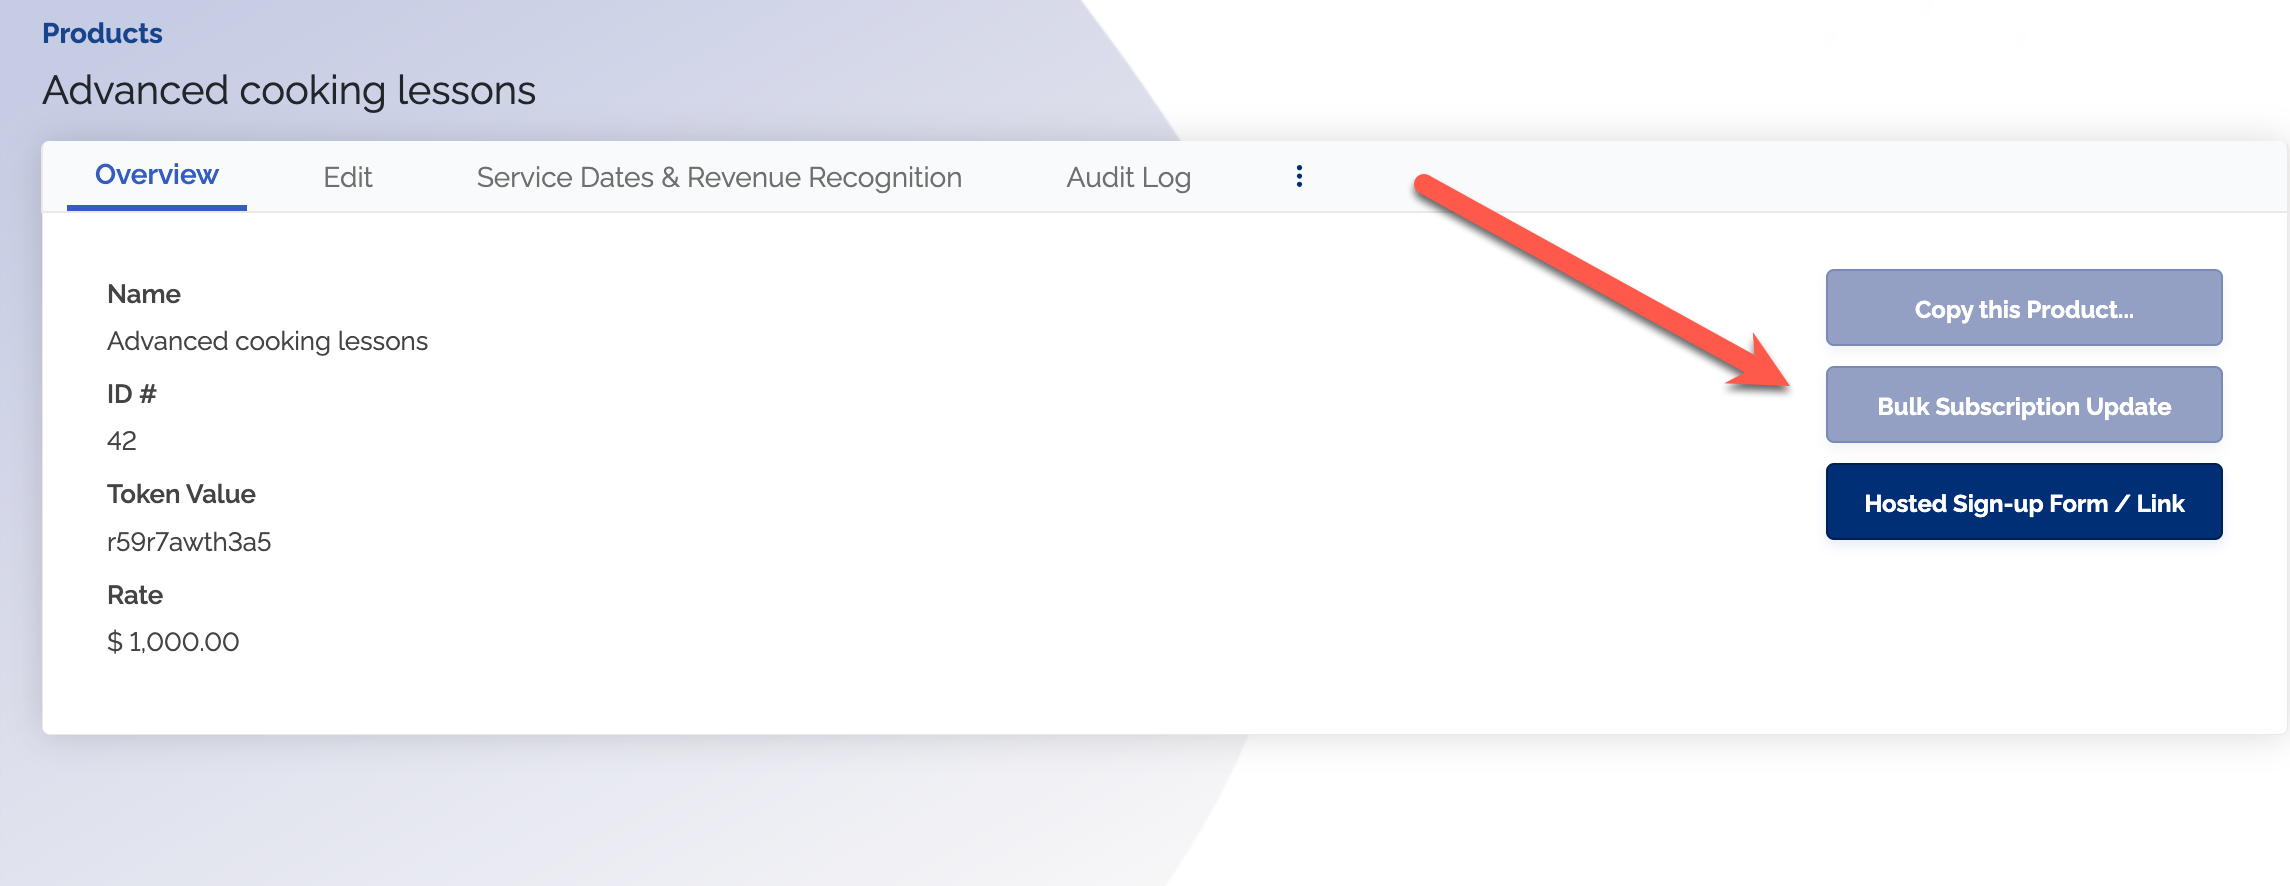
Products and click on the product you want to update prices for - On the Overview page, click the
Bulk Subscription Update button on the right side of the page
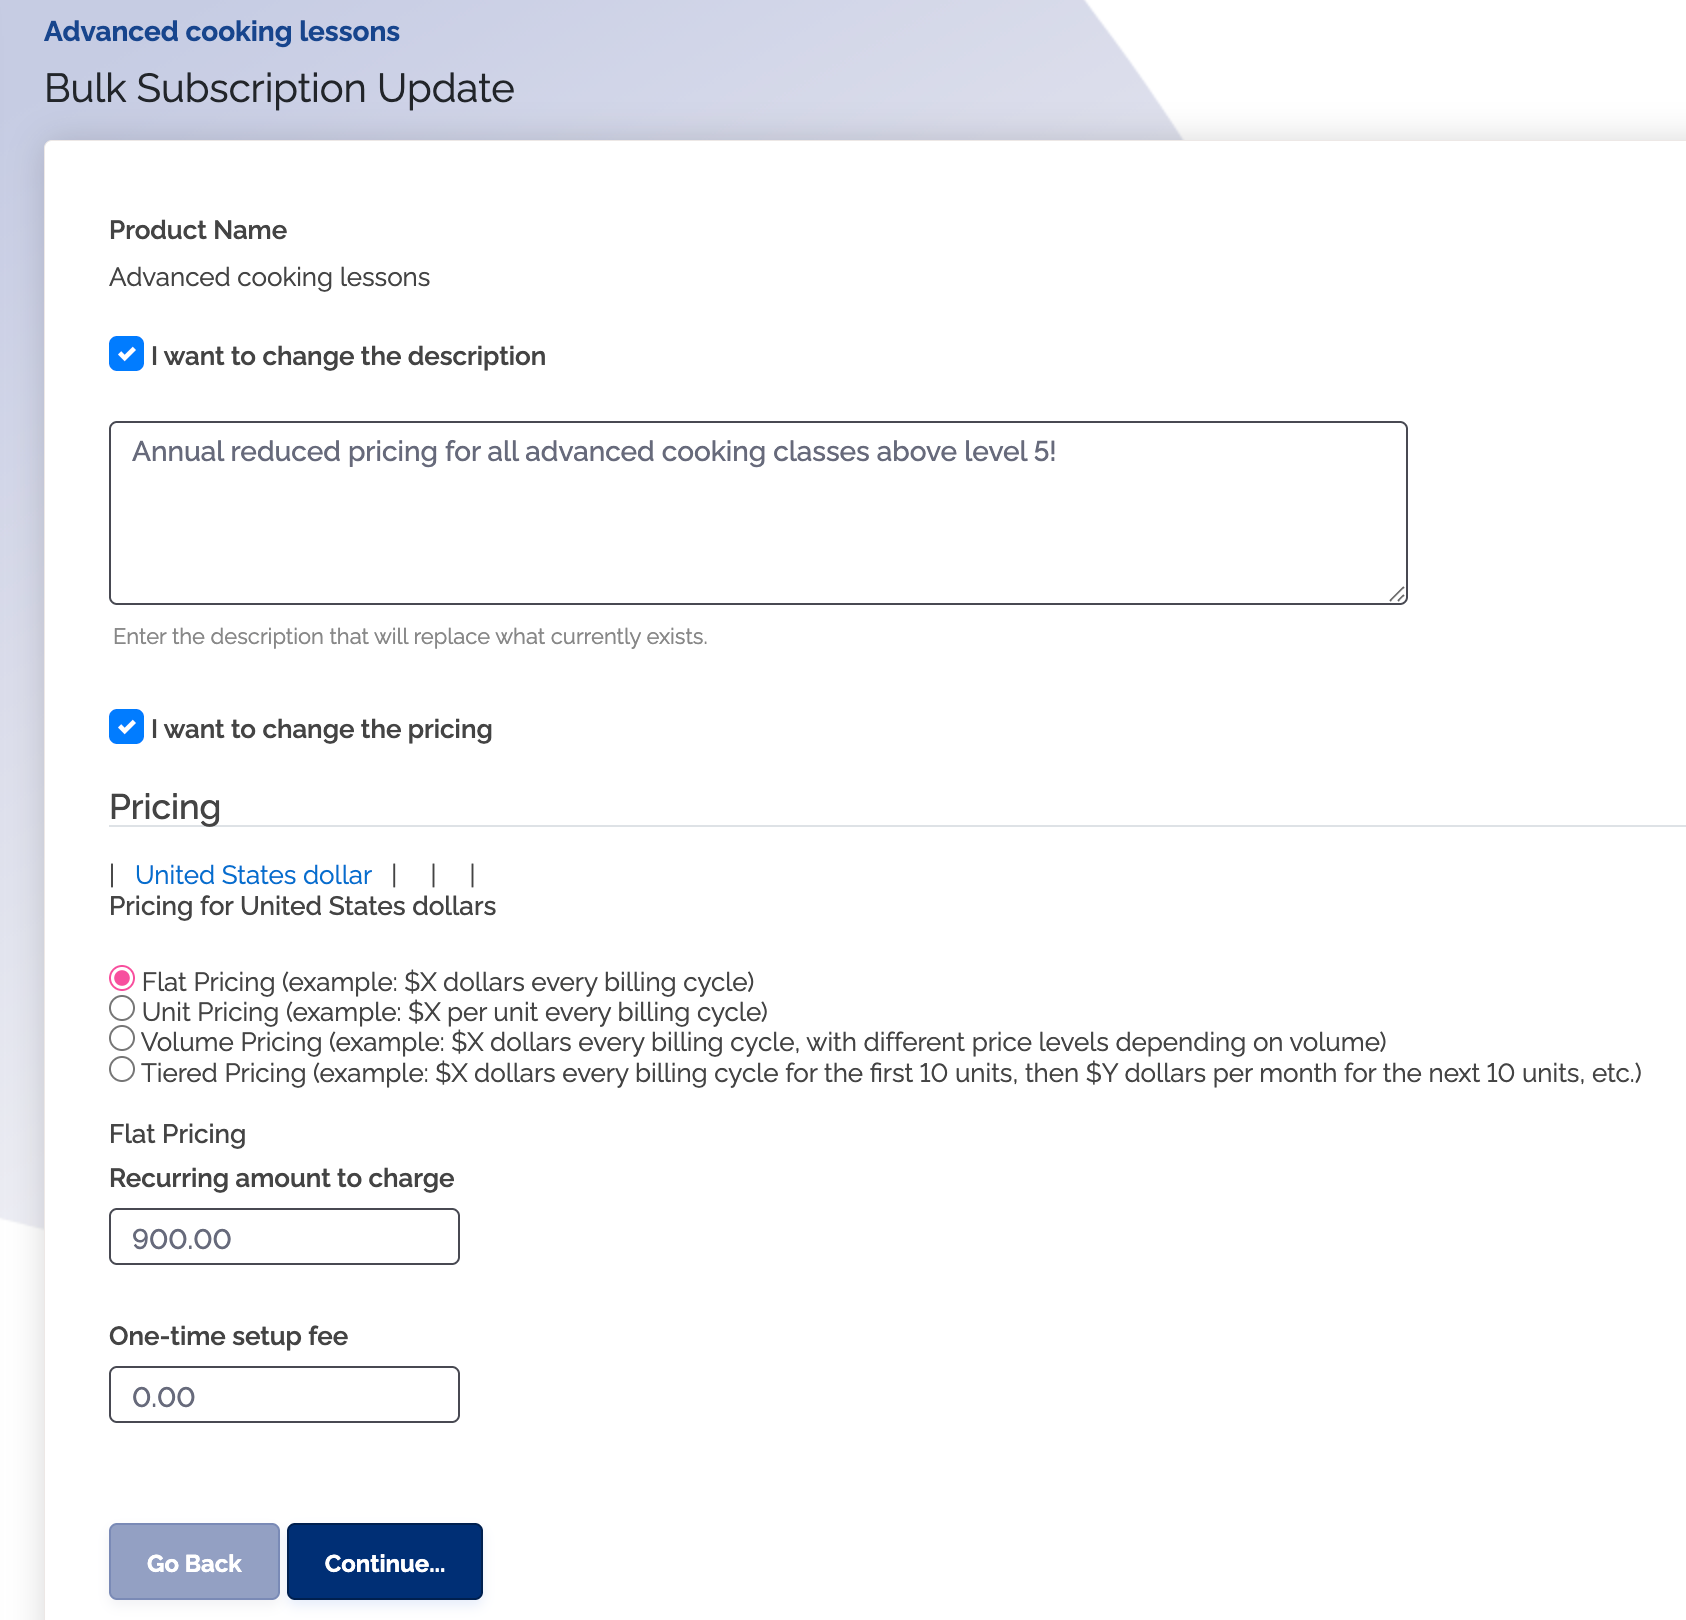
- Select the currencies and brands you want to update the subscription pricing for
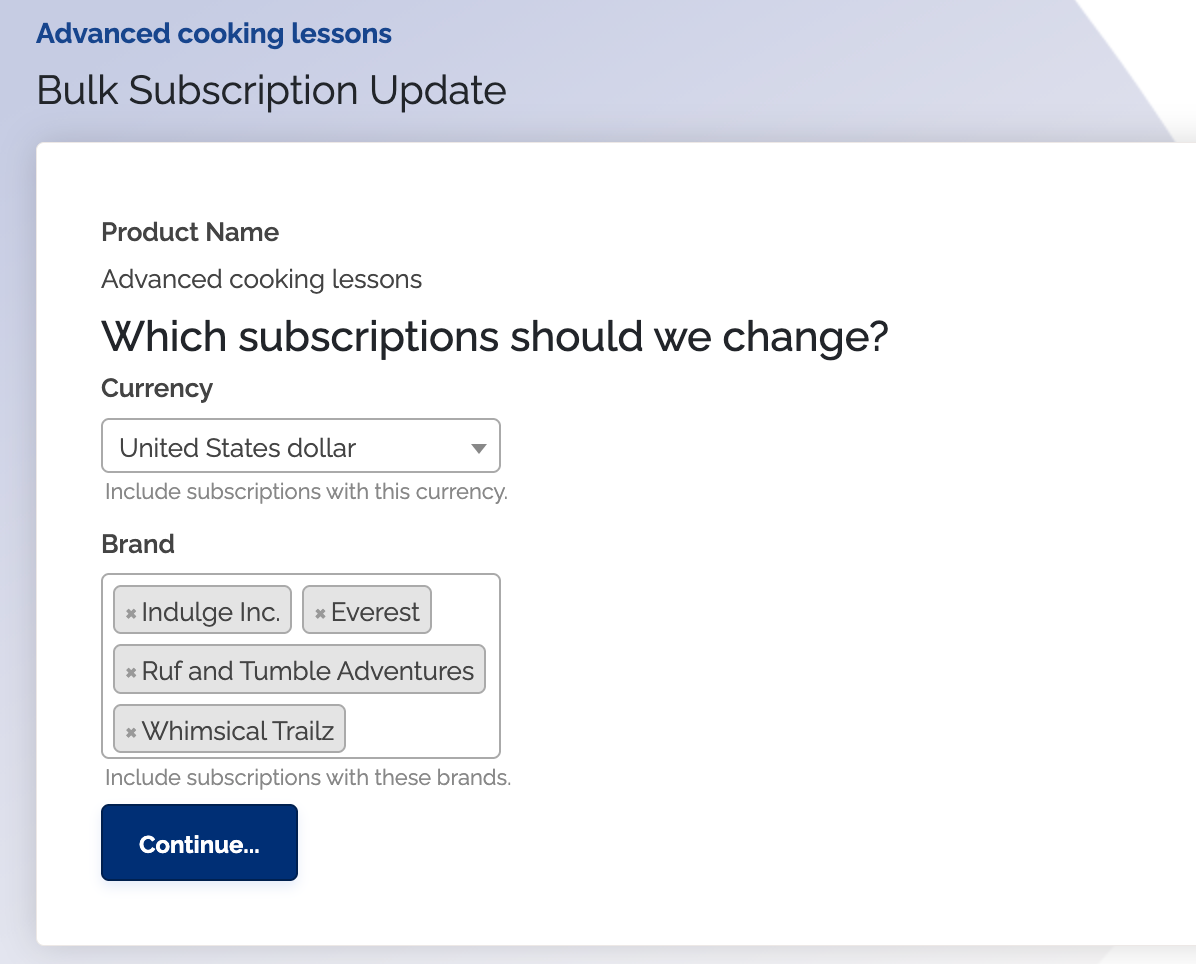
- You have the choice of entering the description, pricing or both. You can then click
Continue
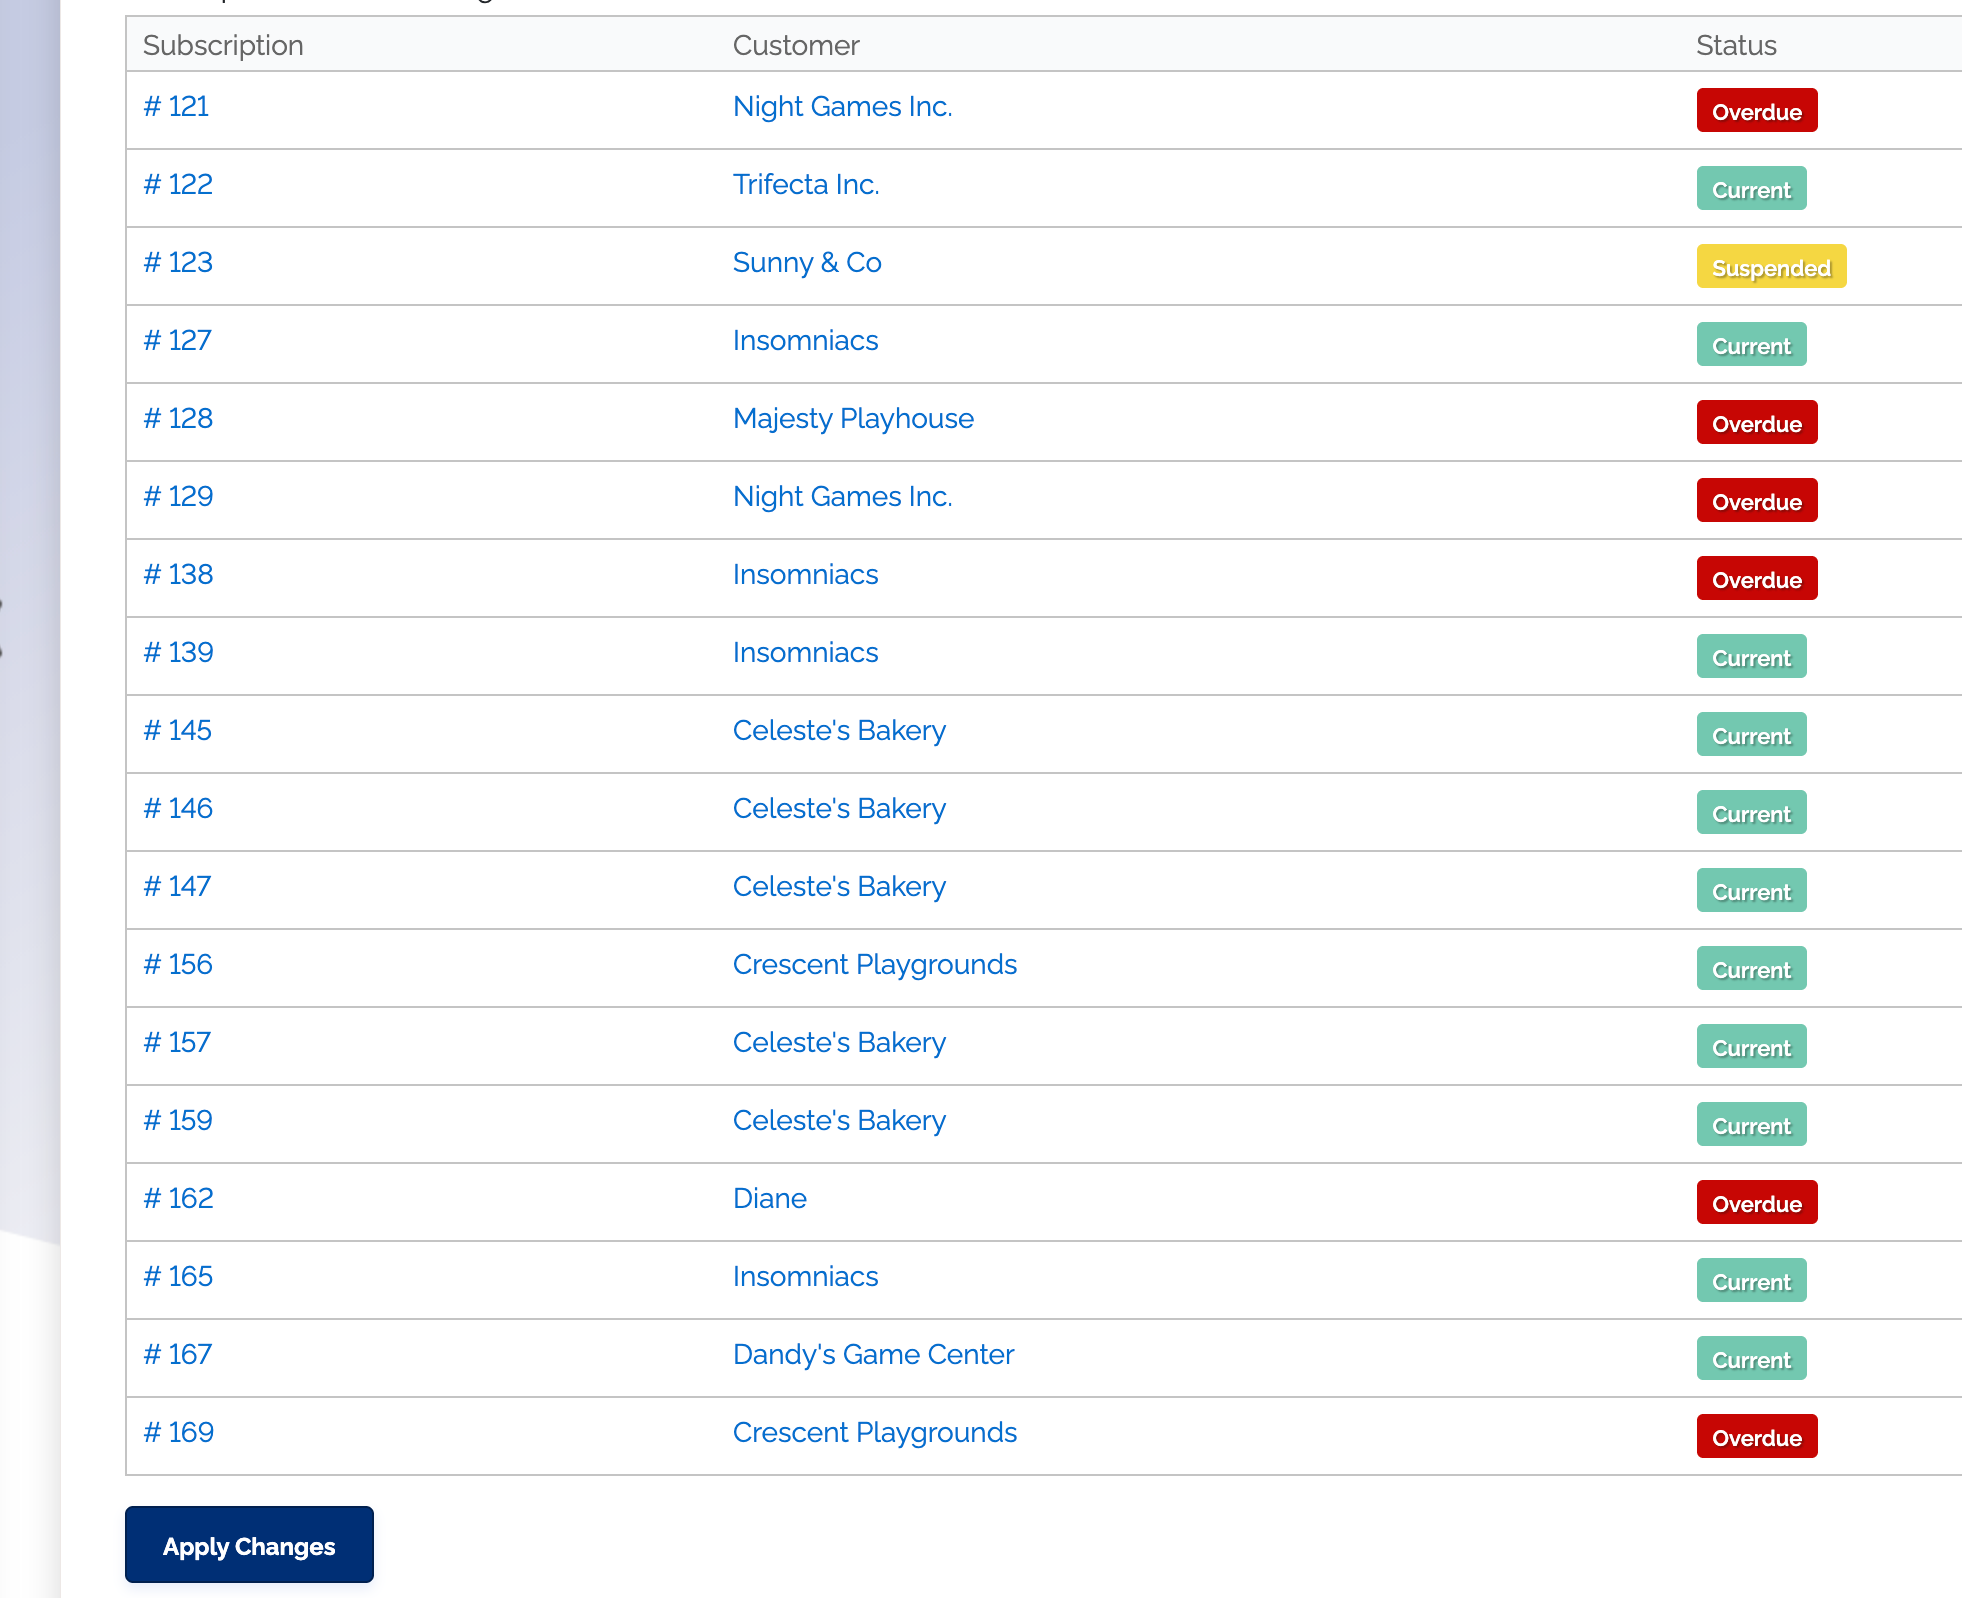
- A window will come up telling you how many subscriptions will be affected by the mass price change
- Click
Apply Changes
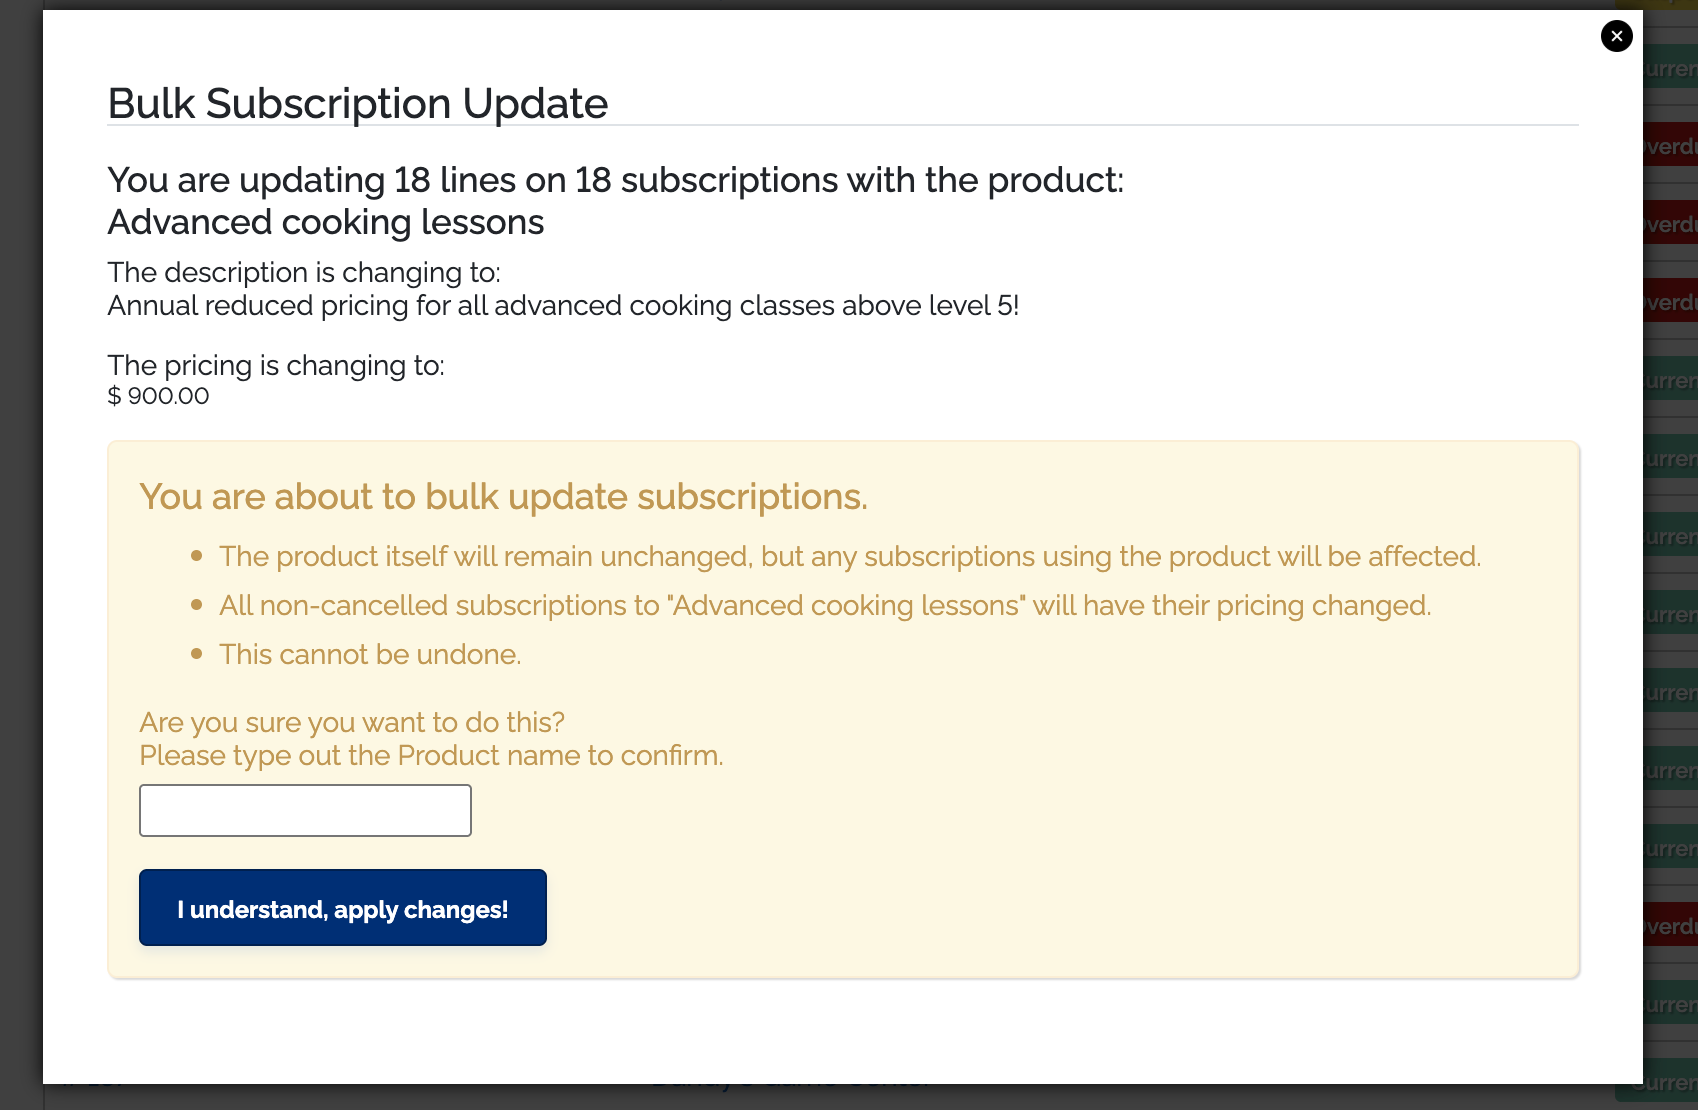
- Next you will see a screen with some information on it. To confirm the price change, you will have to type out the name of the product you are bulk updating the pricing for. This is to make sure you are sure you want to make the changes.
Now the subscription line items associated with the adjusted product will have updated pricing.
Keep in mind
- This tool only affects the pricing on subscriptions. The product or plan itself will remain unchanged, but any subscriptions using the product or plan will be affected
- All non-cancelled subscriptions associated with the updated product will have their pricing changed
- Mass updating the pricing on subscriptions for a certain product cannot be undone
Bulk updating existing subscriptions for a scheduled price increase
We do not support a bulk way to schedule price increases. You can set the price increase on a product, and then any new subscriptions you create that use that product, will have that price increase.
If you want to schedule price changes on existing subscriptions, then you have a few options.
-
You can go to each subscription and manually schedule the price increase on each one
-
You can use the REST API to mass update the subscriptions. Click here to view the REST API documentation.
-
You can reach out to support and we can put a request in to mass update the subscriptions
Setup fees
Setup fees are charges that can be used to charge your customers an initial one-time setup fee. A setup fee will only ever be charged or invoiced once, and only on the first invoice.
If you charge a one-time setup fee, you can use the setup fee field to have this automatically added onto the customers first invoice.
Recurring or base fees
Recurring fees or base fees are fees that are always charged, in addition to any unit, volume, or tiered pricing costs. This is useful in situations where you charge a fee regardless of how much of something the customer uses.
A typical pricing example is something like $10 per month, plus 5 cents per minute.
In a situation like this, the customer is always charged $10 per month, even if they don’t use any minutes. If they do use some minutes, then the charge is $10 per month, which is the base fee, plus 5 cents multiplied by the number of minutes they’ve used.
Base fees can be used in conjunction with unit, volume, or tiered pricing plans.
Pricing for one-time invoices
Compared to subscriptions or recurring invoicing, one time invoices are different. All of the pricing models above apply to typical recurring subscriptions or recurring invoicing in ChargeOver.
For one-time or one-off invoicing, most of the above information does not apply. One-time invoices just have a rate and a quantity for each line item, and thus unit, volume, and tiered pricing will not apply or automatically calculate anything for you.
Set default payment cycle for specific product
When creating a new product, you can set the default payment cycle for that specific product.
After adding that product to the subscription, ChargeOver will then automatically adjust the subscription to the appropriate payment cycle for that plan.
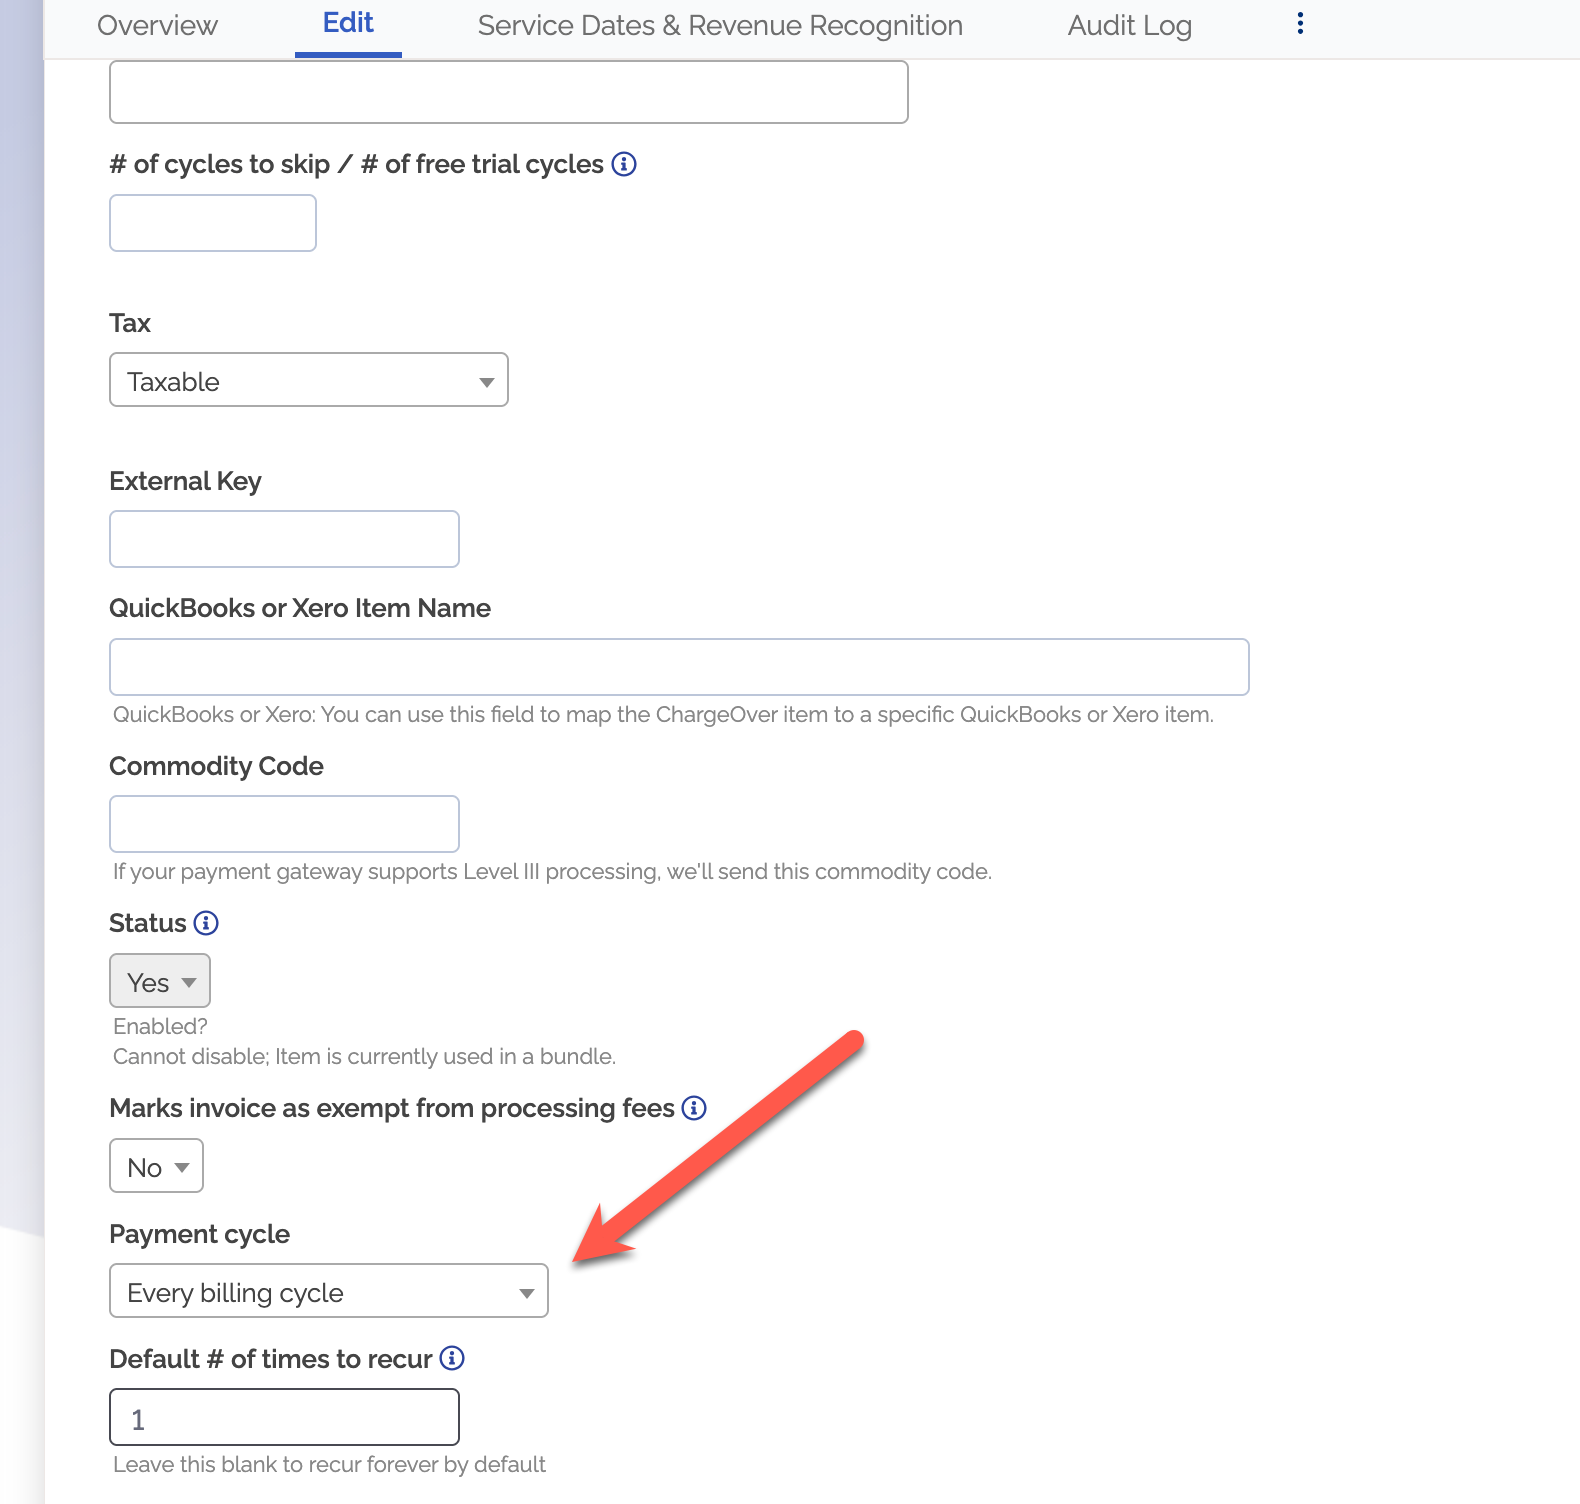
Change products default pay cycle
- Head over to your Products list and select the product you wish to edit from the list
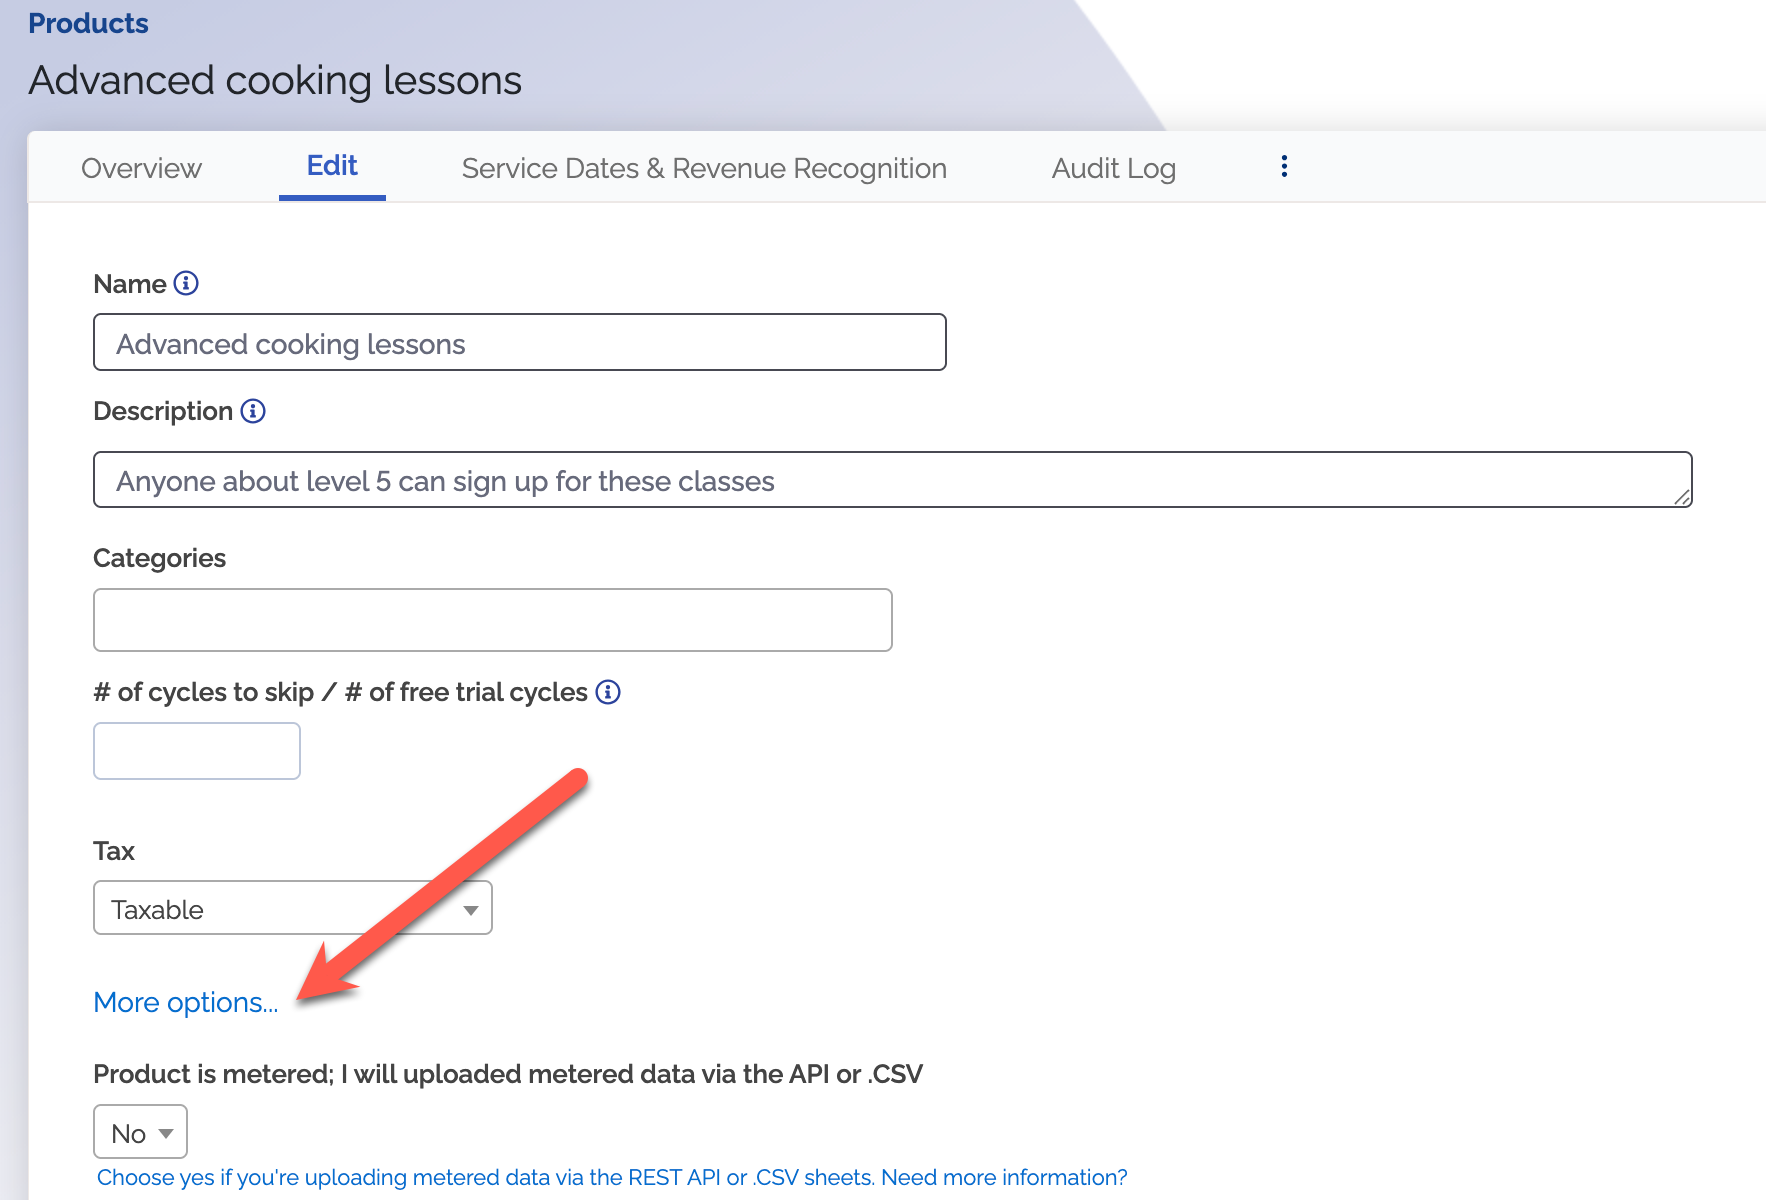
- Select the
Edit tab at the top of the page and clickMore Options to reveal the payment cycle form
- Select a payment cycle from the drop down and then click
Save
Trials to skip
Trials are a great way for your business to target new customers who are "window shopping". Maybe they are interested in your product but just aren't sure if the product is worth their money. Offering a free trial is a good incentive to secure a lasting sale.
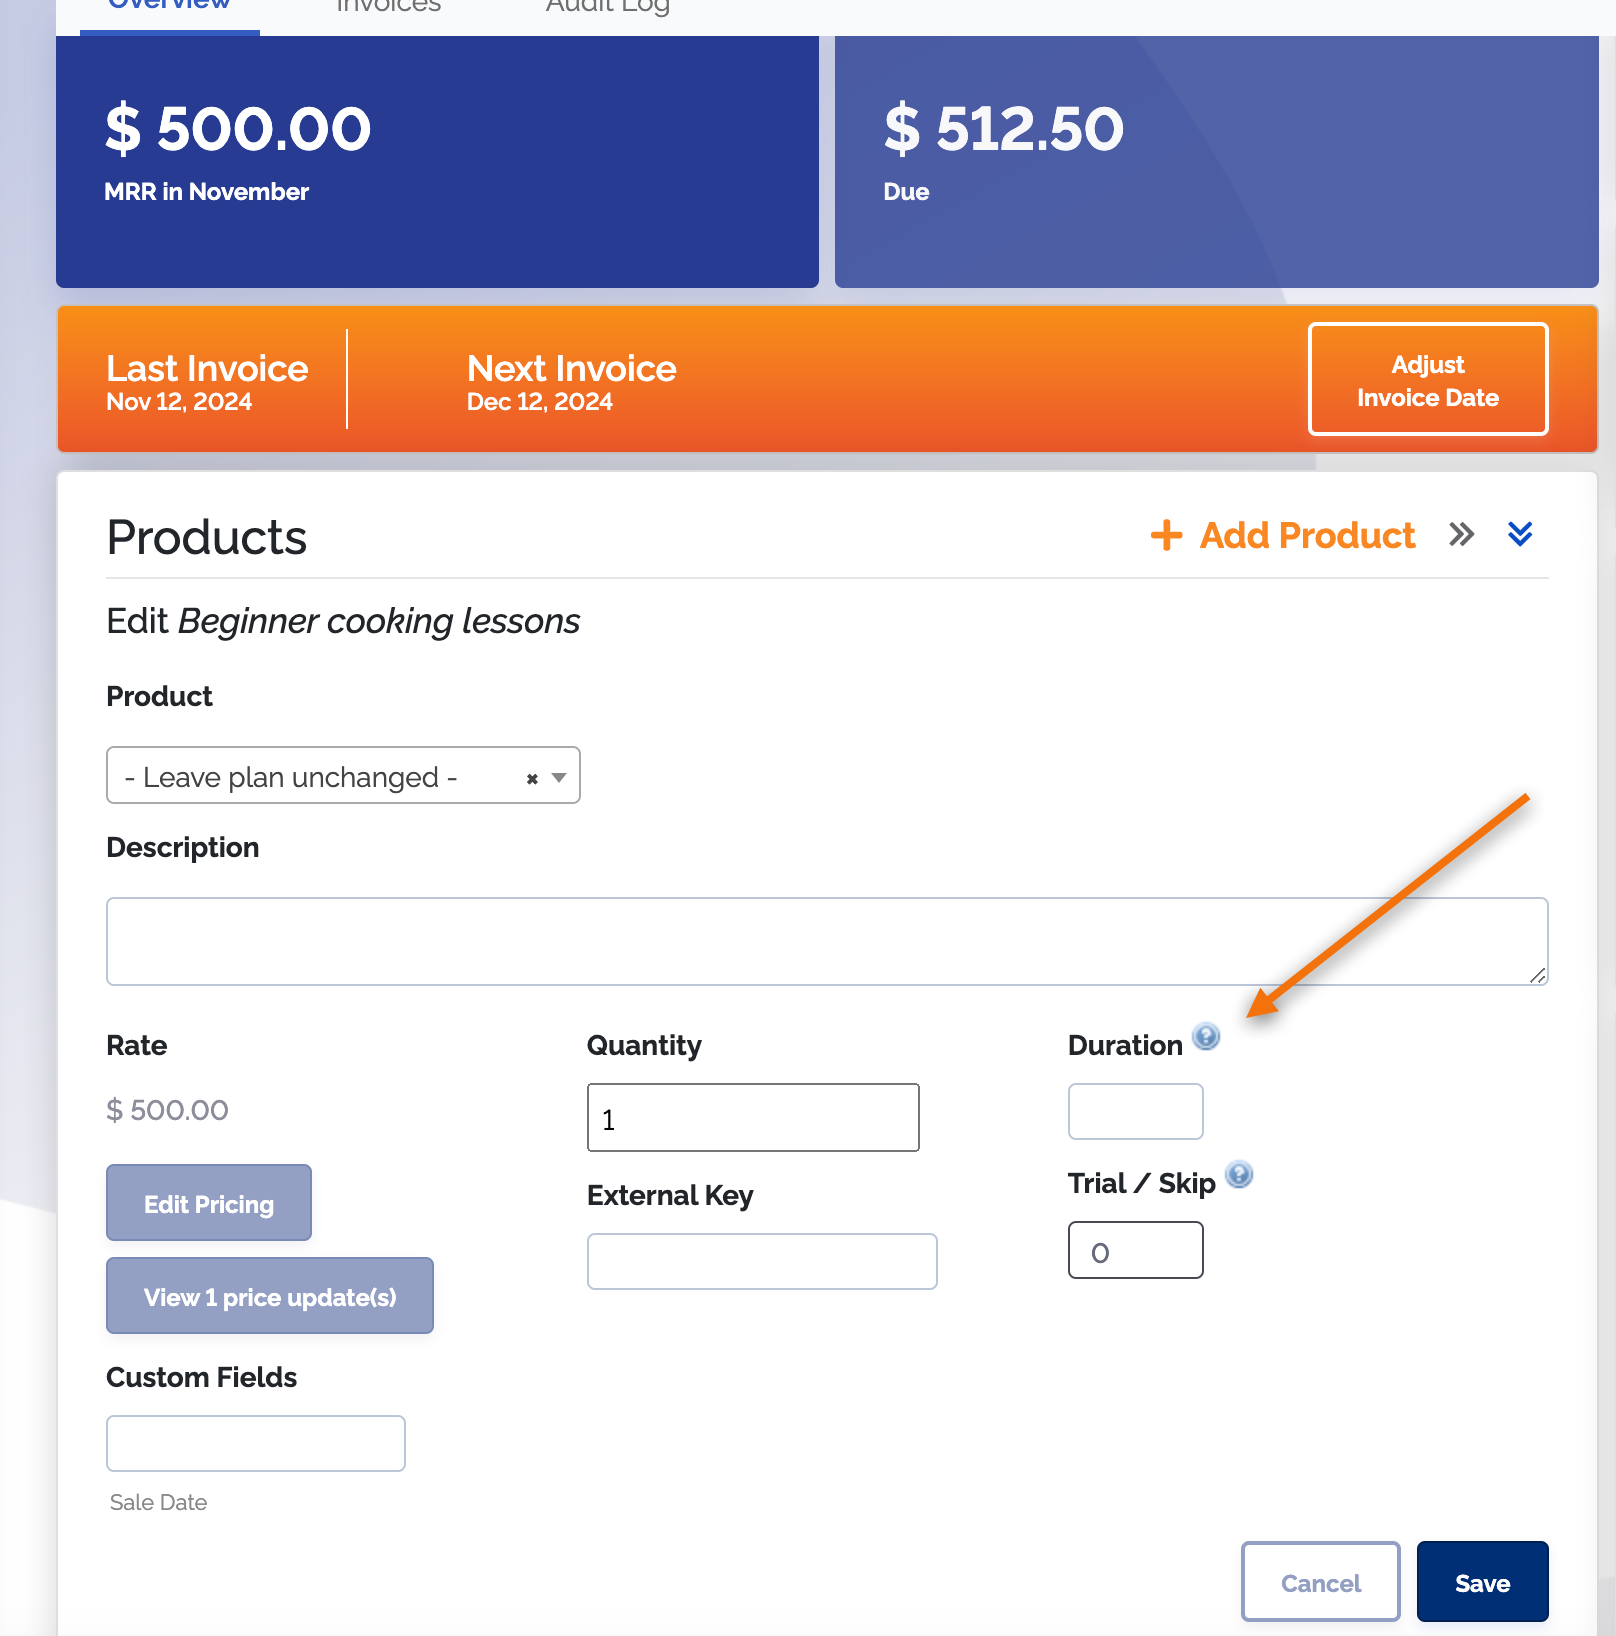
You can use our trial and skip field to set-up free trials for a line item on a subscription. This option is hidden under each line item.
To find it, you will need to hover over the line item you want to put the trial on and then click
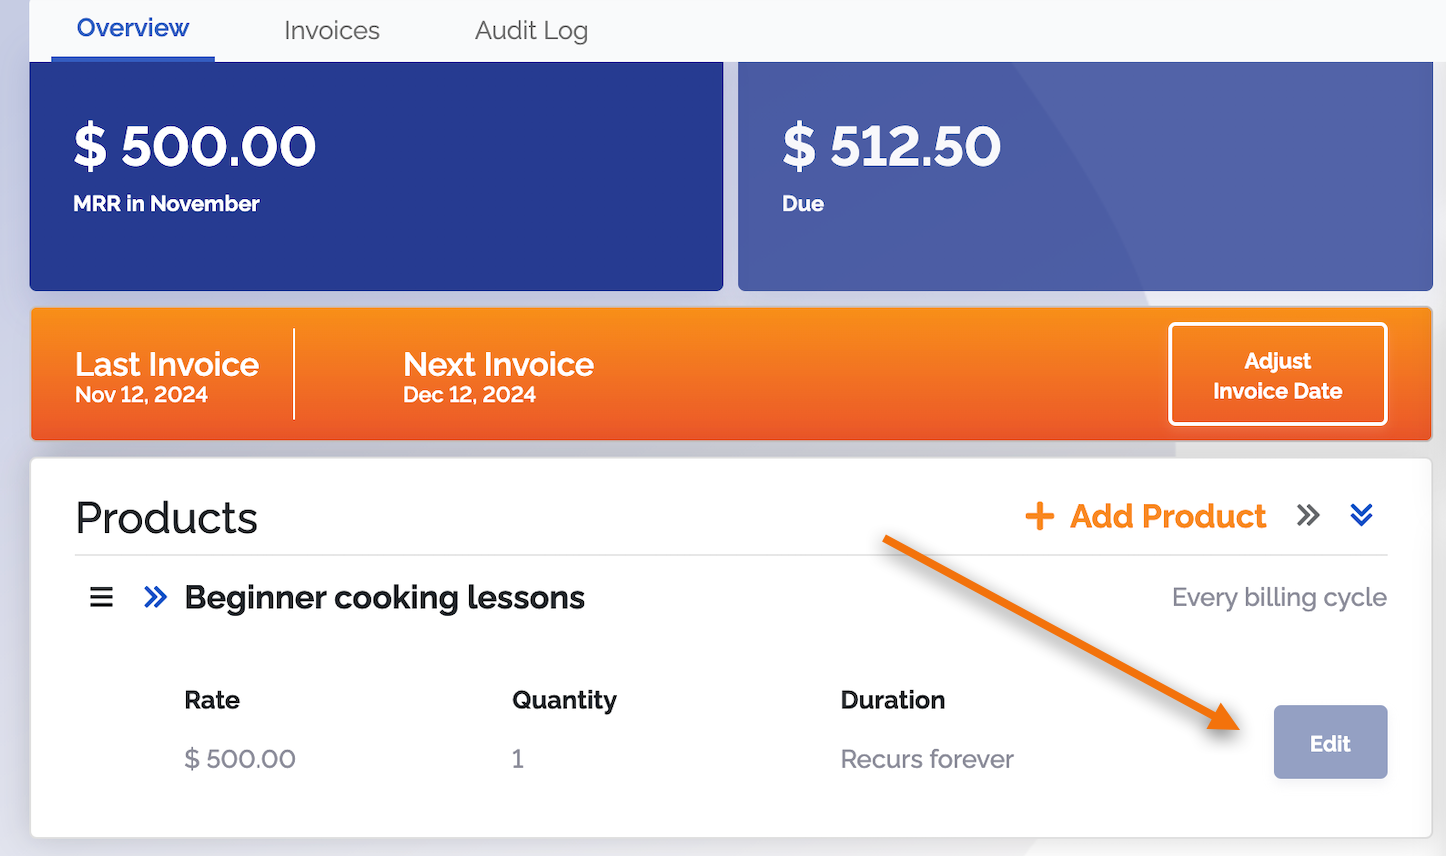
If you are creating a new subscription that has not created any invoices yet, you can enter in the number of payment cycles you want to give for free before the subscription will charge full price again. For example, if you want to give the customer one free payment cycle, you will enter a one into the trial and skip box.
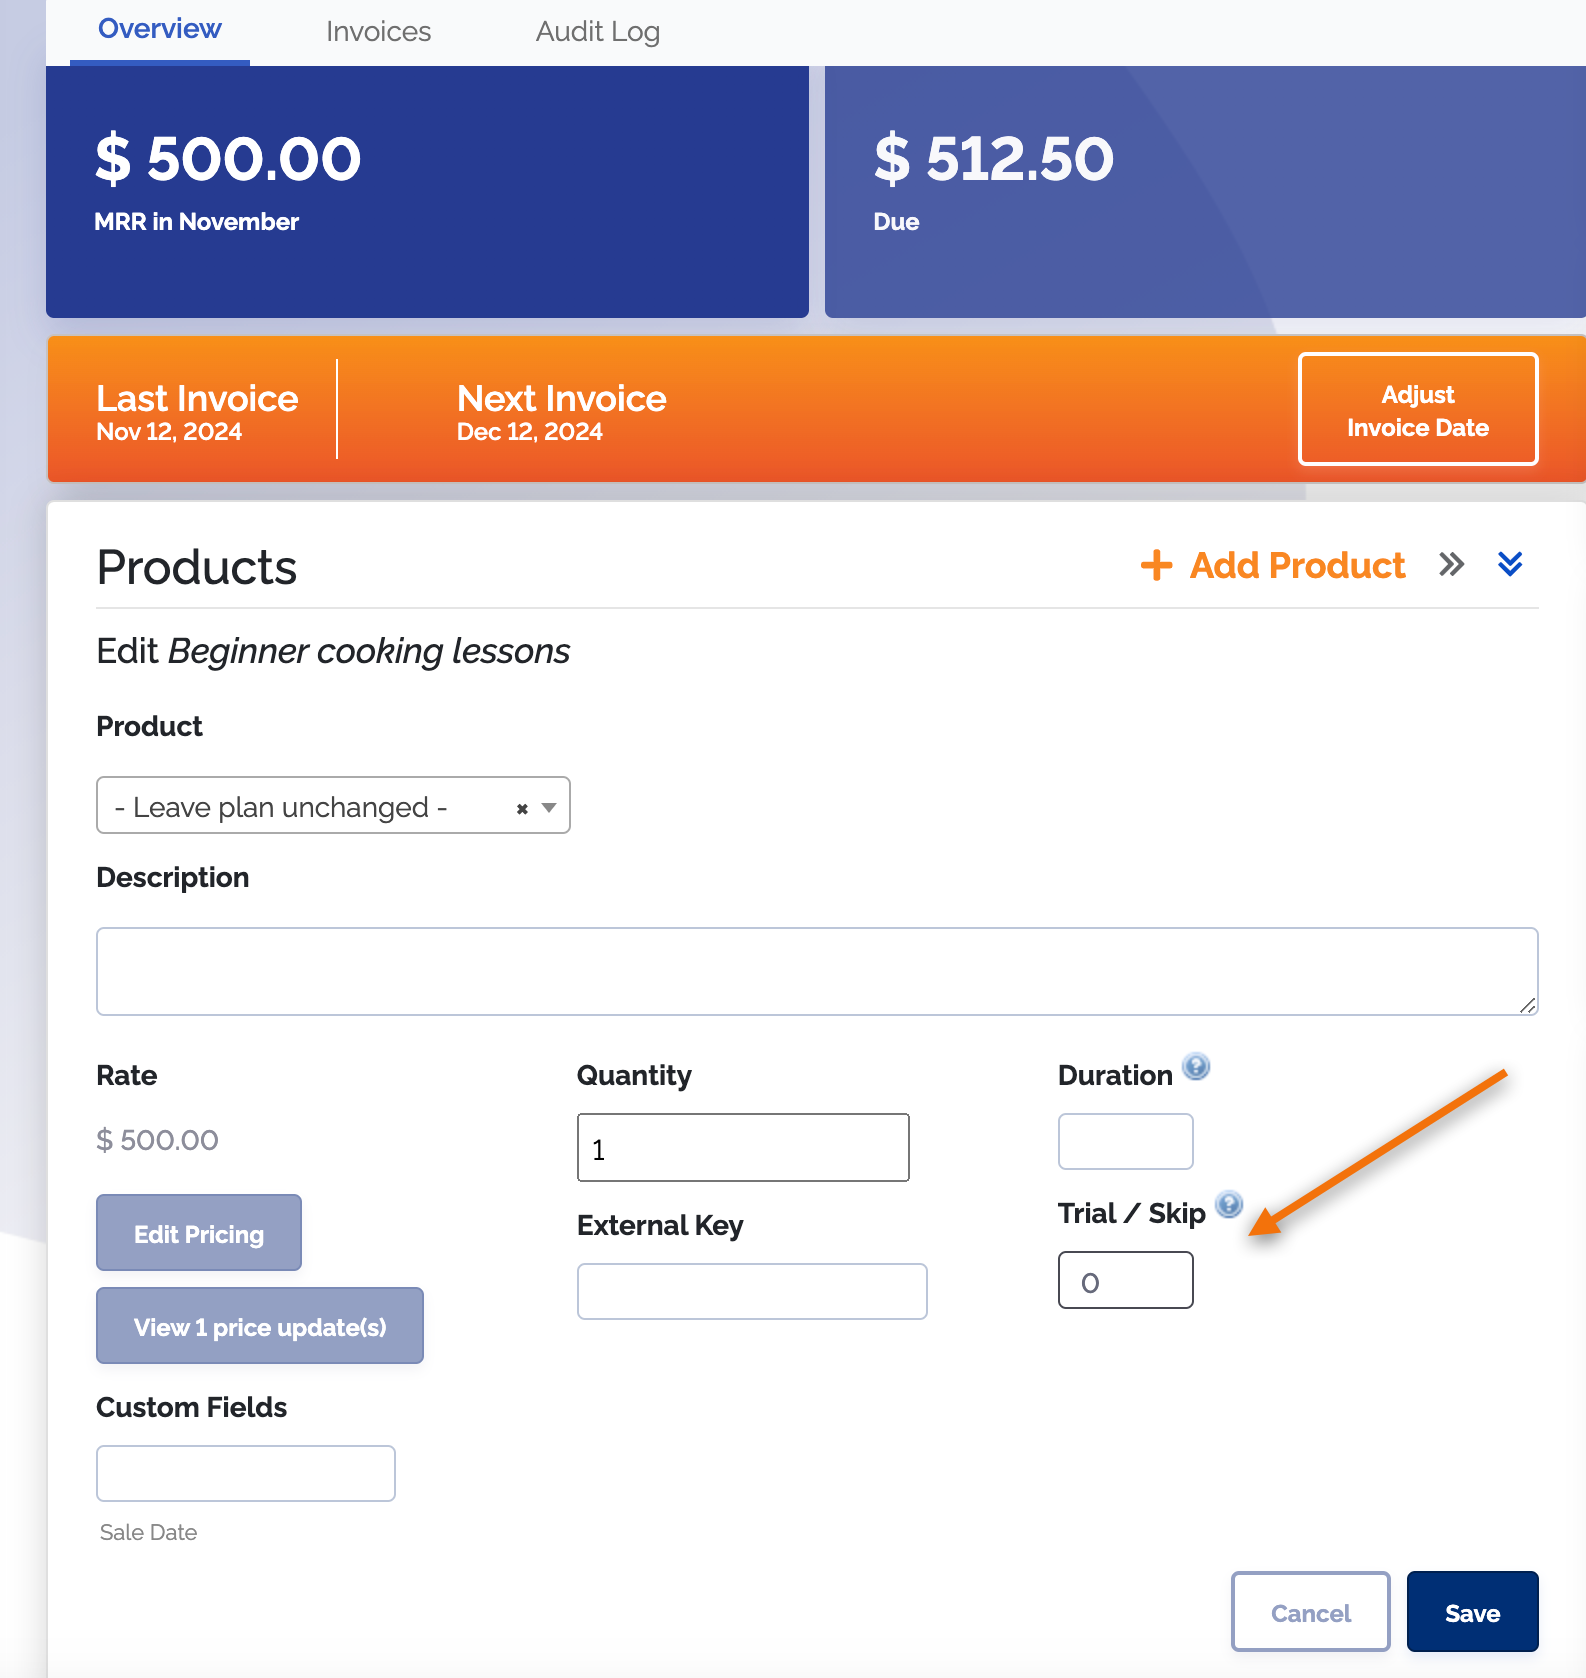
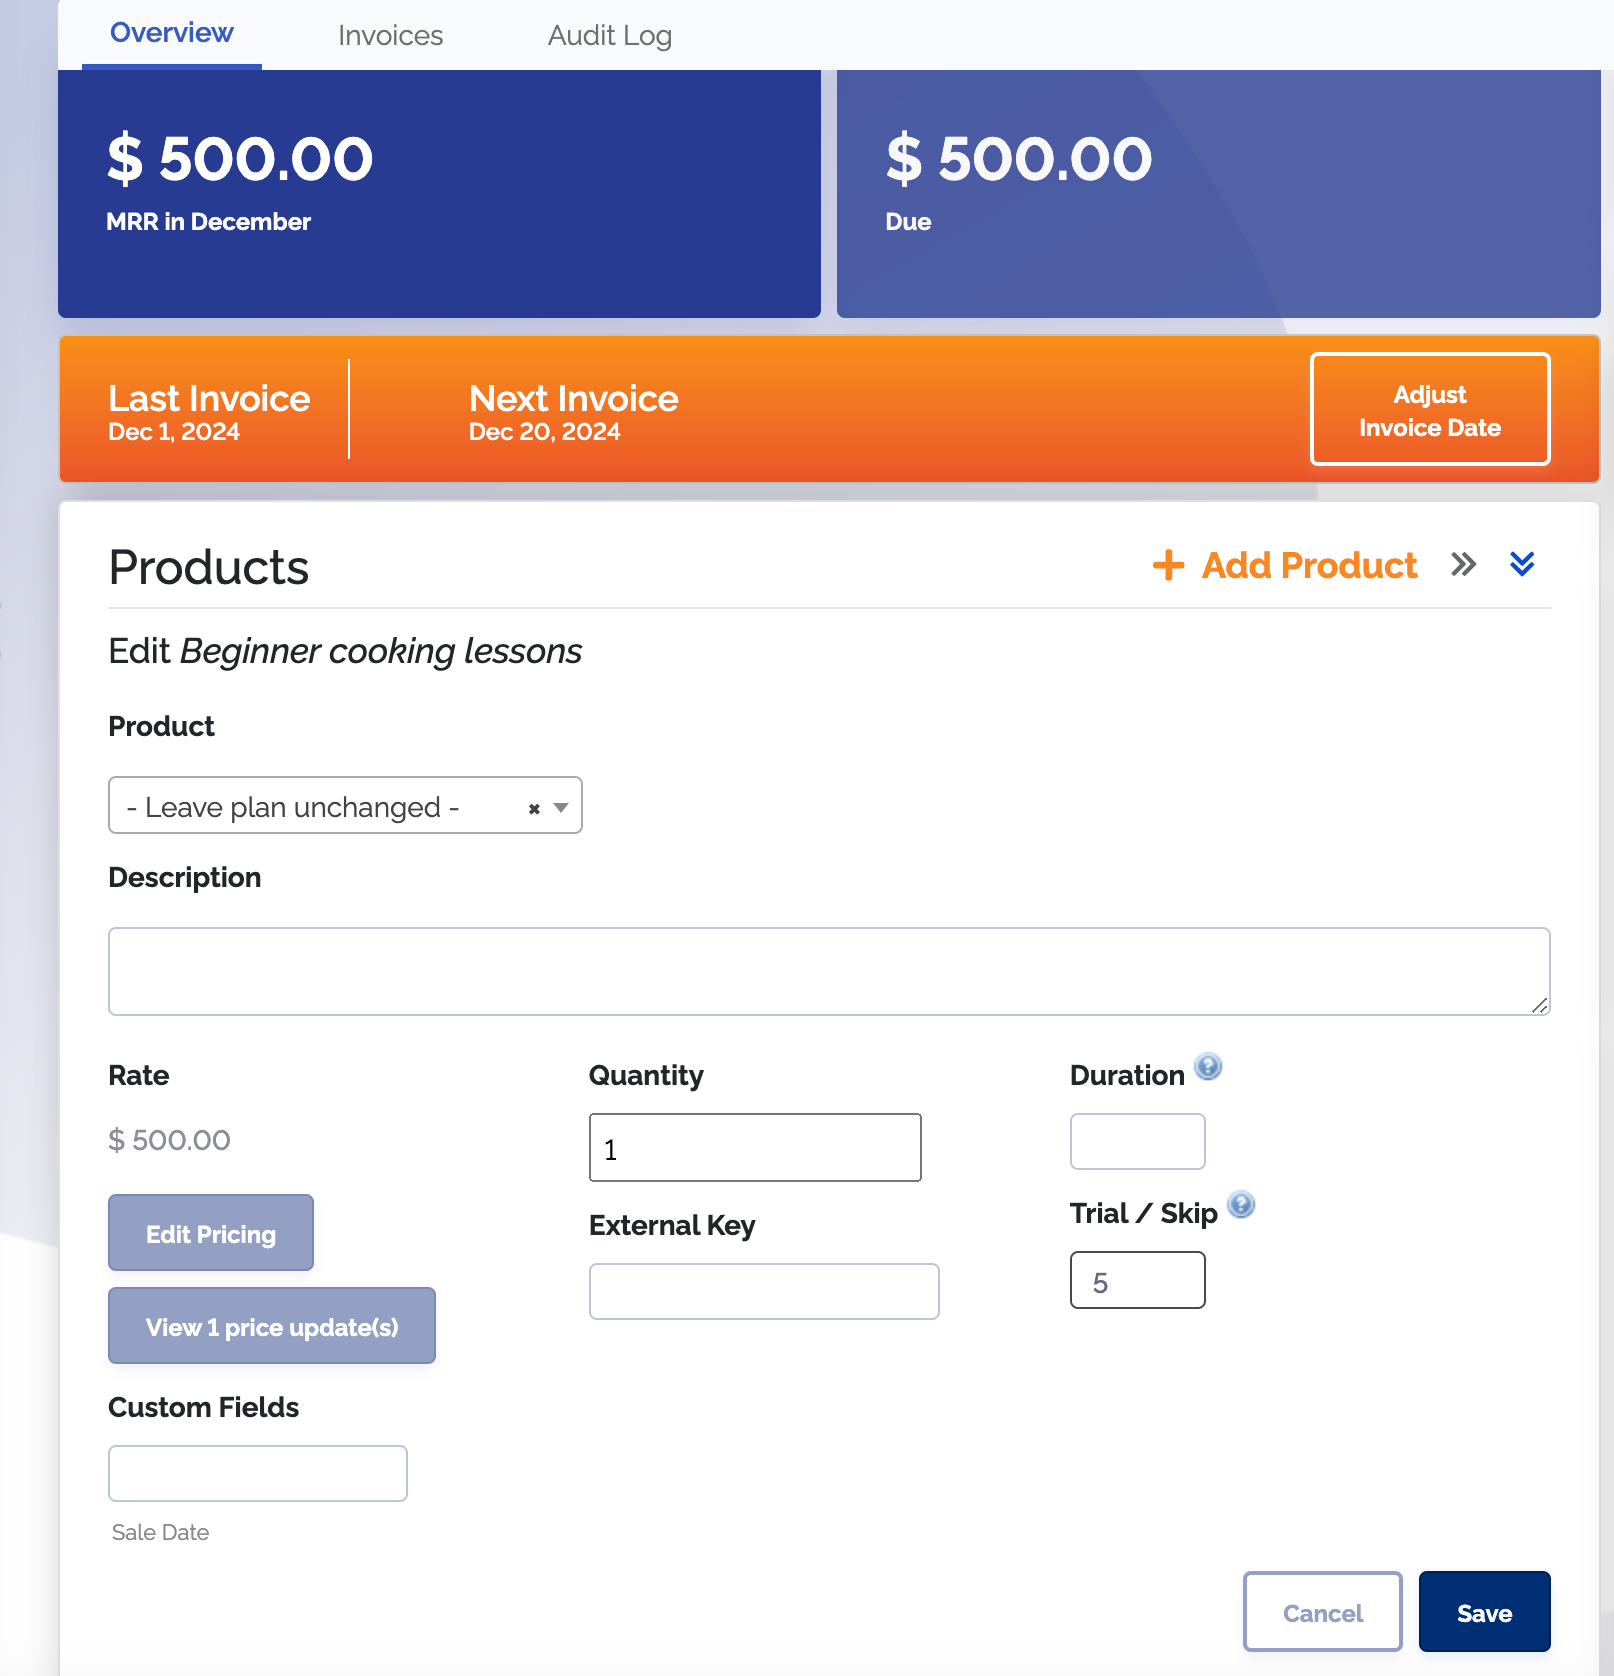
If you are adjusting the number of cycles to skip on an existing subscription that has already created invoices, you will need to calculate the number you enter into the box a little differently. First, go to the invoices tab attached to the subscription and count up how many invoices there are. Then add that number to the number of free payment cycles you want to give your customer.
For example, if an existing subscripiton has created three invoices already and you want to give your customer two free billing periods, you would enter the number five into the trial and skip box.
Make sure to save your changes after editing.
We recommend you check the invoice forecast after editing this field on an existing subscription, to ensure the customer will be billed the correct amount at the right time.
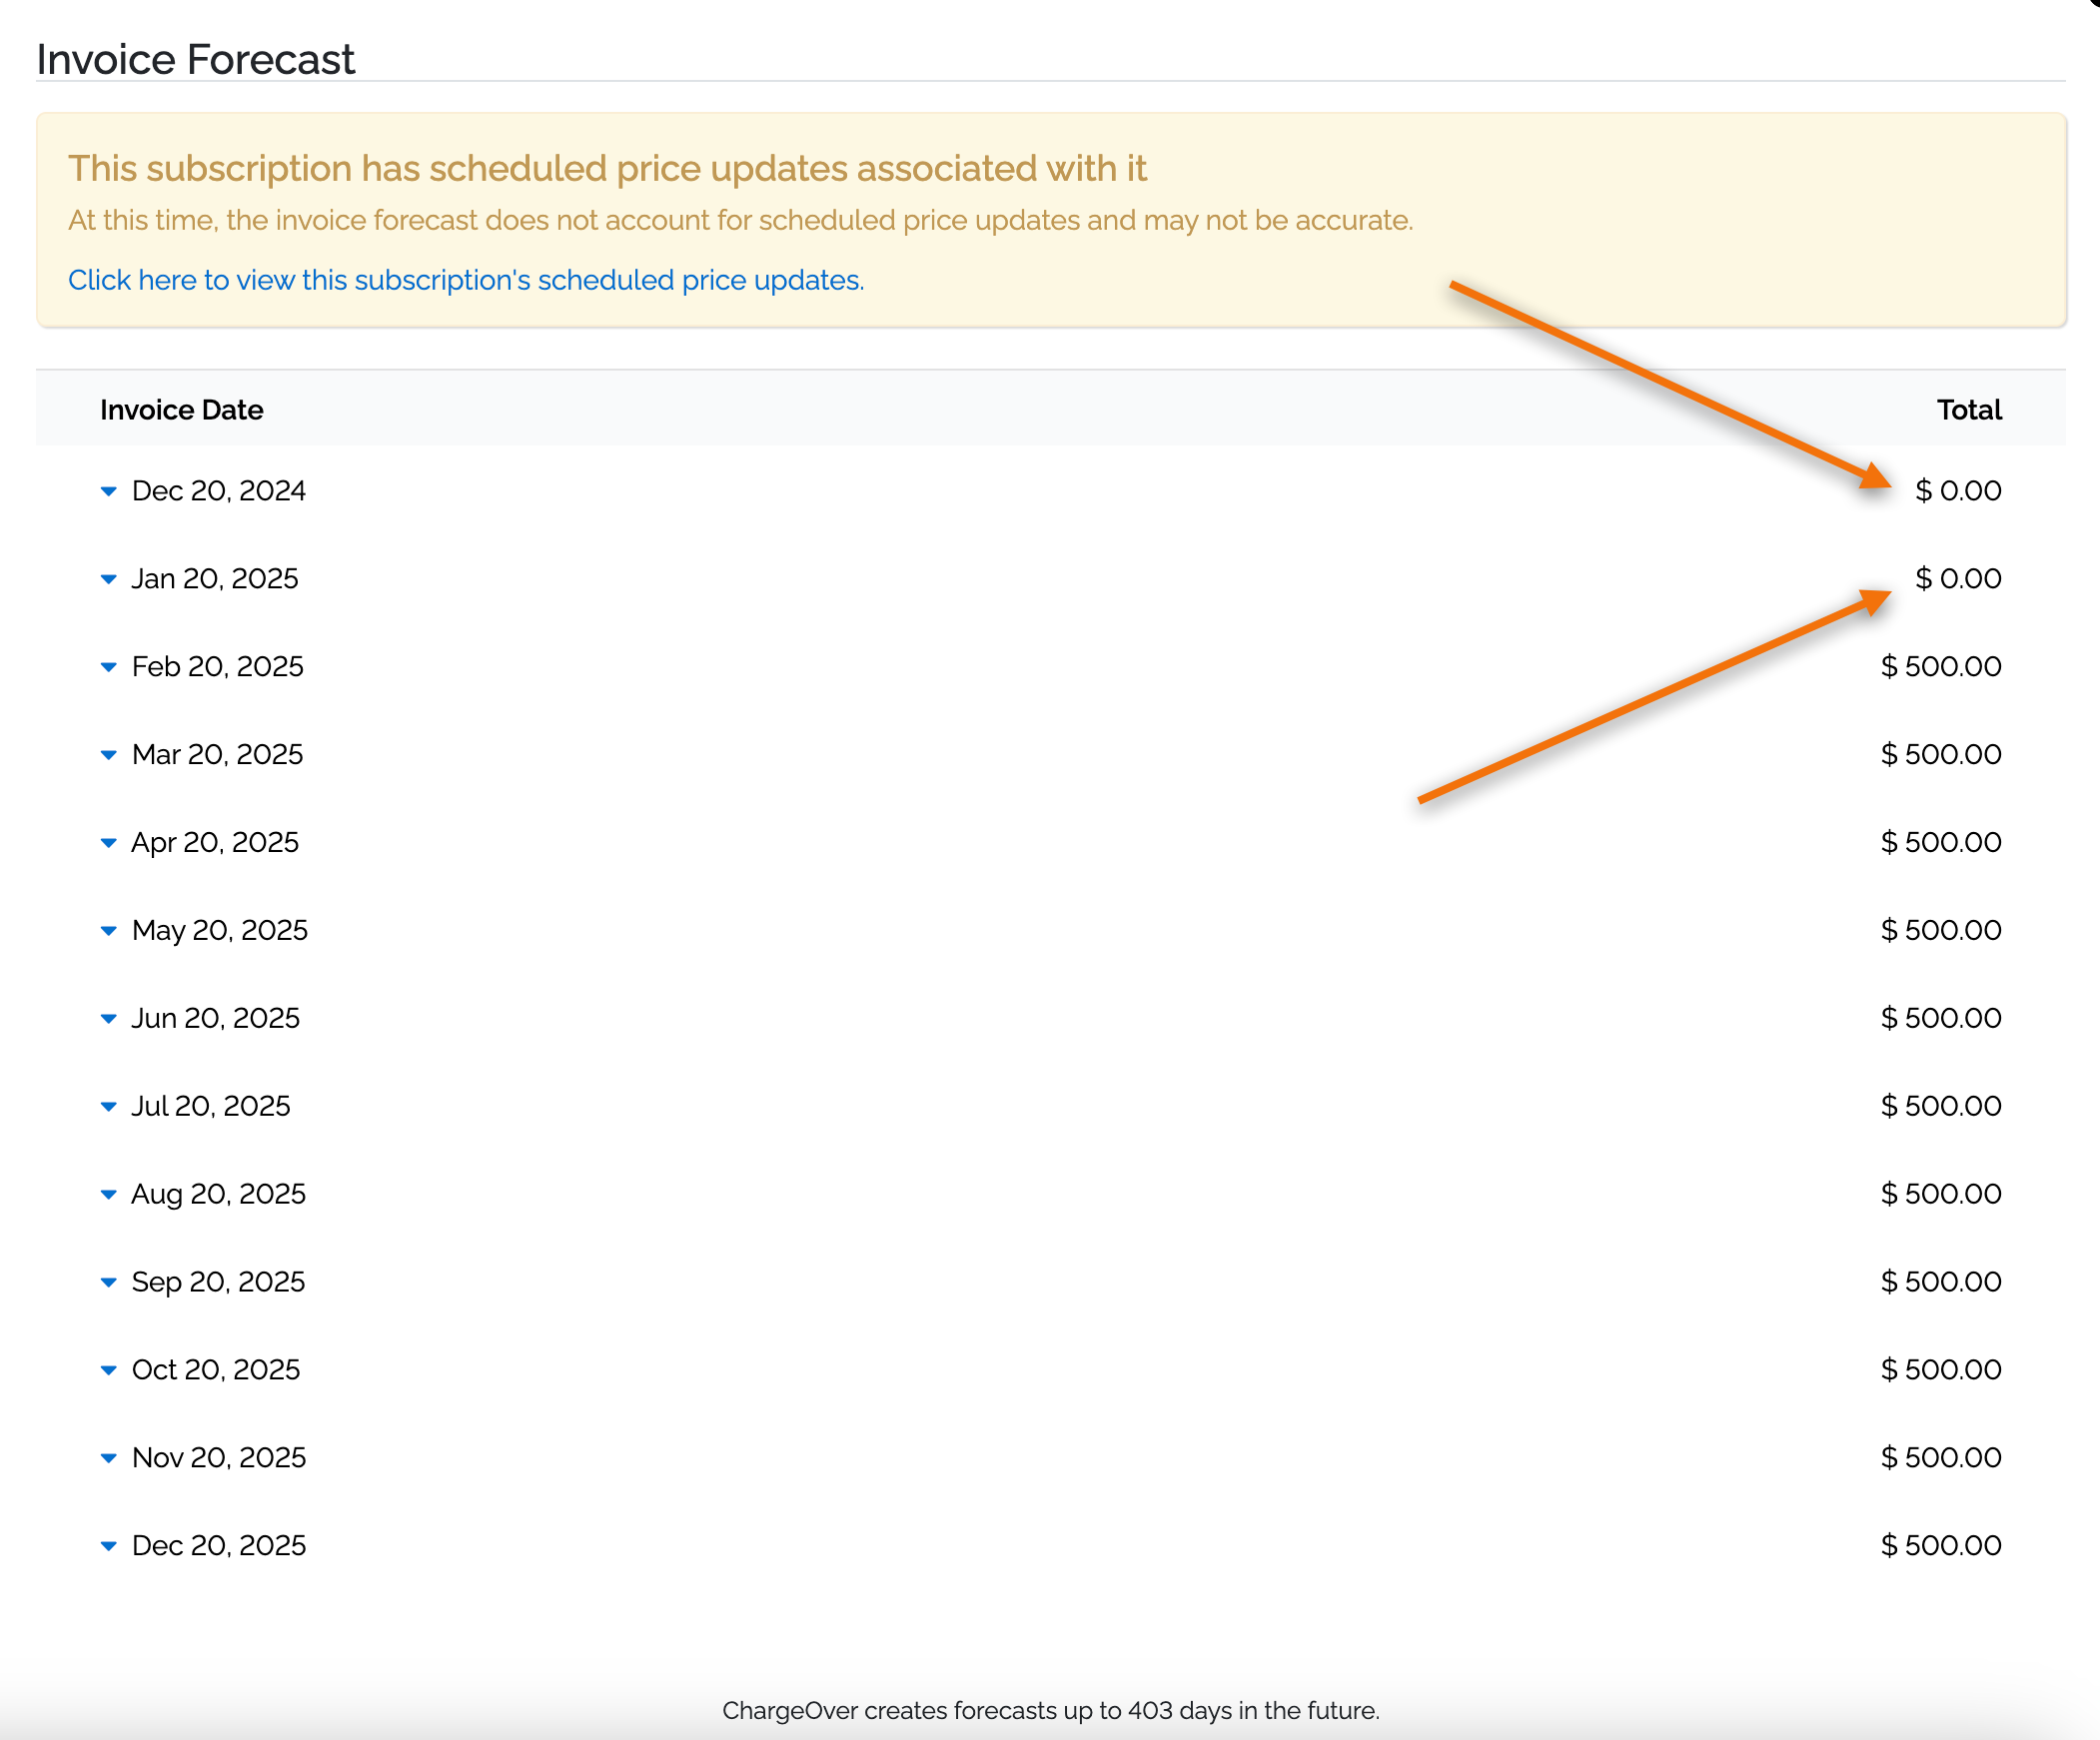
For products with no trial period, leave the trial and skip box blank. This means it will charge infinently while the subscription is active.
![]()
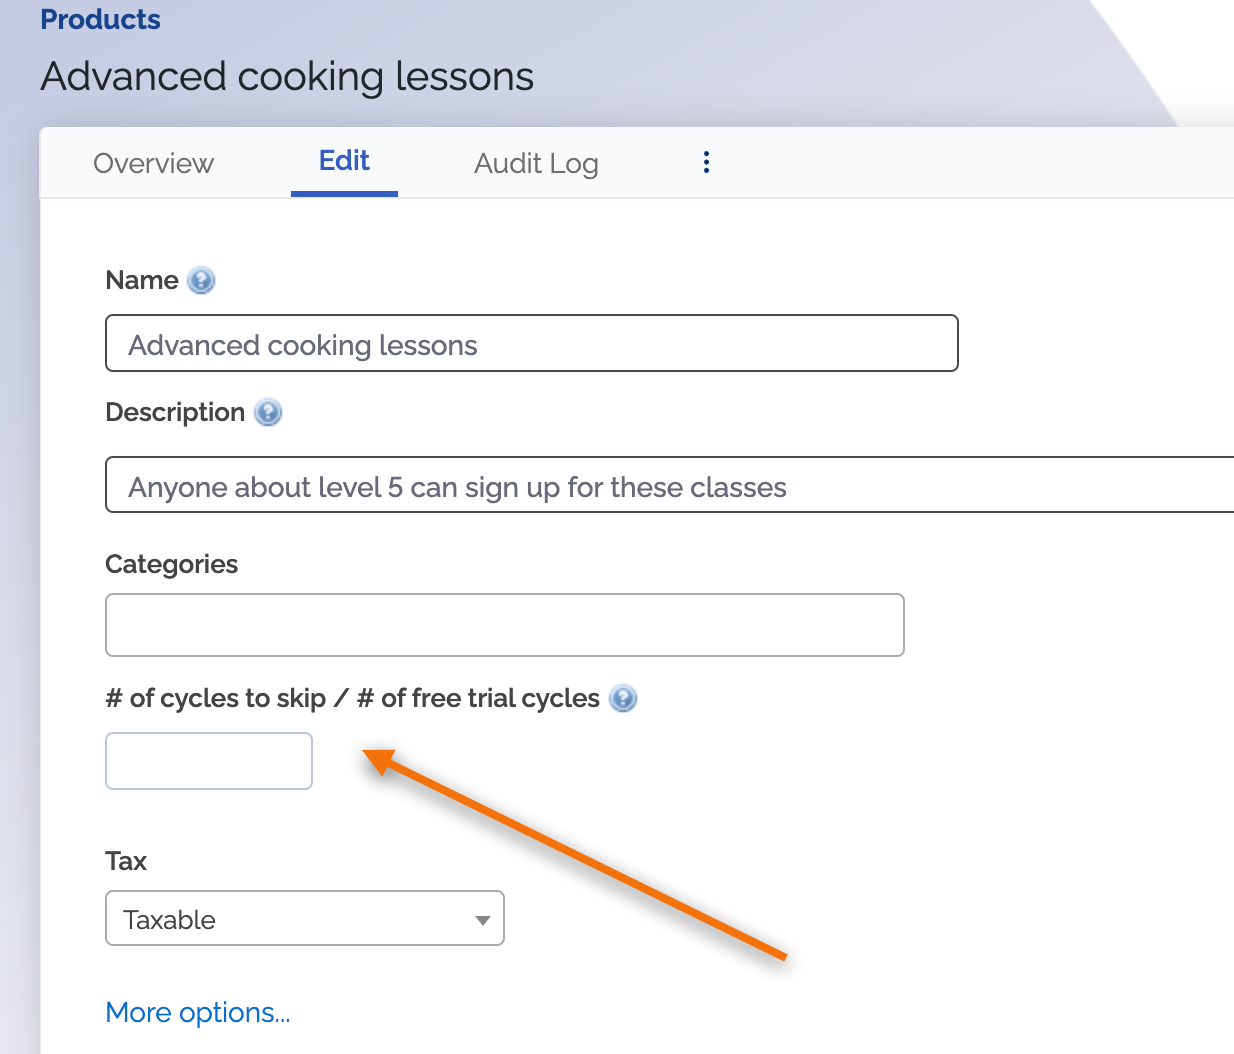
If you know you will be offering a free trial period for a certain product all the time, you can set that product with an automatic trial cycle. Go to your Products tab and edit the product. Then set the number of trials and skips within the box. In this way way, anytime that product is added to a subscription, it will auto-apply the trial cycles to upcoming invoices for that line item.
Duration
Use the duration box field when you want to cancel a product after so many billing cycles. A common use case for this field is when you want to have a subscription run only once and then stop.
To find the duration field, you can go under any product and click the
Using the duration field
If you are creating a new subscription that has not created any invoices yet, you can enter in the number of payment cycles you want the product to run for until it stops charging. For example, if you want to stop a subscritpion after two billing cycles, you will enter a two into the duration box.
If you are adjusting the duration on an existing subscription that has already created invoices, you will need to calculate the number you enter into the box a little differently. First, go to the invoices tab attached to the subscription and count how many invoices there are. Then add that number to however many more billing cycles you want to charge the customer for.
For example, if an existing subscripiton has created two invoices already and you want to charge the customer for one more billing period, you would enter the number three into the duration box.

After you set the field, you should see the number of times the product will recur, like this.
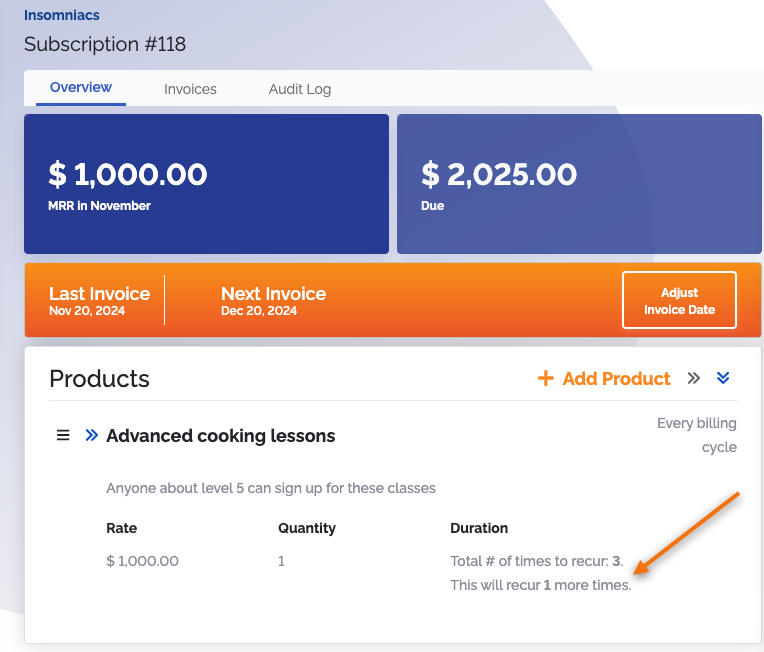
We recommend you check the invoice forecast after editing this field on an existing subscription, to ensure the customer will be billed the correct amount at the right time.
Commodity codes for level 3 processing
ChargeOver can send additional data to some payment gateways to unlock lower interchange fees and lower transaction risk, via level 3 and level 2 processing.
Generally, you'll need to set a Commodity Code for each product to take advantage of lower rates:
- Talk to your payment processor, and make sure that they support level 3 processing first
- For each product, look up your commodity code (a common resource is https://www.naics.com/search/)
- In the More options... section in ChargeOver, set the commodity code

Disable a product
If you have a product you no longer need to use, you can disable the product. Disabling the product does not delete it, but it does make it so that it cannot be used on new invoices or subscriptions.
- Go to your Products list and select the one you want to disable
- Select the three vertical dots and then click "Make Inactive"
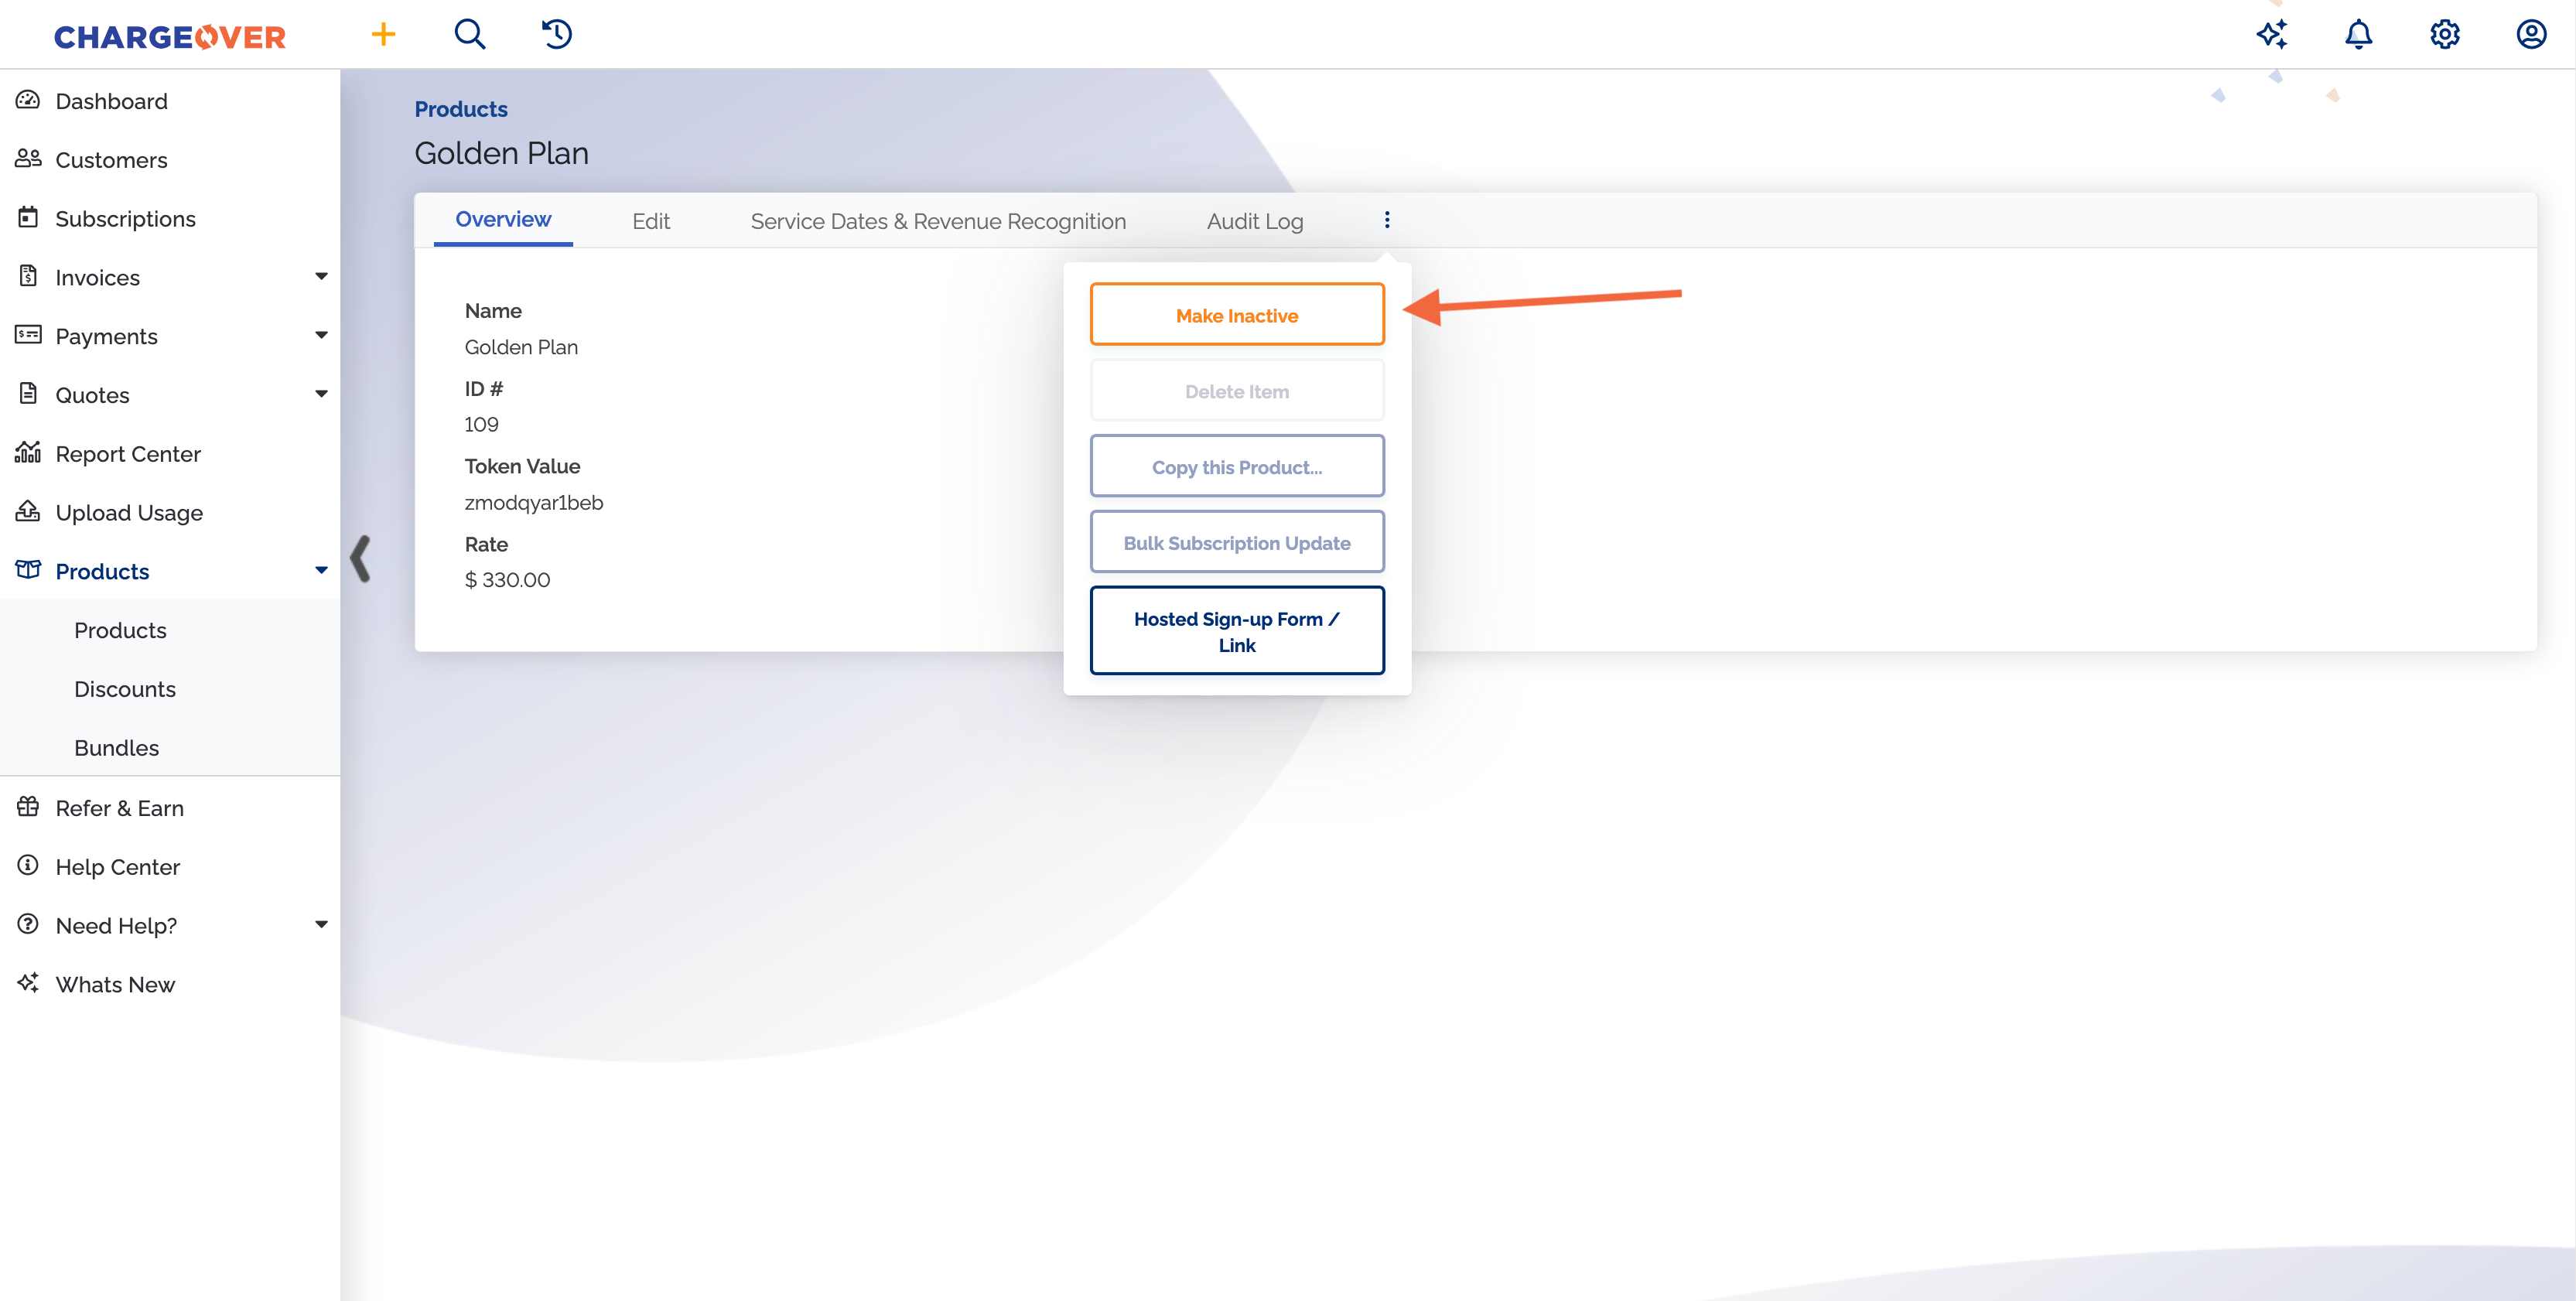
Now that the product has been disabled, you will not be able to create any new subscriptions with that product.
Subscriptions already in use with the product will continue to be charged and will not be affected.
Keep in mind
- You can re-enable a disabled product at any time by following the same steps above
- Once a product has been re-enabled, you can use it on invoices and subscriptions again
- Products can only be disabled if they've been used on an invoice or subscription at least once. Click here to learn how to delete a product
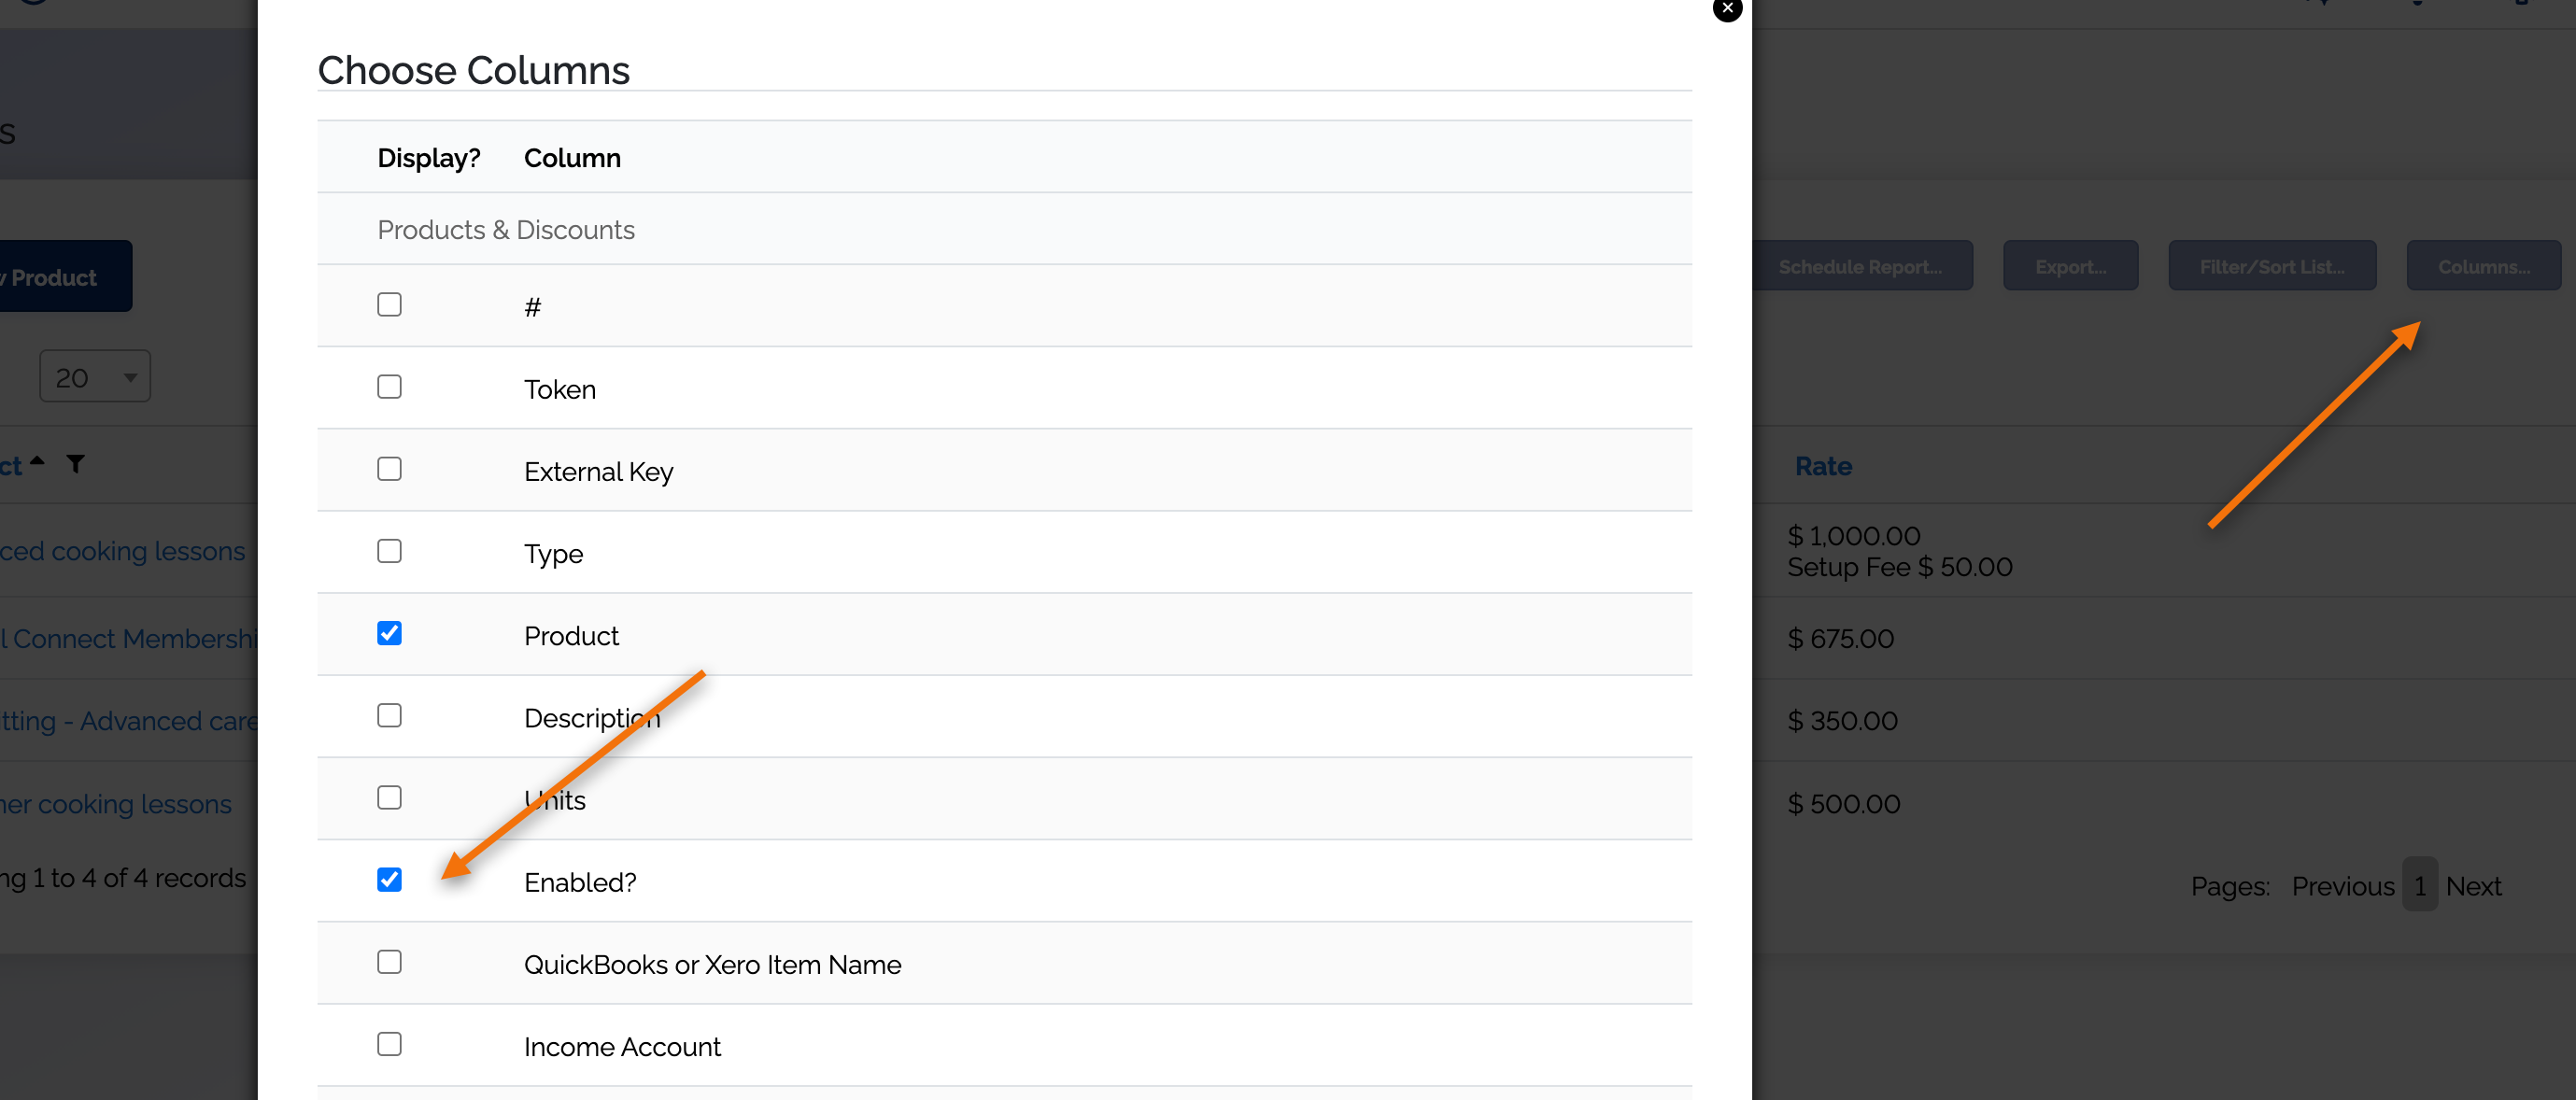
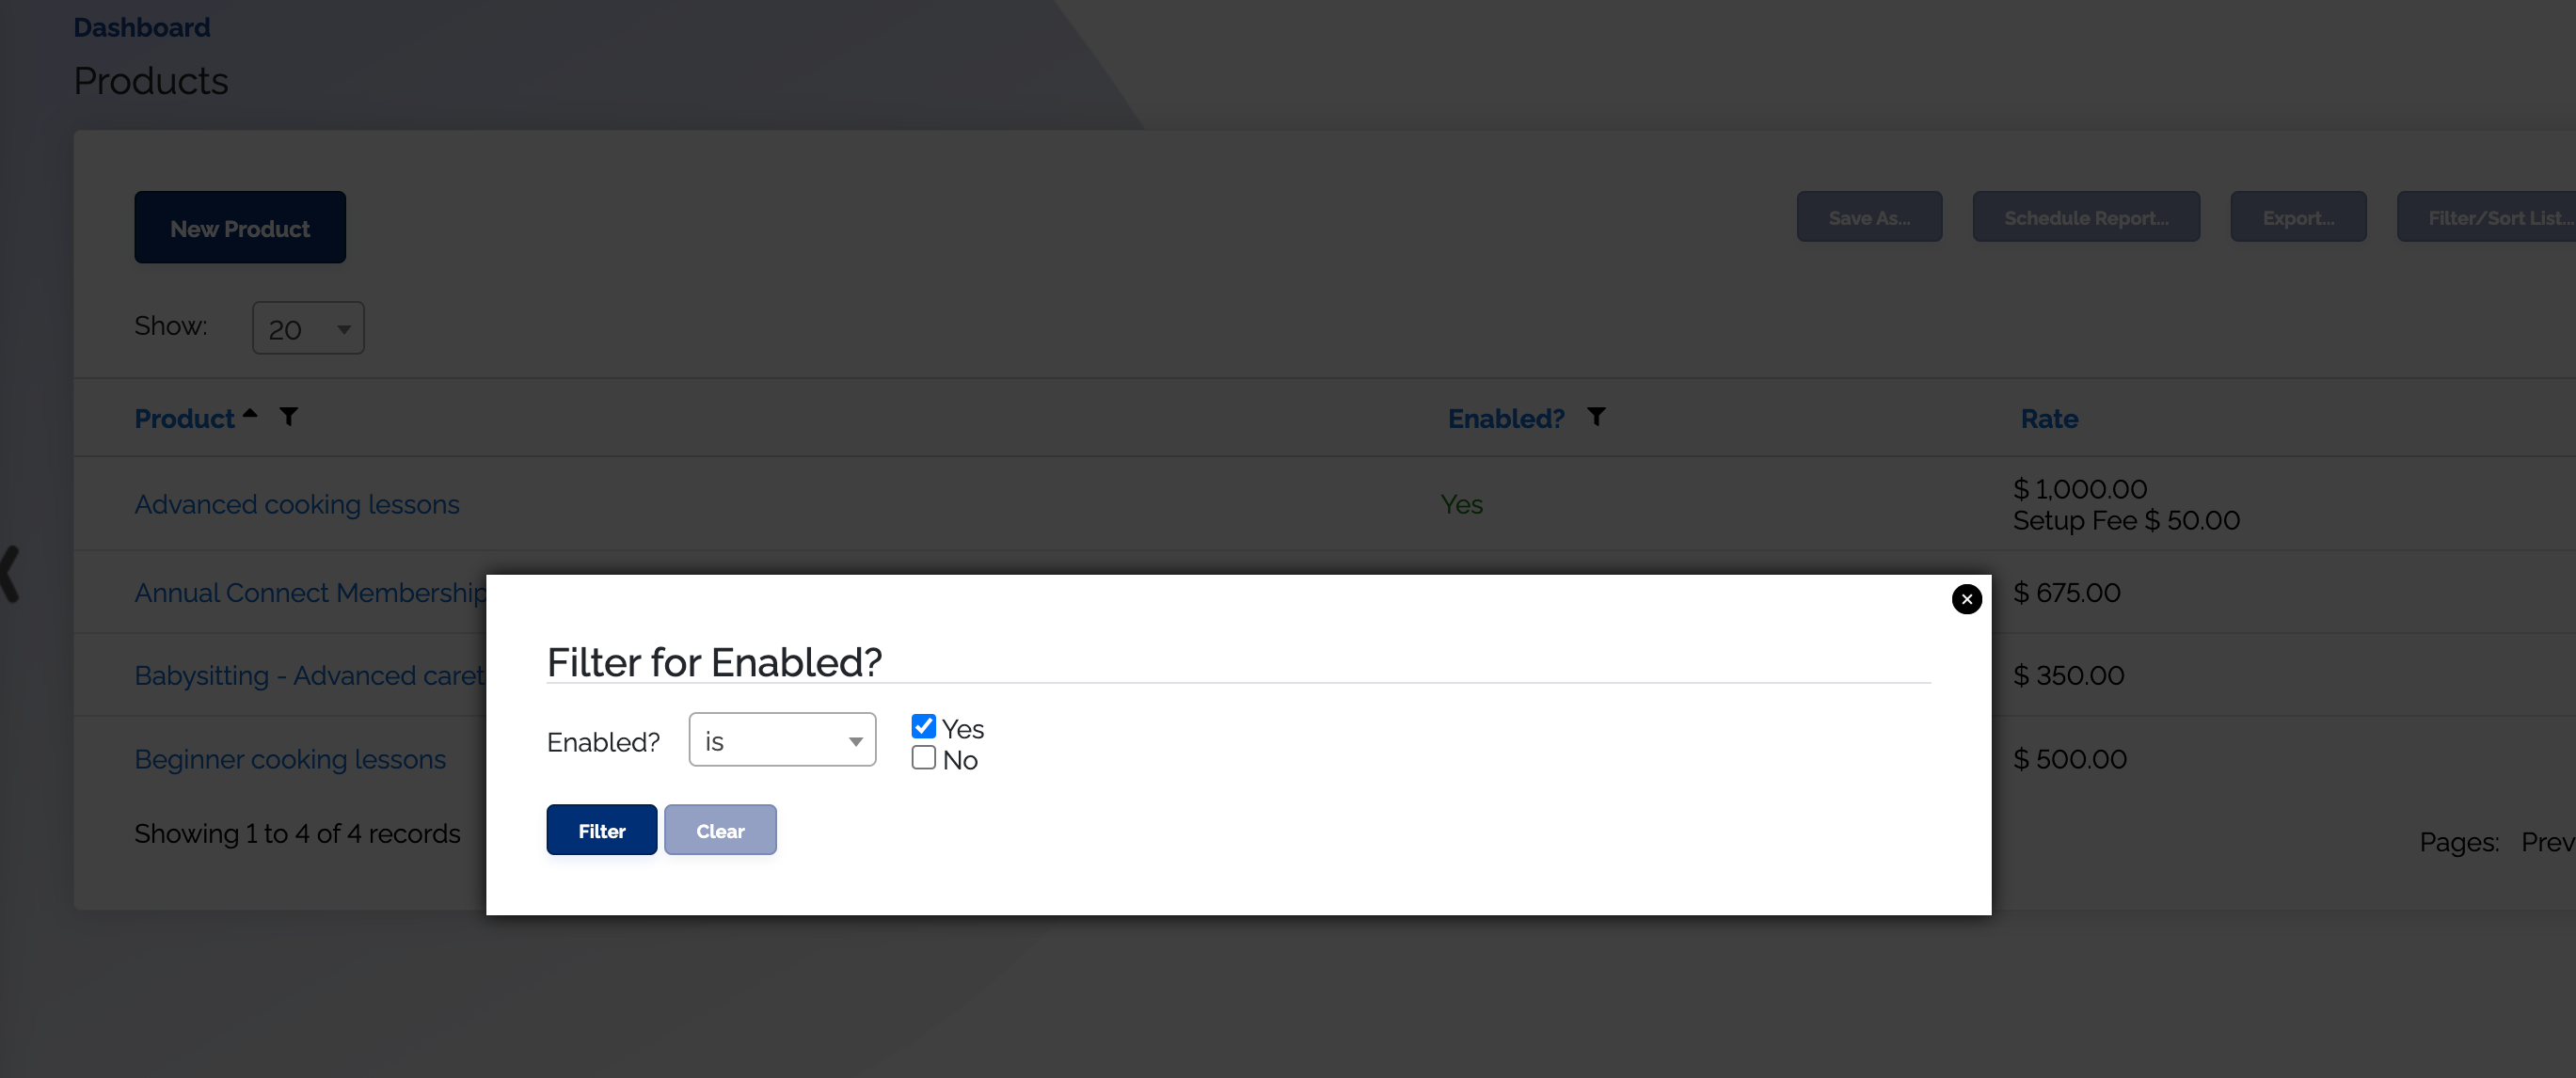
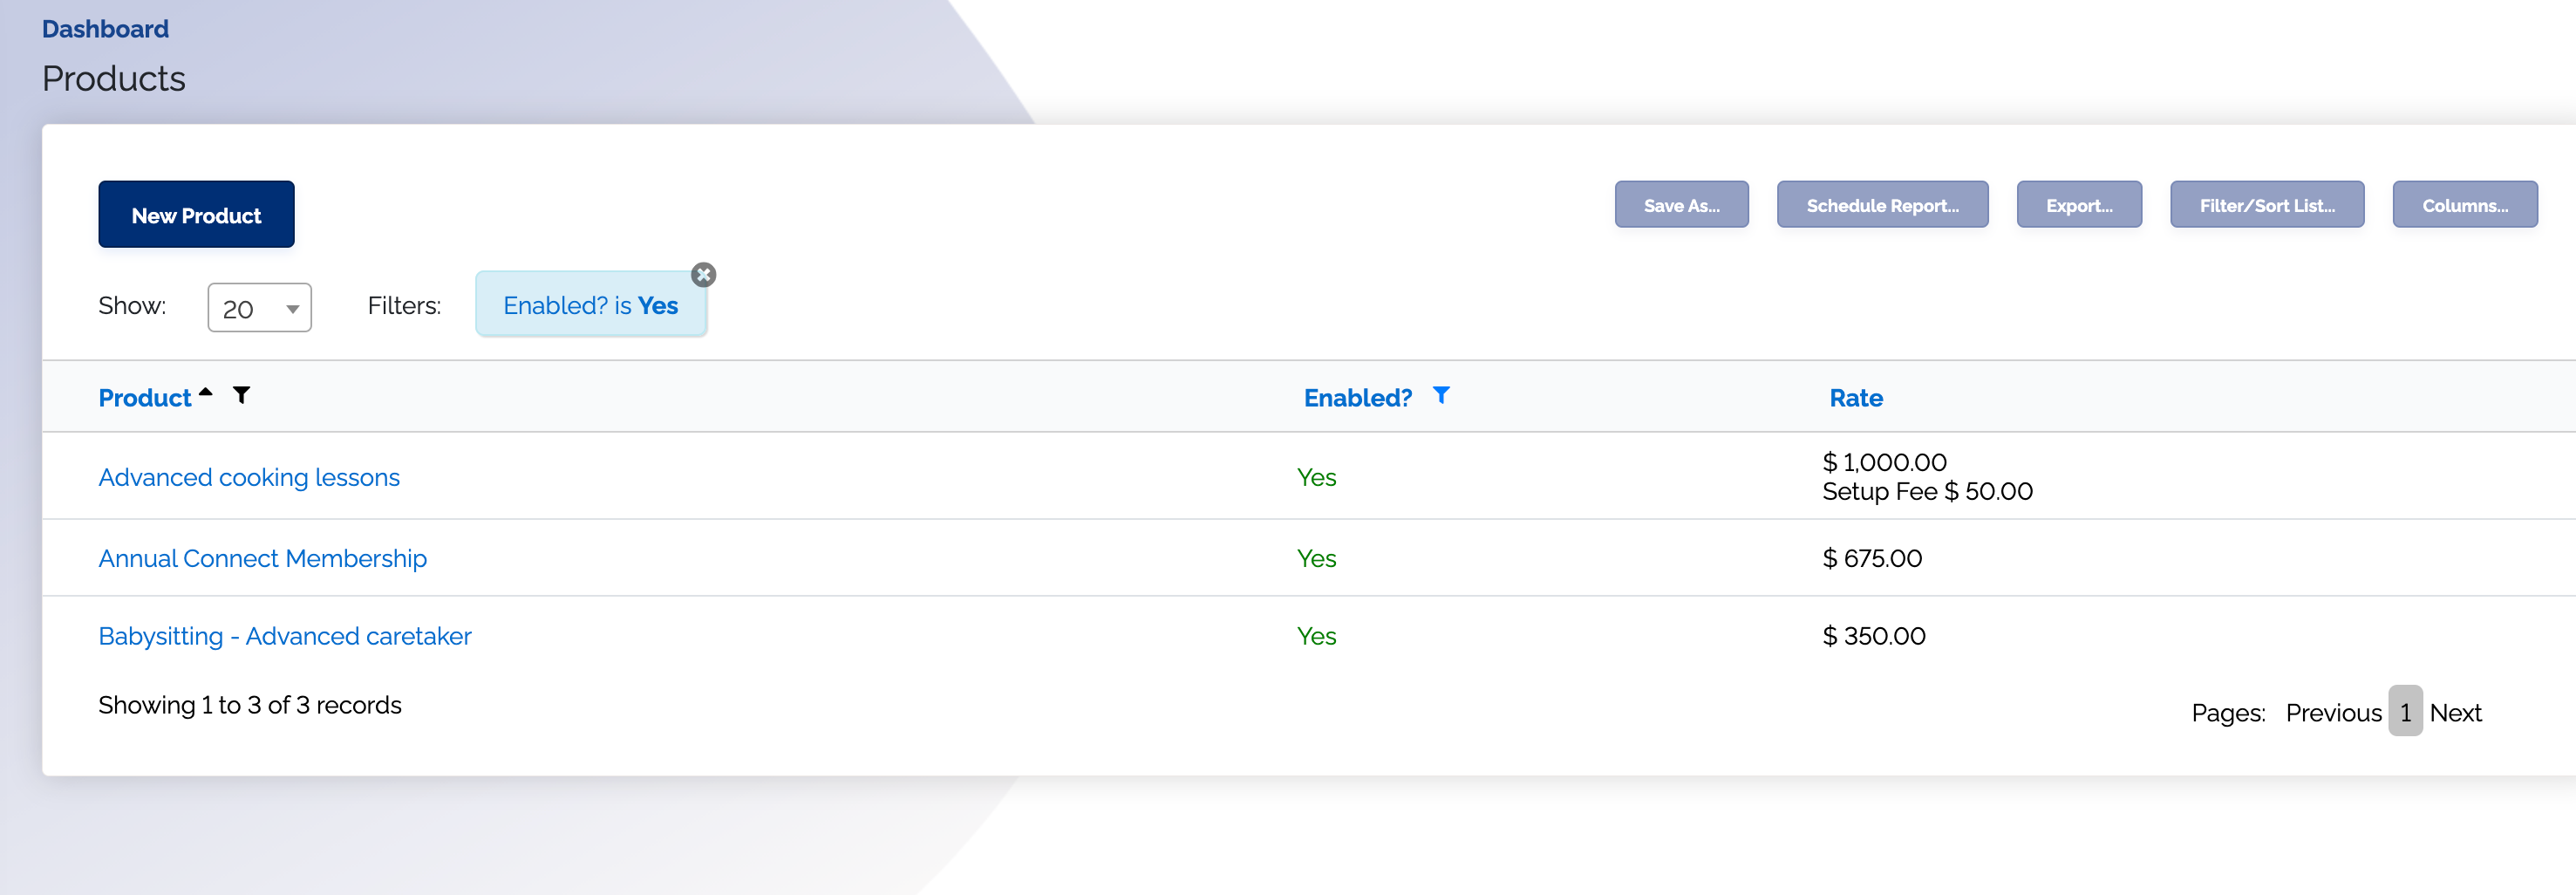
Archive or hide disabled products
You can utilize our reporting features to hide disabled products from your products tab.
Make sure you have the column 'Enabled?' added. Then click the black filter button and filter by 'Enabled' status. Make sure to
Delete a product
If you've created a product a no longer have a need for it, you can delete the product so that it is no longer listed.
Products in ChargeOver can only be deleted if they have never been used in an invoice or subscription. Otherwise, the option to delete the product will not be available and you will only have the option to disable.
Steps
- Go to your list of Products and select the item you want to delete
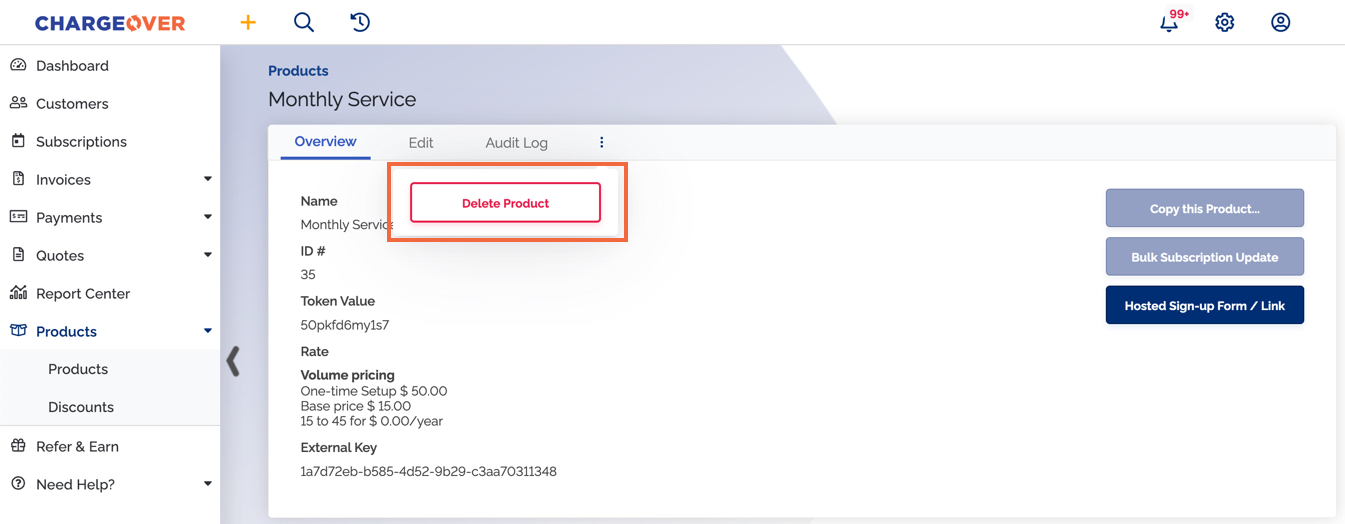
- Select the three vertical dots
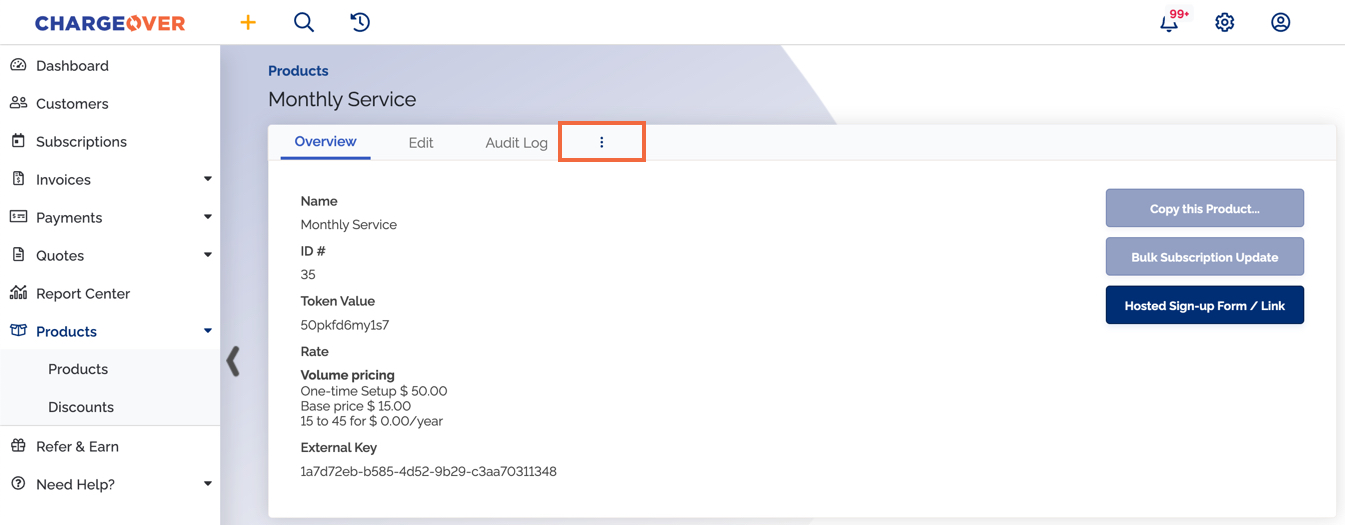
- Click the red
Delete Product button
Keep in mind
- If you're not seeing the option to delete, that means the product has been used at least once on an invoice or a subscription
- Once the product is deleted, it cannot be retrieved. You can simply recreate the product if needed
- If you're using the add on, hosted sign-up pages, the link to the sign-up page will no longer be active
If you run into any issues or have any further questions, please don't hesitate to reach out.