QuickBooks Online

Overview
Connecting to QuickBooks Online enables automatic syncing of customers, invoices, payments, refunds, and more from ChargeOver to QuickBooks Online.
Customers
The new customer’s information is entered into ChargeOver directly or automatically through web forms or the API.
ChargeOver pushes the new customer’s information to QuickBooks automatically -- details include contact name, company, email address, phone number, address, etc.
Quotes
ChargeOver pushes the quote with detail to QuickBooks.
This includes all fields such as individual line items, descriptions, rates, quantities, discounts, dates, custom fields, classes (if used), net terms and more.
Invoices
ChargeOver invoices or bills customers according to your instructions. We also push the invoice (with detail) to QuickBooks. These details include all fields, such as sales tax, line items, quantities, rates, and discounts, dates, and more.
If you void the invoice, we will sync the void status over to QuickBooks and if you unvoid the invoice, we will NOT sync the updated status.
For the status of an unvoided invoice to sync, you will need to manually update the invoice in QuickBooks.
Payments
When your customers make payments, ChargeOver notes the payment in ChargeOver as received. We then create the payment in QuickBooks.
Details of the transaction are synced over and include transaction numbers, date, amount, payment method (Visa, Mastercard, etc.), memo, etc.
ChargeOver also marks the invoice in QuickBooks as paid.
Refunds
If you unfortunately have to refund money to your customers, ChargeOver creates a refund in QuickBooks.
The refund syncs the standard transaction information. We also include any details that relate to how it has been applied in ChargeOver.
Credit Memos
Standalone credit memos created in ChargeOver can be synced to QuickBooks. Credit memos that are generated from refunds cannot be synced.
Learn more about syncing credit memos from ChargeOver to QuickBooks.
The process to transfer data from ChargeOver to QuickBooks Online is automatic. Data transfers automatically and instantly, as soon as you perform actions in ChargeOver.
Steps to Connect
This is a one-time setup process. Once you are connected, you won't have to do this again.
Within ChargeOver, go to your settings and click
Integrations on the left menu. SelectMore Integrations Find QuickBooks Online, and click the
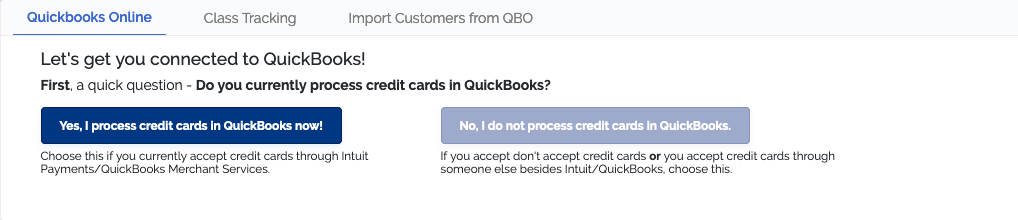
Get Started buttonYou'll be asked whether to connect to QuickBooks, or to both QuickBooks AND Intuit Payments
If you process payments using QuickBooks Payments then click "Yes, I process credit cards in QuickBooks now"
- If you DO NOT process credit cards in QuickBooks Payments, or if you want to use a different payment gateway/merchant account within ChargeOver, choose "No, I do not process credit cards in QuickBooks"
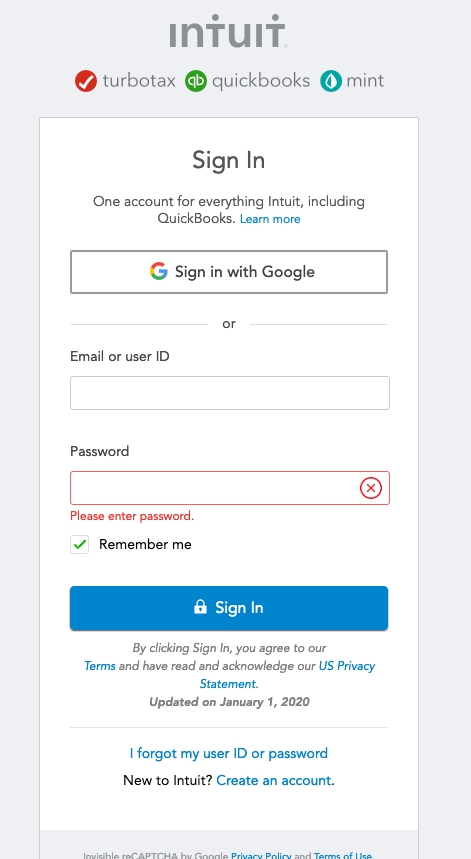
- If you are not already logged into QuickBooks, you'll be asked to log in
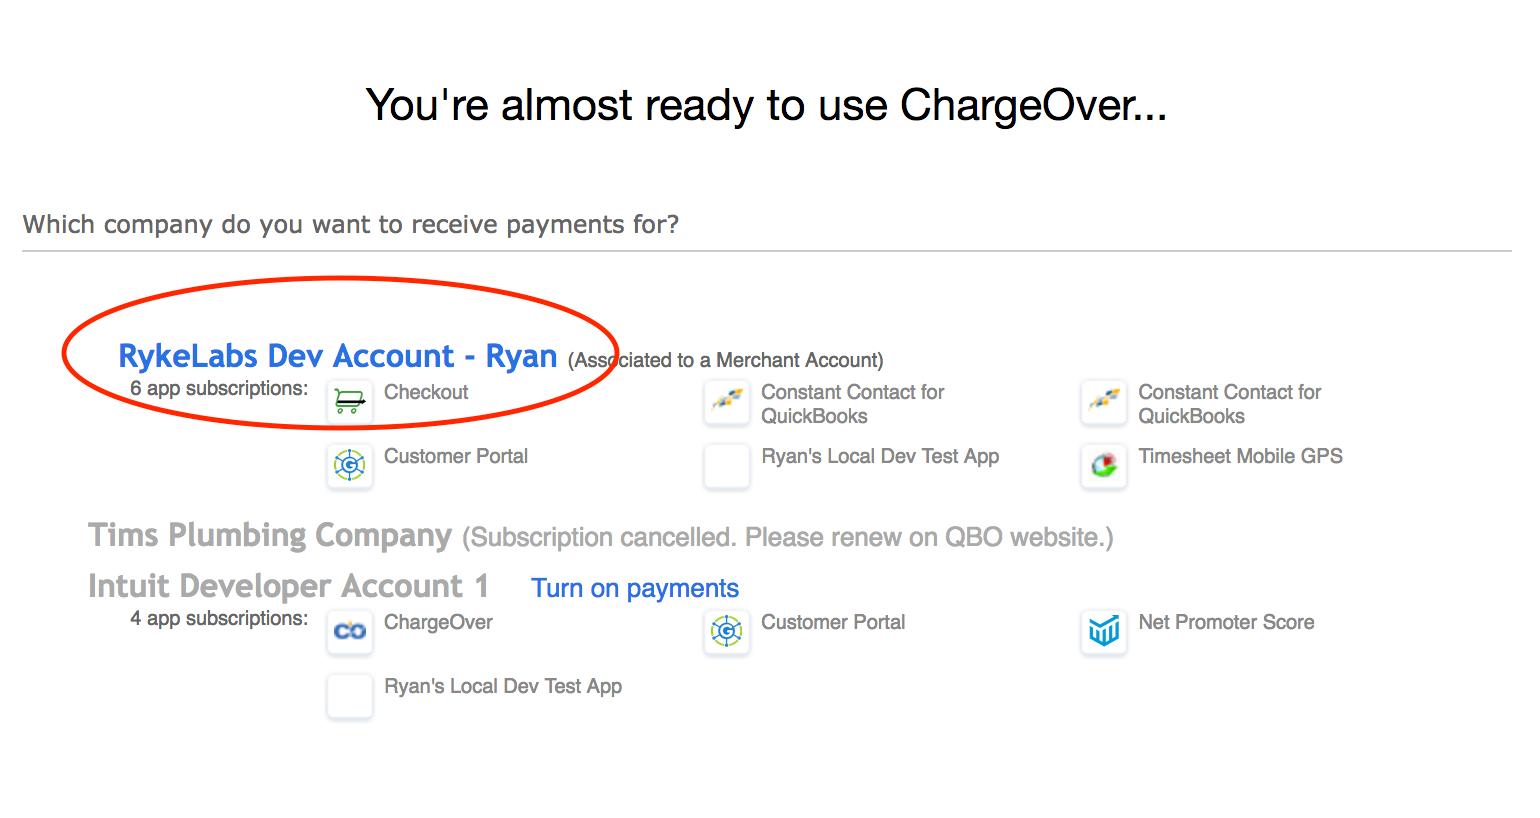
If you have more than one QuickBooks Online account, you'll be prompted to choose which QuickBooks Online account you want to connect to
If you are using QuickBooks Online Accountant edition, you will get a slightly different looking page.
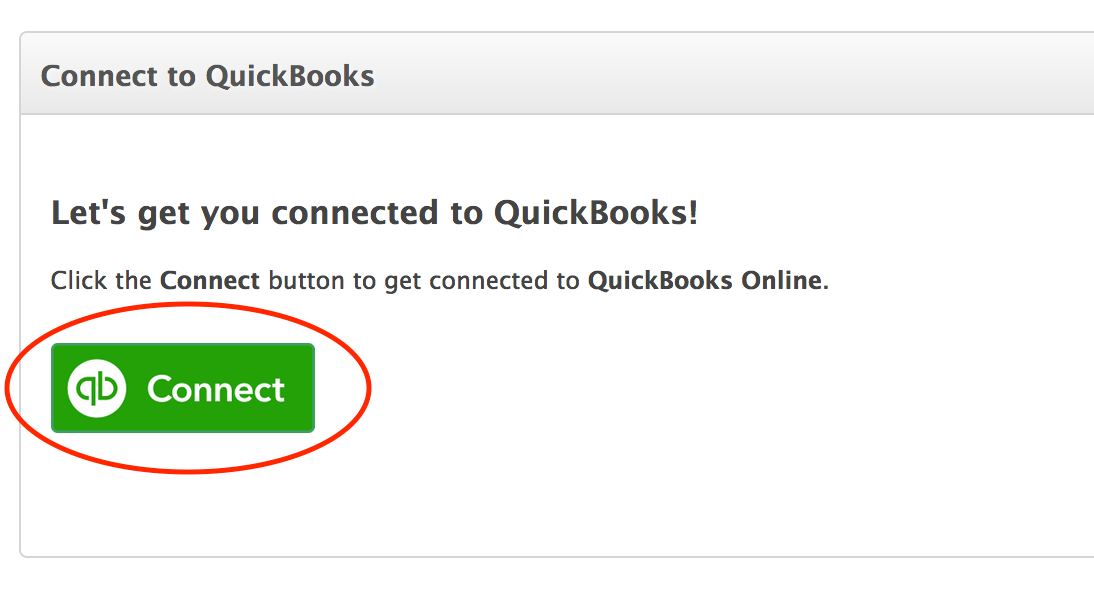
- You'll be asked to authorize access to QuickBooks Online. Click the
Authorize button
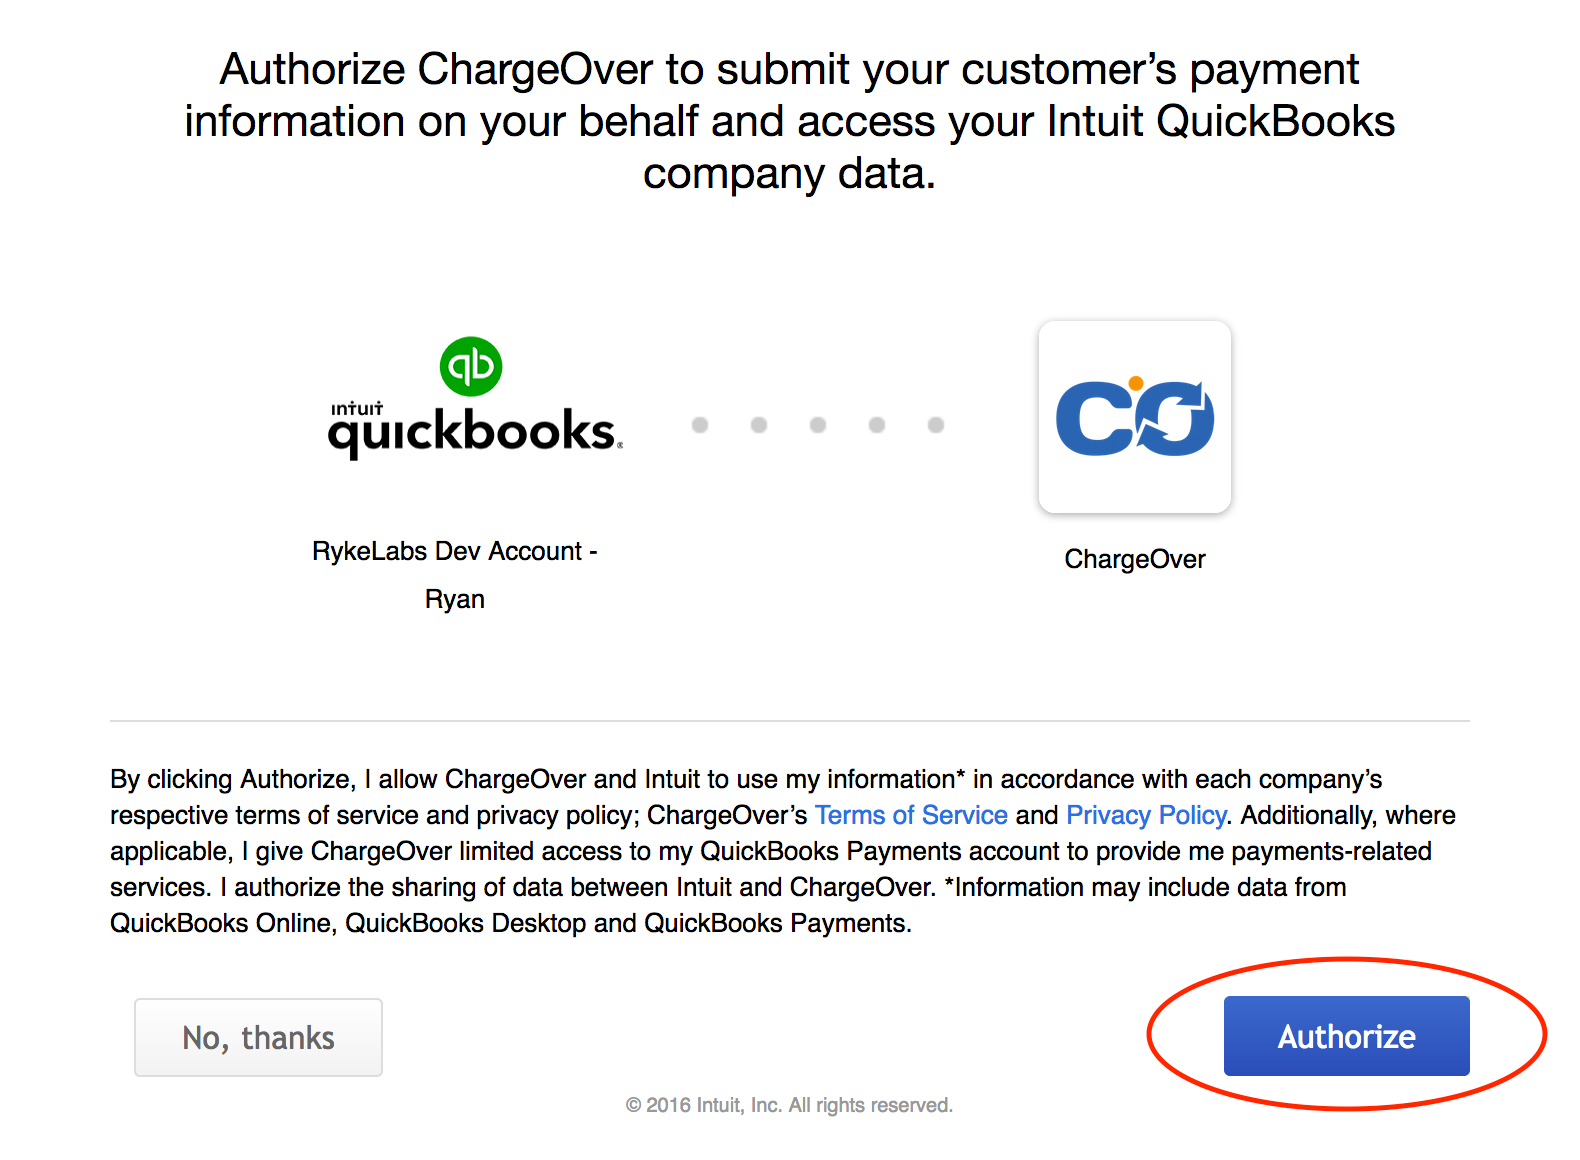
Wait for a minute, while QuickBooks and ChargeOver get connected
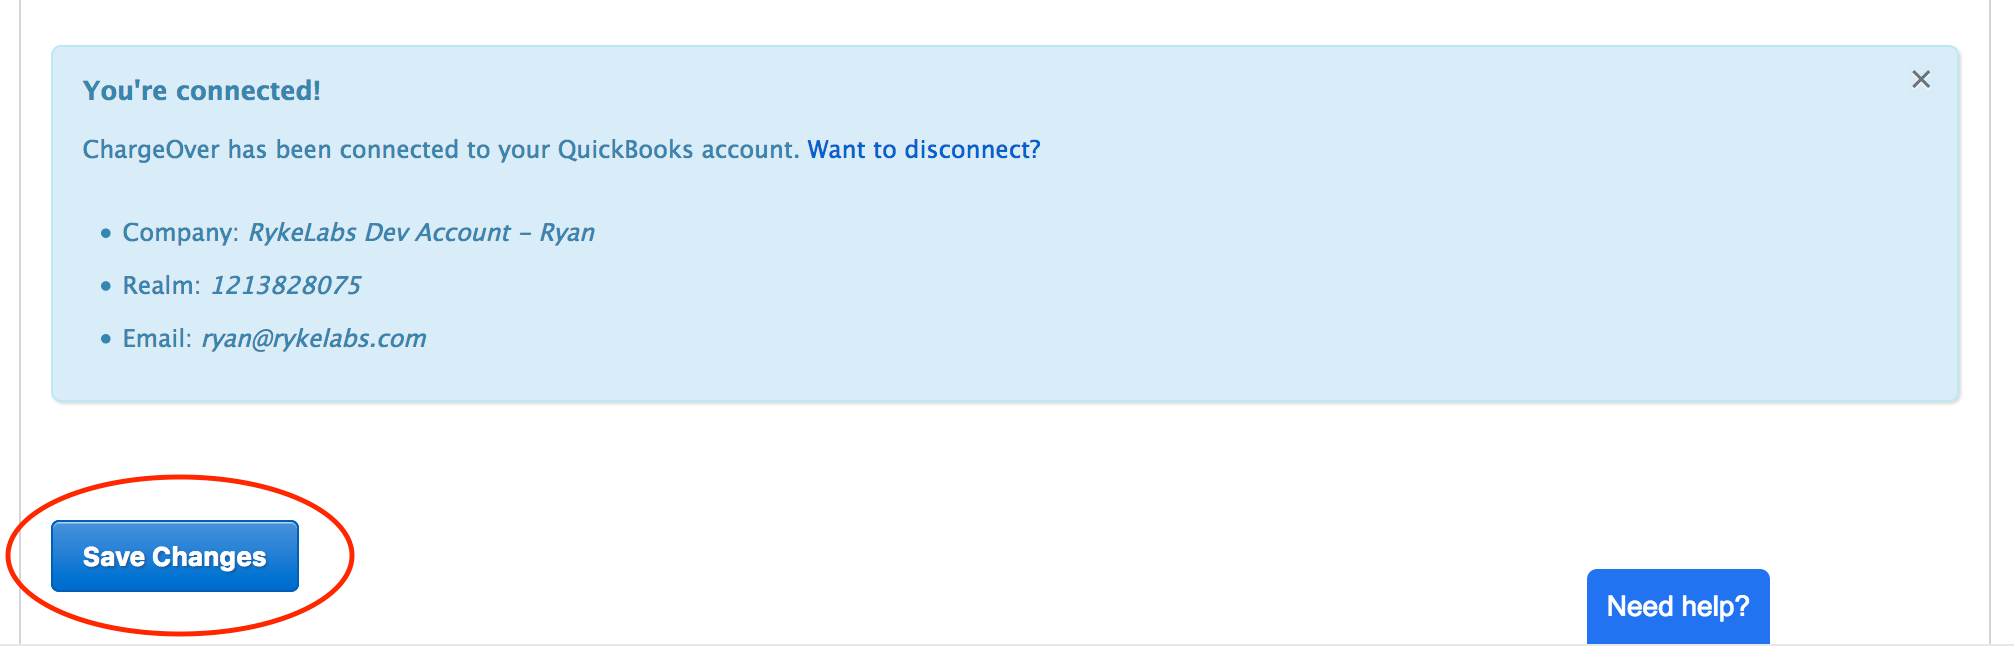
ChargeOver will show a confirmation message confirming your changes to QuickBooks Online
Click the
Save Changes button
Keep in Mind
Going forward, all NEW customers, invoices, payments, etc. will be synced automatically from ChargeOver to QuickBooks Online.
If you need help syncing EXISTING customers, invoices, payments, etc., from ChargeOver to QBO, please contact us for help.
If you need help IMPORTING your QuickBooks customers into ChargeOver, please jump to this section or contact us for help.
Class Tracking
Many business owners have certain segments of their business that they want to track. By using the class tracking feature, you can define these segments and track their associated account balances on invoices, bills and other documents.
Why Use it?
By assigning classes to transactions in QuickBooks (and ChargeOver) you can track account balances by department, business office or location, separate properties you own, or any other meaningful breakdown of your business.
Companies with different departments or locations can use classes to report account balances for each department.
For example, if you had a a company with three locations, you might create an Uptown, a Midtown and a Downtown class for tracking account balances by location.
A nursery might create a class for each enterprise – for example, Trees, Plants, and Accessories. At the end of an accounting period, the company could create separate reports for each location. Likewise, the nursery could create separate reports for each enterprise.
New classes that are added to QuickBooks can take up to an hour to sync over to ChargeOver.
Enable Class Tracking
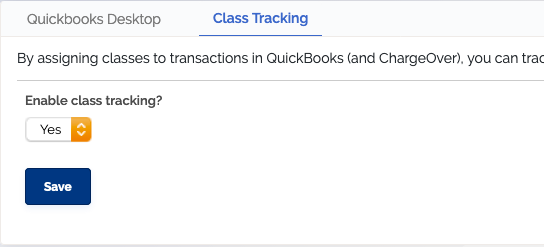
- Go to your Settings and select
Integrations then [QuickBooks Online] from the left side menu - Find the Class Tracking tab and Set the "Enable this feature?" option to "Yes"
- Click
Save
Once you have enabled classes in your account and connected ChargeOver to QuickBooks Online, your classes in QuickBooks will automatically carry over to ChargeOver.
Adding or Updating Classes
Classes must be added or updated in QuickBooks. If you add or update classes in QuickBooks, the changes will sync to ChargeOver within 24 hours.
Mapping ChargeOver Products to QuickBooks Online
By default, ChargeOver maps products in ChargeOver to your Product and Service list in QuickBooks Online.
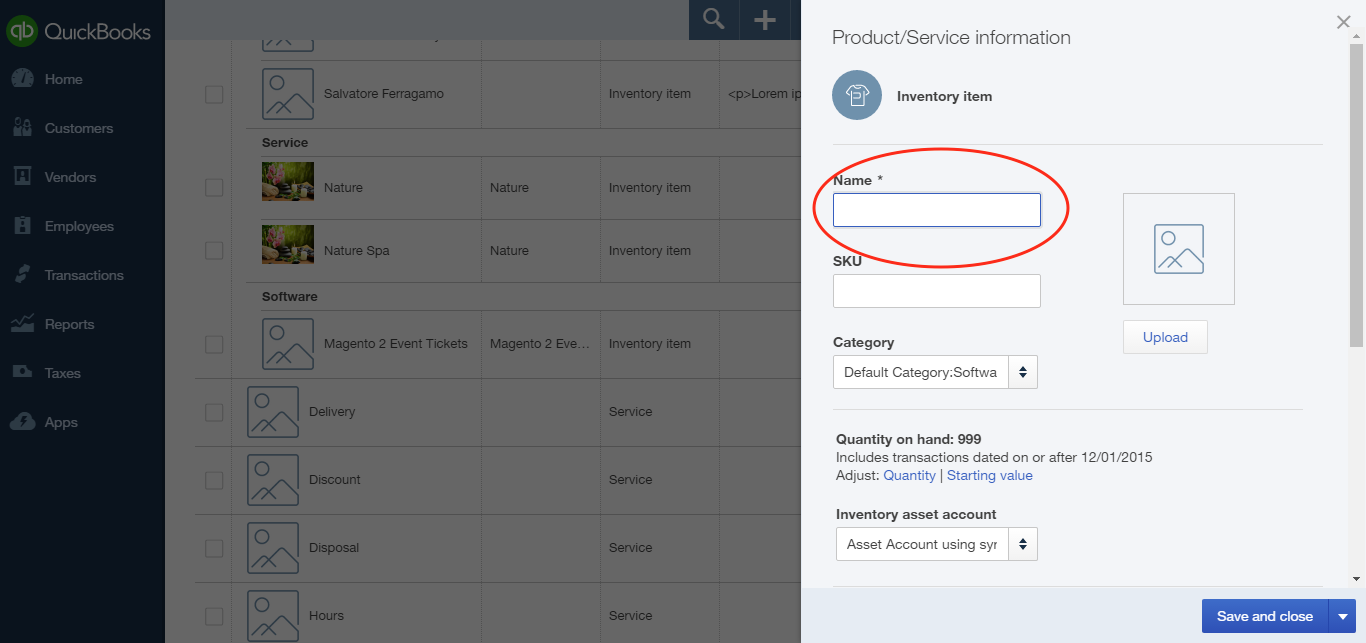
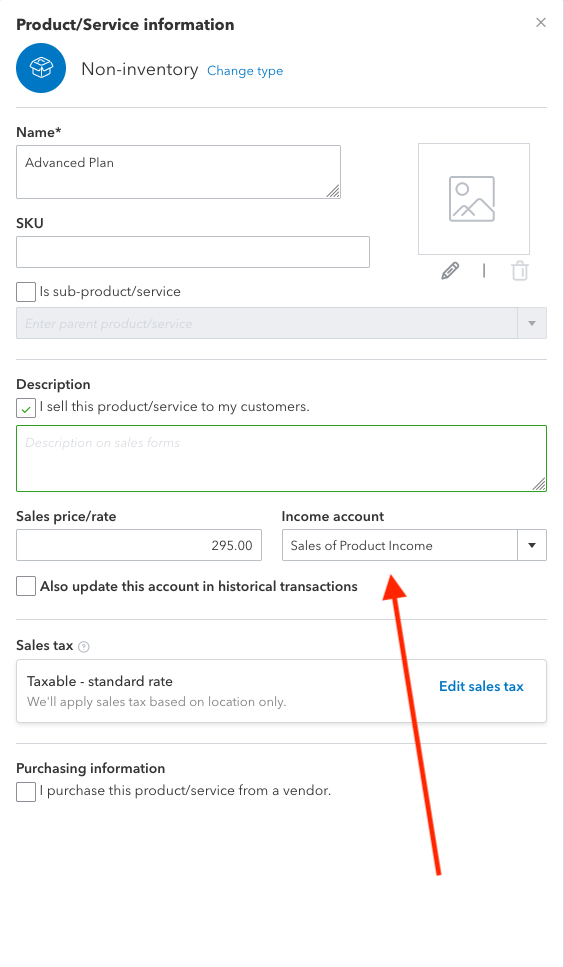
ChargeOver looks for a QuickBooks product/service with the same Name as the name listed in ChargeOver. If a product or service does not exist in QuickBooks, ChargeOver will create it automatically.
For example, this
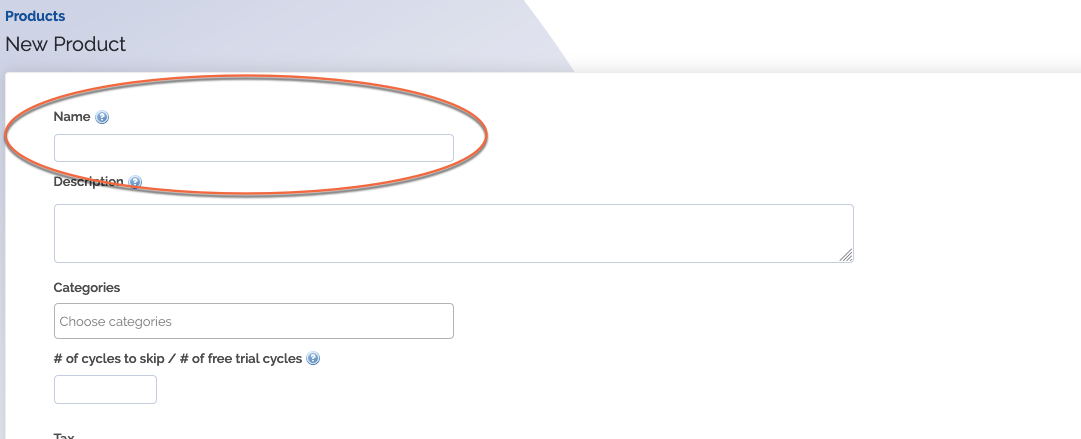
Should match this
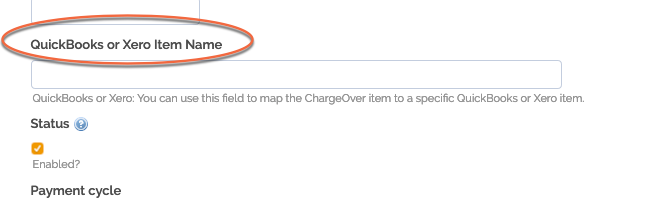
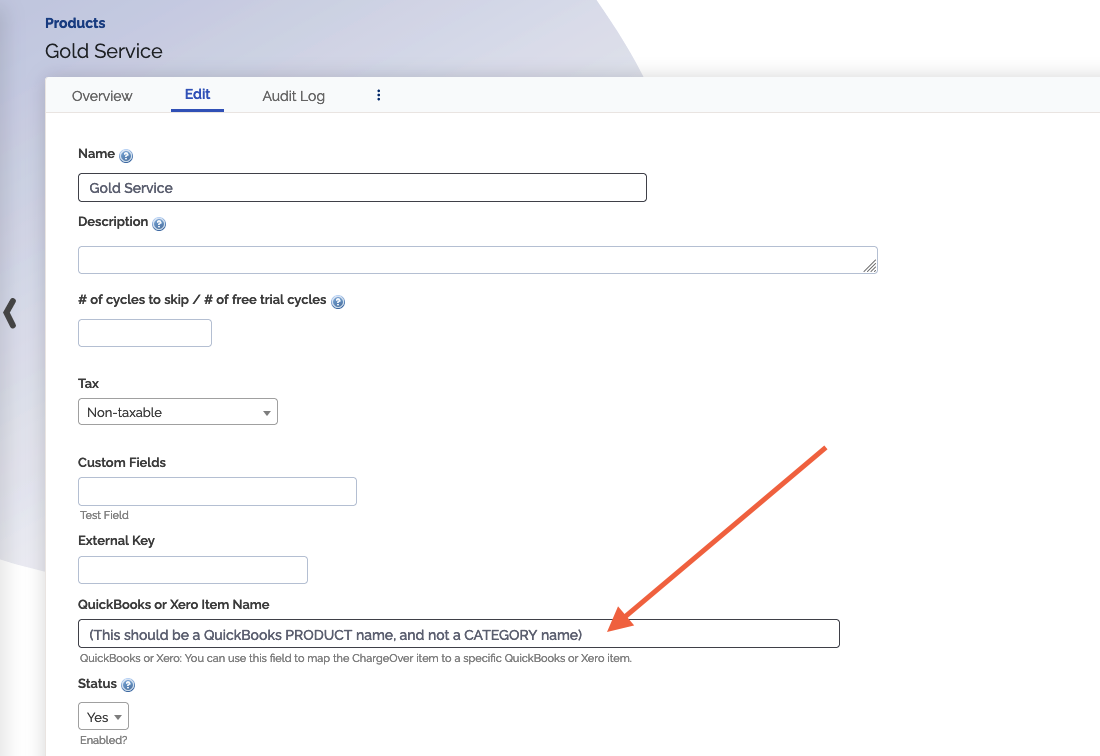
Occasionally, there is reason to have your product in ChargeOver named something different than what it's named in QuickBooks.
In that case, you can use the "QuickBooks or Xero Item Name" field in ChargeOver instead. By entering the "QuickBooks or Xero Item Name" field in ChargeOver, ChargeOver will then ignore the product name in ChargeOver, and instead look in QuickBooks for something matching the QuickBooks or Xero Item Name.
If you have products or services in QuickBooks that are in an hierarchy / category, you must prefix them with the parent product/category.
For example, this
Clothes
      > Shirts
           > Red T-Shirt
Should be represented as
Clothes:Shirts:Red T-Shirt
Import Customers from QuickBooks Online into ChargeOver
Go to your settings and select
Integrations then selectQuickBooks Online From the tabs, select
Import your customers from QBO

- The import will begin and you will see your customers in ChargeOver shortly after!

Syncing closing dates from QuickBooks Online into ChargeOver
ChargeOver can automatically sync closing dates from QuickBooks Online to ChargeOver. To enable this, all you have to do is Enable closing dates in ChargeOver and in QuickBooks Online.
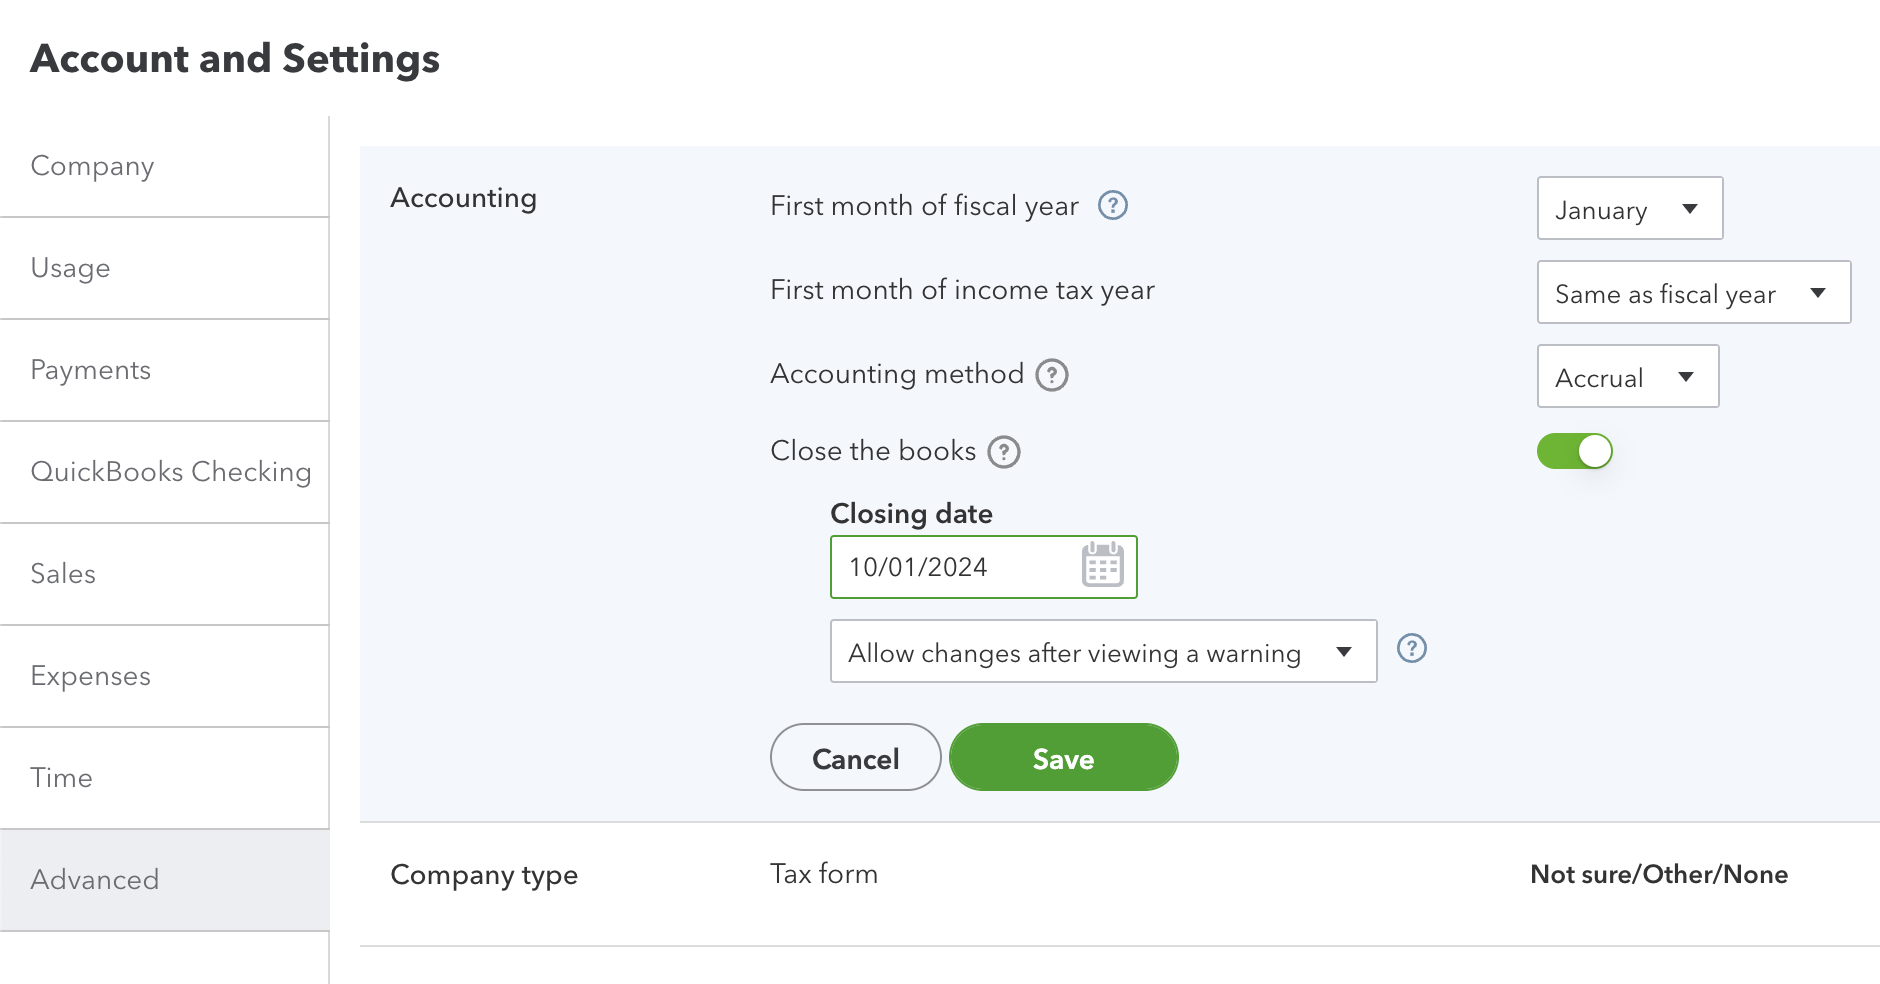
Enable closing dates in QuickBooks Online
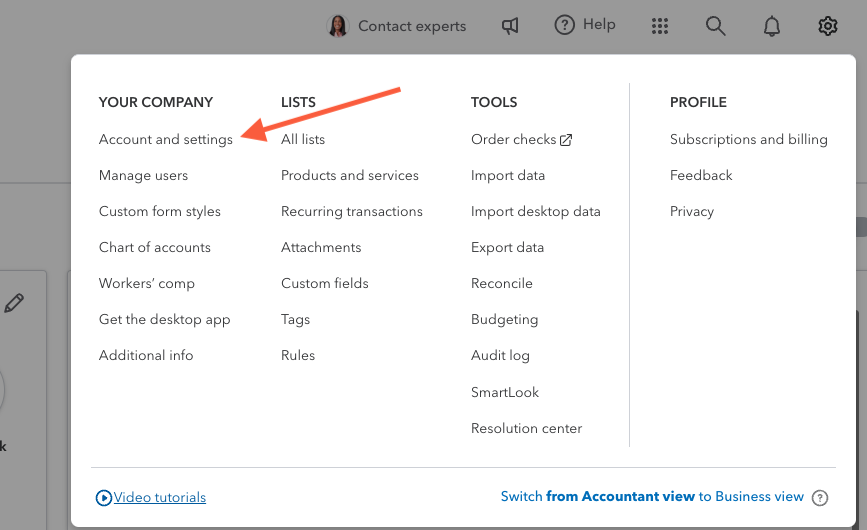
Click the gear icon in the top right to go to your settings
Go to Account and settings
- Click the Advanced tab in the left navigation
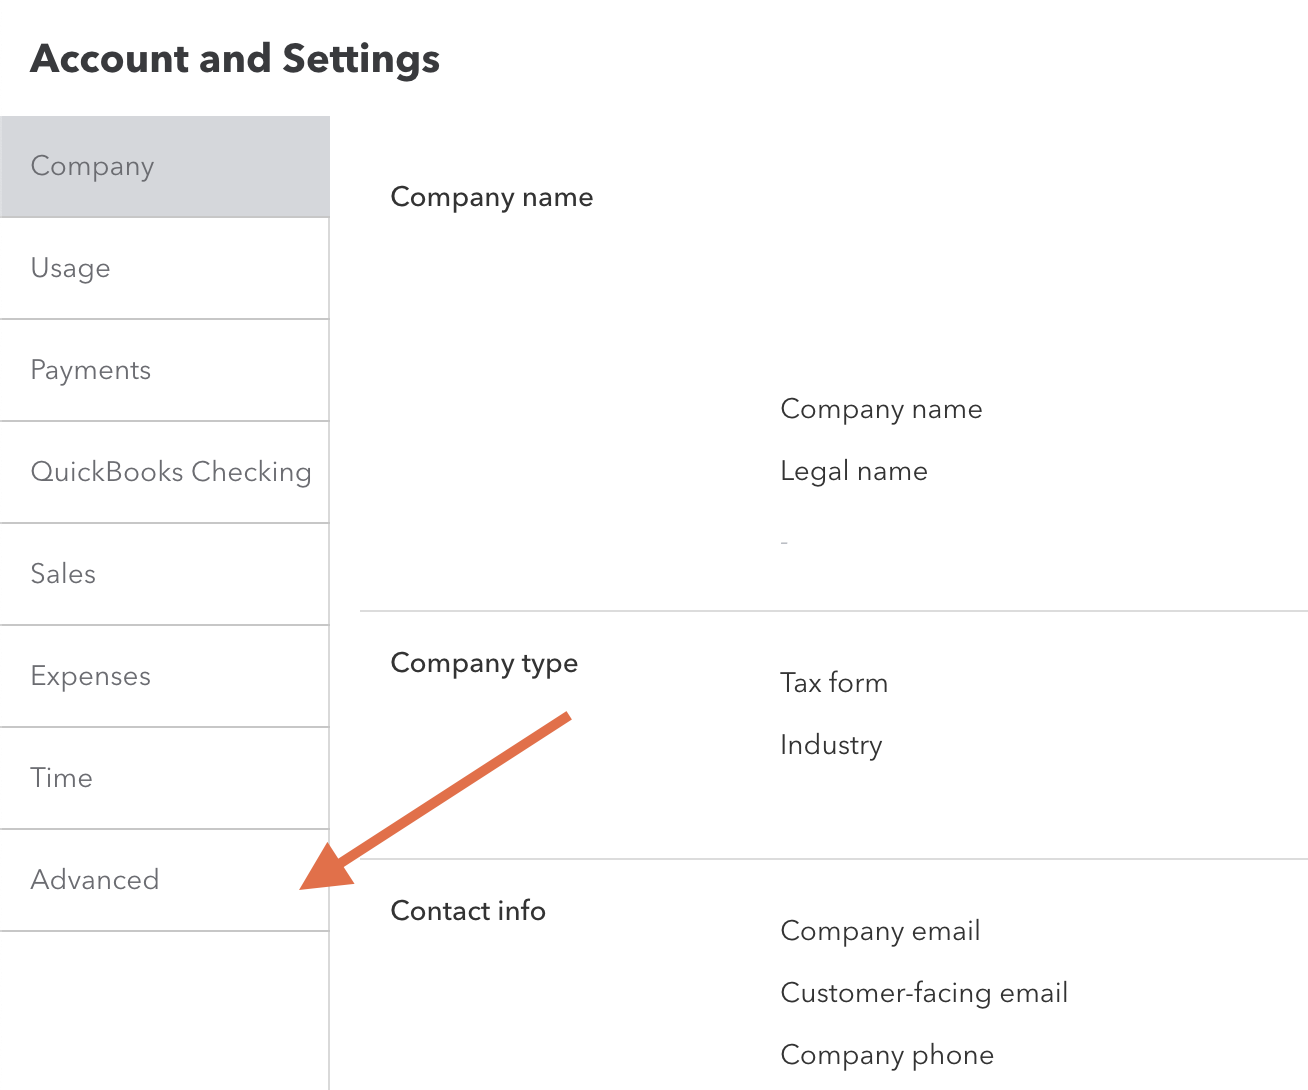
- Enable the Close the books setting, and set a closing date
Changing the closing date
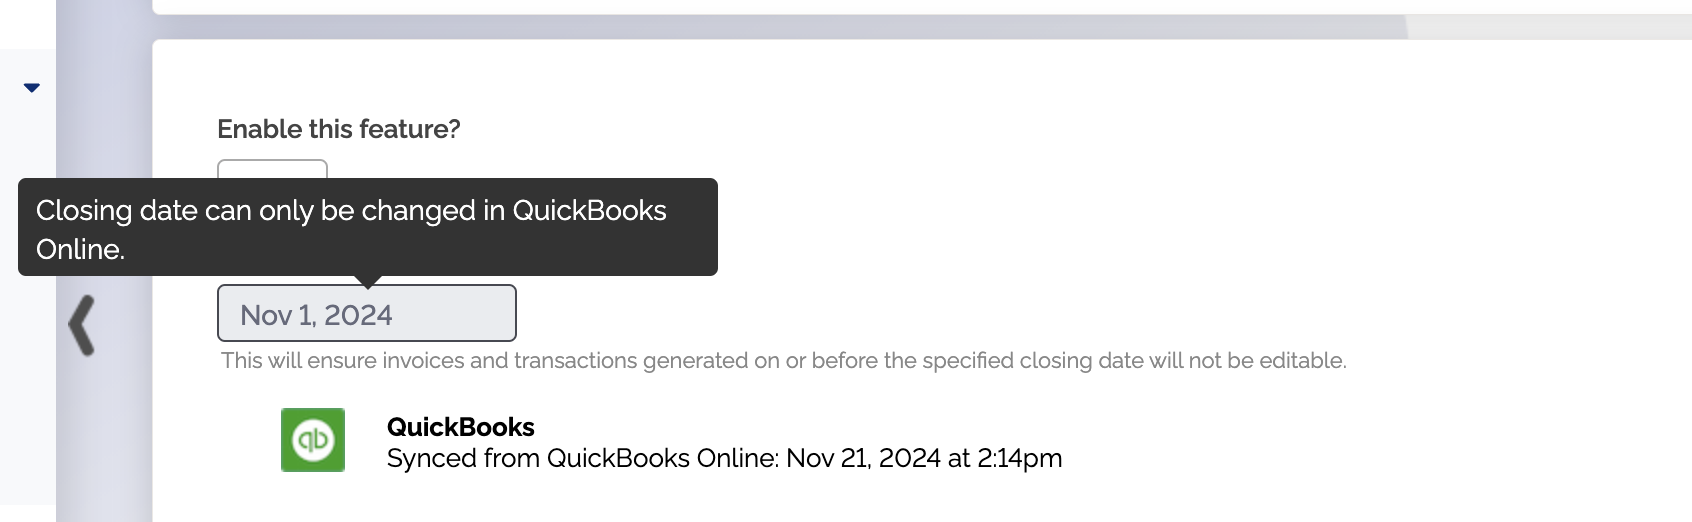
When you are connected to QuickBooks Online, and you have closing dates enabled in both ChargeOver and QuickBooks, the closing date shown in ChargeOver always shows the closing date saved in QuickBooks Online.
To change the closing date in ChargeOver, you'll have to change the closing date in QuickBooks Online.
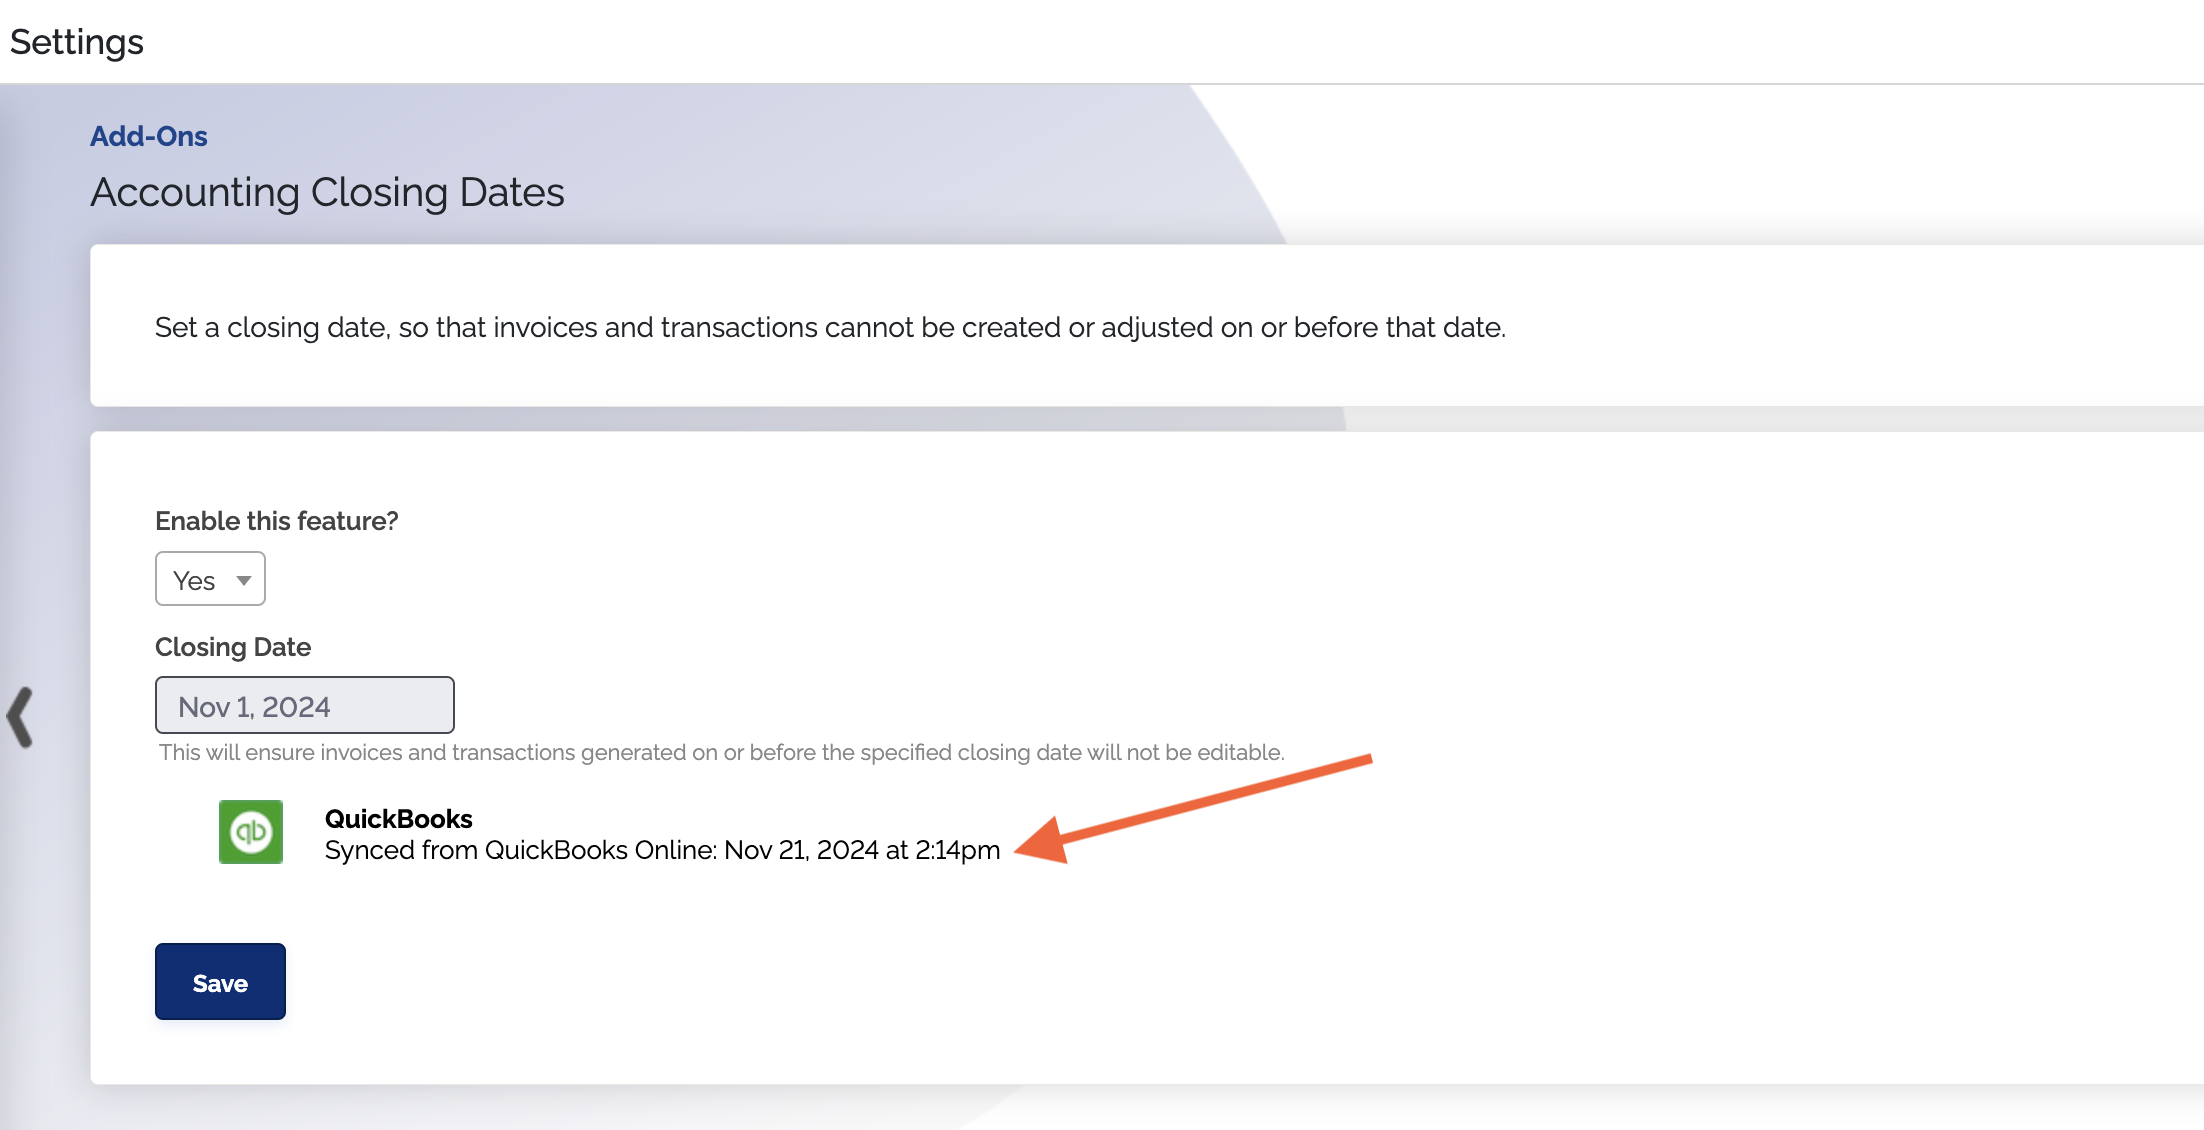
Closing date sync status
When you sync your closing date from QuickBooks Online, you can see the last date and time the closing date was synced from QuickBooks Online. You can see that in ChargeOver's Accounting Closing Dates add-on settings page.
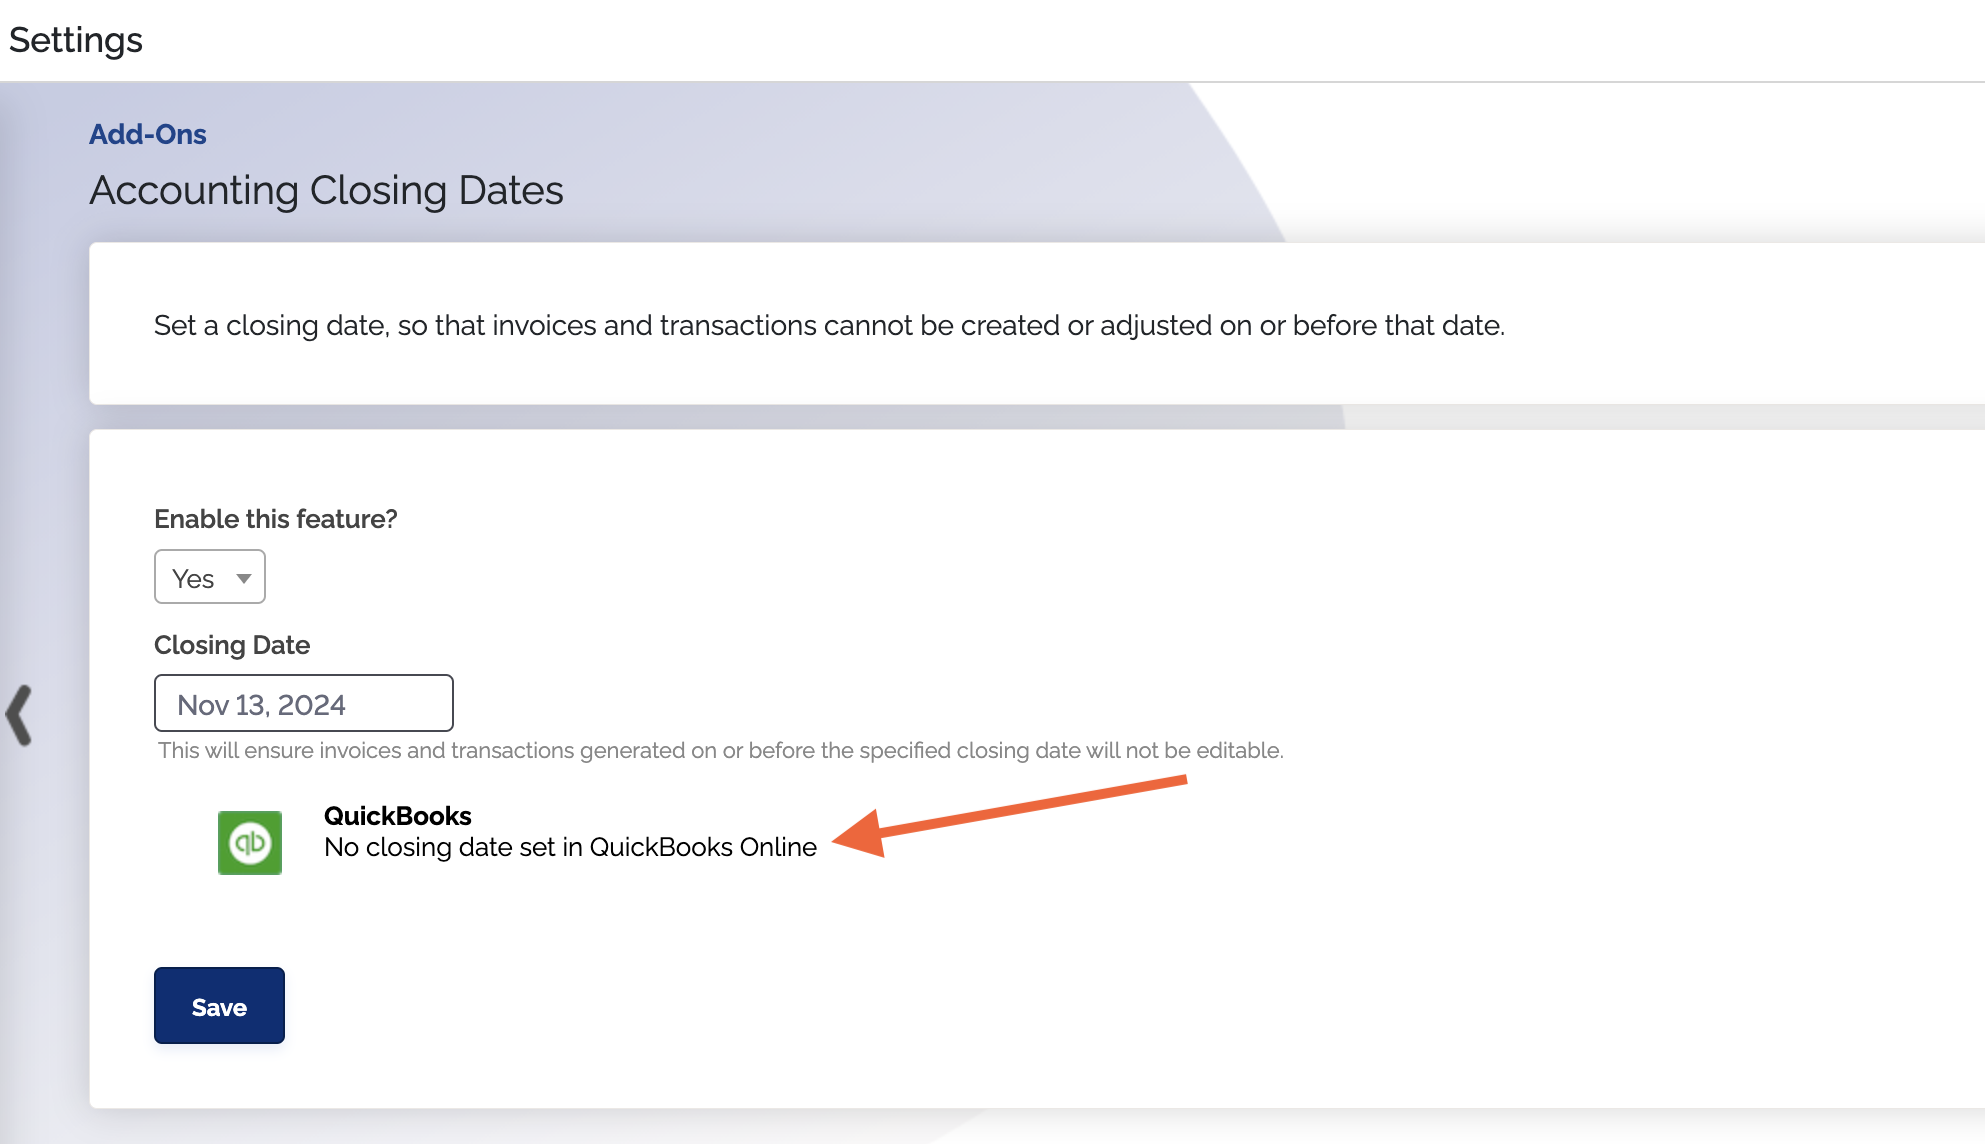
If closing dates are not enabled in QuickBooks Online, the sync status will indicate that there's no closing date set in QuickBooks Online.
Keep in mind
- Disabling closing dates in QuickBooks Online does not disable closing dates in ChargeOver. If you disable closing dates or disconnect from QuickBooks Online, the last closing date synced from QuickBooks will remain the closing date in ChargeOver, until it's changed
Closing dates sync approximately every hour.
Syncing Payments from QuickBooks Online into ChargeOver
ChargeOver supports being able to sync payments from QuickBooks Online back into ChargeOver!
Once you toggle this feature on, we will automatically pull payments from QBO into ChargeOver.
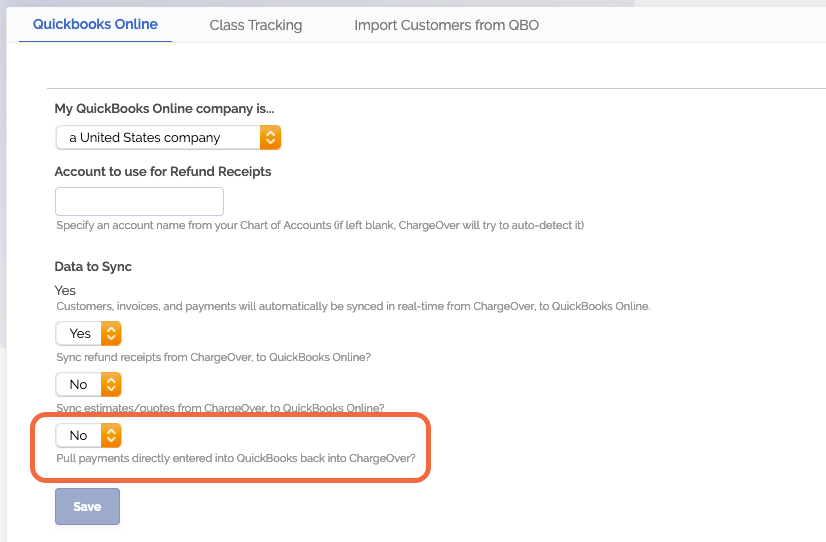
Go to your Settings and select
Integrations thenQuickBooks Online Set the "Pull payments directly entered into QuickBooks back into ChargeOver?" option to
Yes and selectSave
In order for a payment to sync from QBO to ChargeOver there is a list of things that have to happen.
- The customer has to exist in both ChargeOver and QuickBooks Online
- The invoice must have been originally created in ChargeOver
- The invoice balance in ChargeOver must be greater than or equal to the payment amount
- The invoice in ChargeOver must not be voided
- The payment must have been created in the last 7 days
- The payment must have a date within the last 35 days
- Payments dated more than 15 days in the future will not be imported.
- Payments are pulled from QuickBooks Online into ChargeOver every hour.
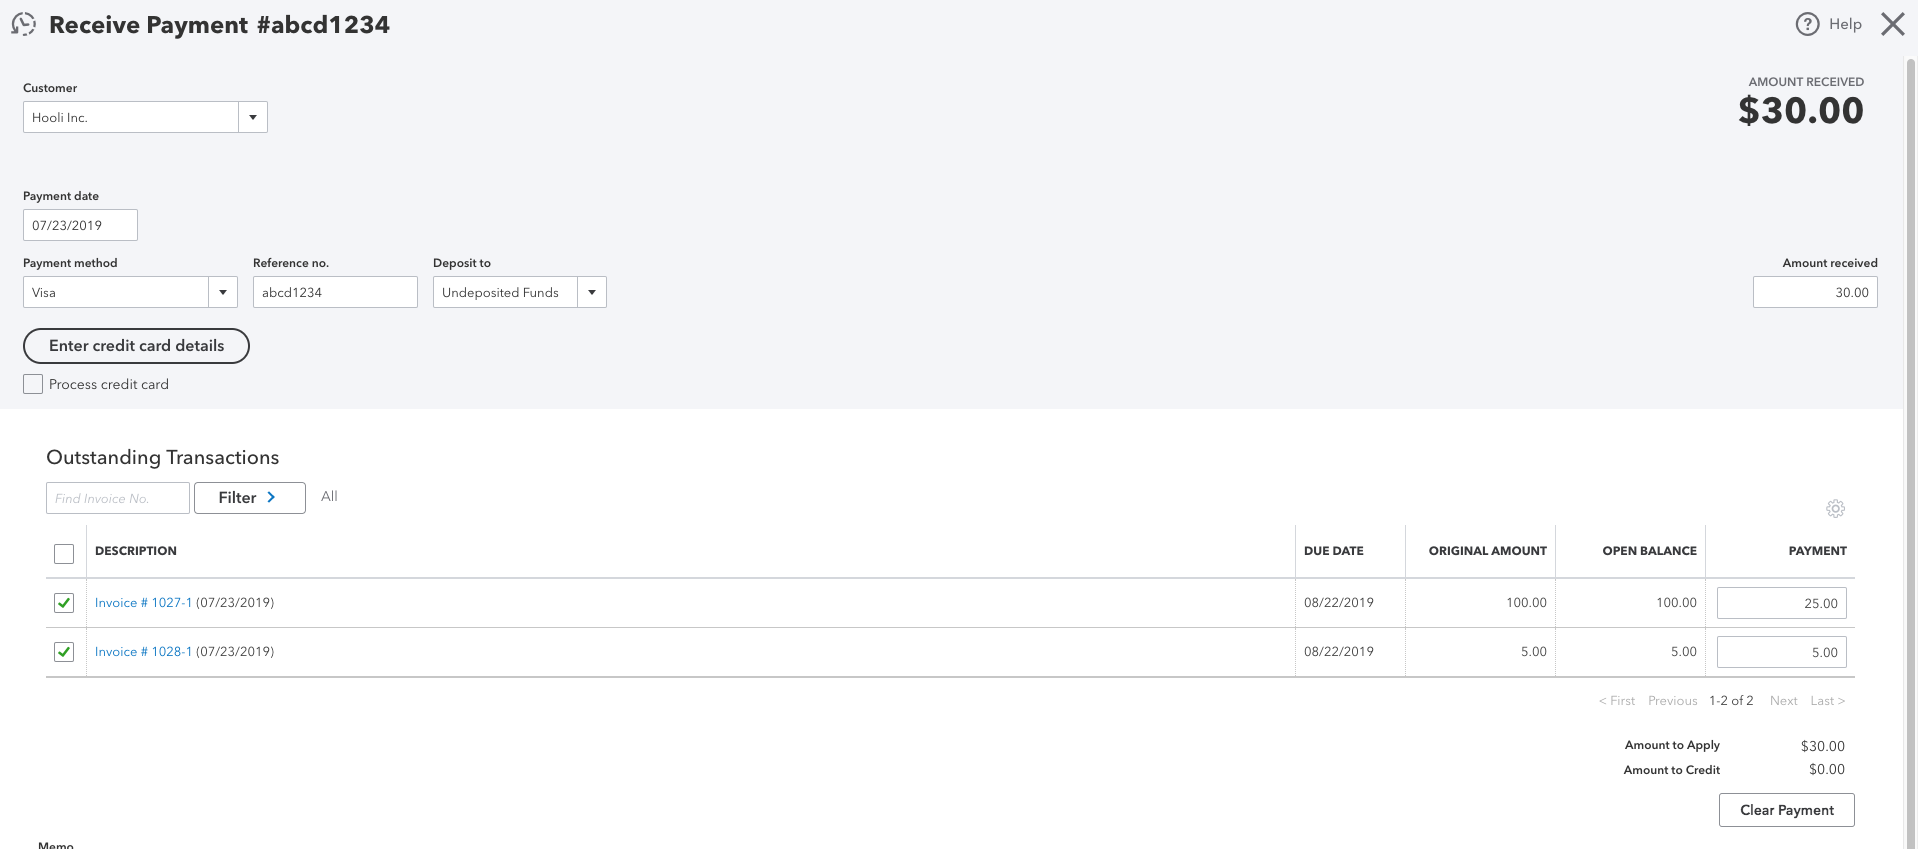
What the payment looks like in QuickBooks Online
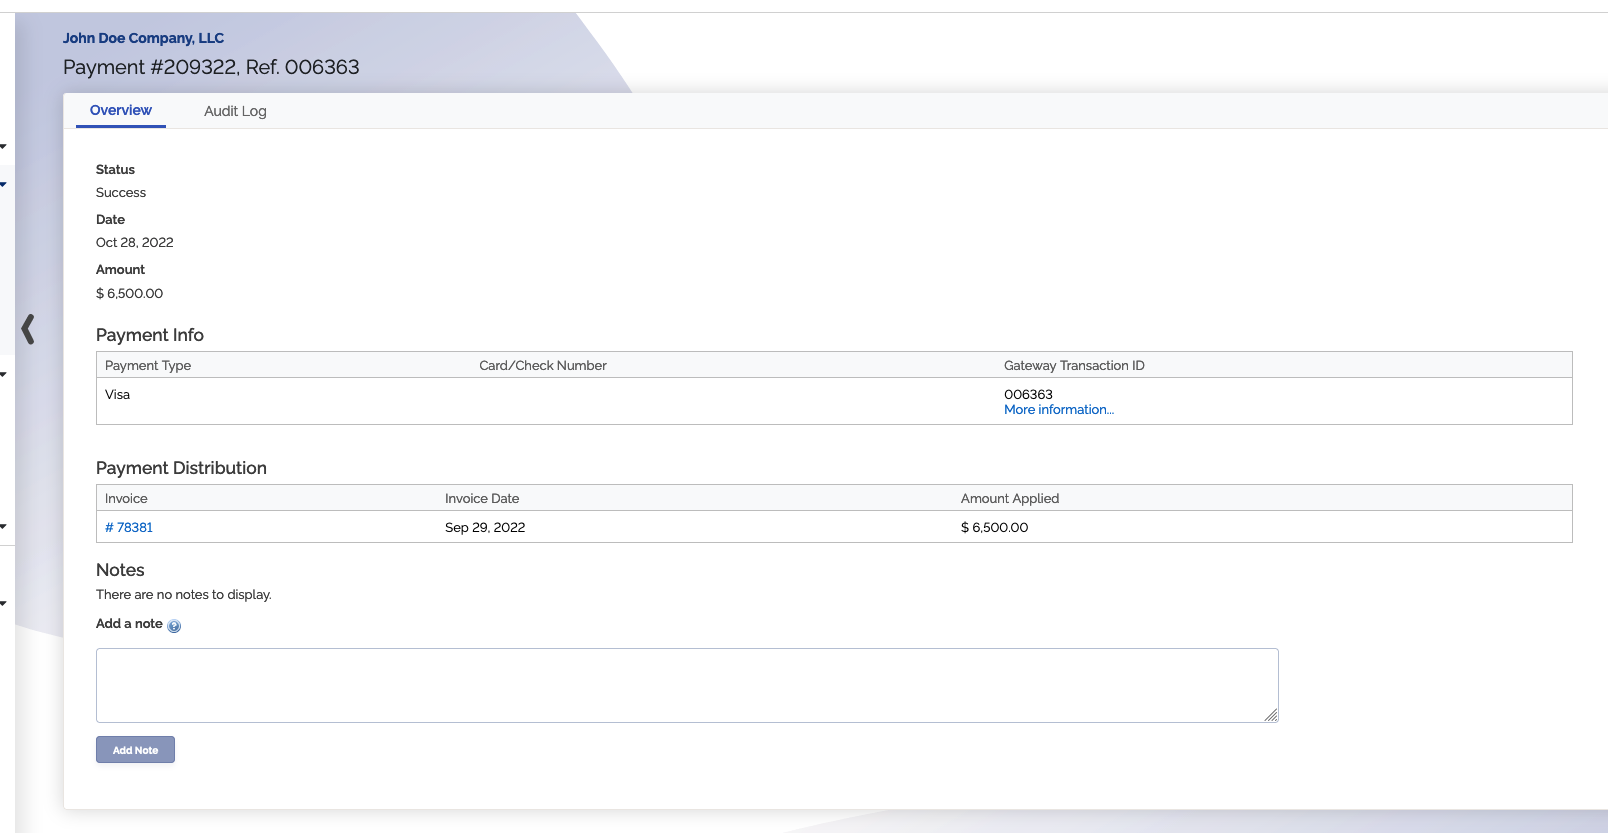
What the synced payment looks like in ChargeOver
Payments sync approximately every hour.
How Payment Methods are Mapped From QuickBooks to ChargeOver
When importing payments from QuickBooks Online to ChargeOver, we follow this logic to determine the payment method to display in ChargeOver.
- If you want a payment method to show up in ChargeOver, make sure you enter a payment method in QuickBooks
- If the payment method you choose in QuickBooks Online is
CheckorCheque, it will be reflected asPaid by checkin ChargeOver - If the payment method you choose in QuickBooks Online is
ACHorQuickBooks Payments-Bank, it will be reflected asACH/eCheckin ChargeOver - If the payment method you choose in QuickBooks Online is
Wire, it will be reflected asPaid by wire transferin ChargeOver - If the payment method you choose in QuickBooks Online is
Visa,Mastercard,Discover, orAmerican Expressin QuickBooks, that will transfer over to QuickBooks asVisa,Mastercard, etc. respectively in ChargeOver - Any other payment method chosen in QuickBooks Online will be shown as
Paid by cashin ChargeOver
Syncing Credit Memos From ChargeOver to QuickBooks Online
This is only for stand-alone credit memos. Credit memos that are generated from refunds cannot be synced.
To sync credit memos from ChargeOver to QuickBooks Online, you must enable the "Sync credit memos credit ChargeOver?" in the QuickBooks Online integration settings.
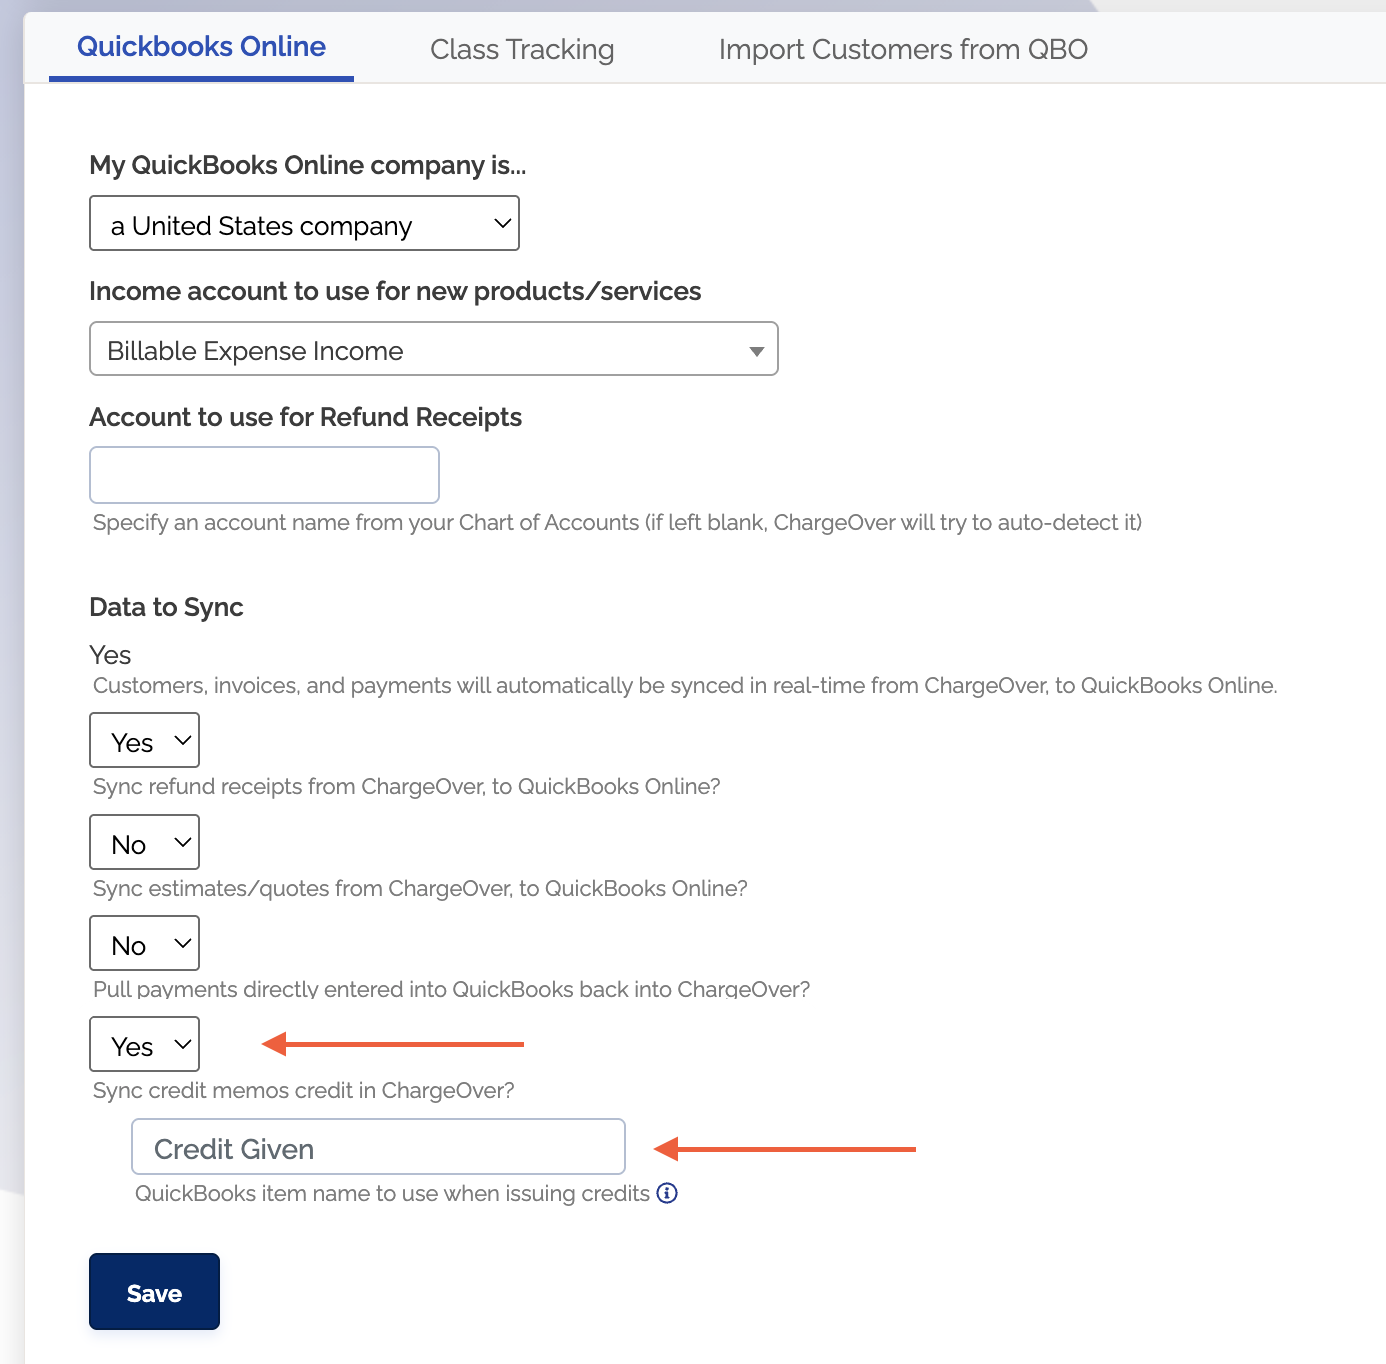
You will need to enter name for the credit memo item in QuickBooks Online. The default value is Credit Given. If you already have an item
you want to use for credit memos in QuickBooks Online, you can enter the name of it here. If you don't have an item created already,
a new non-inventory item will be created in QuickBooks Online with the name you enter here.
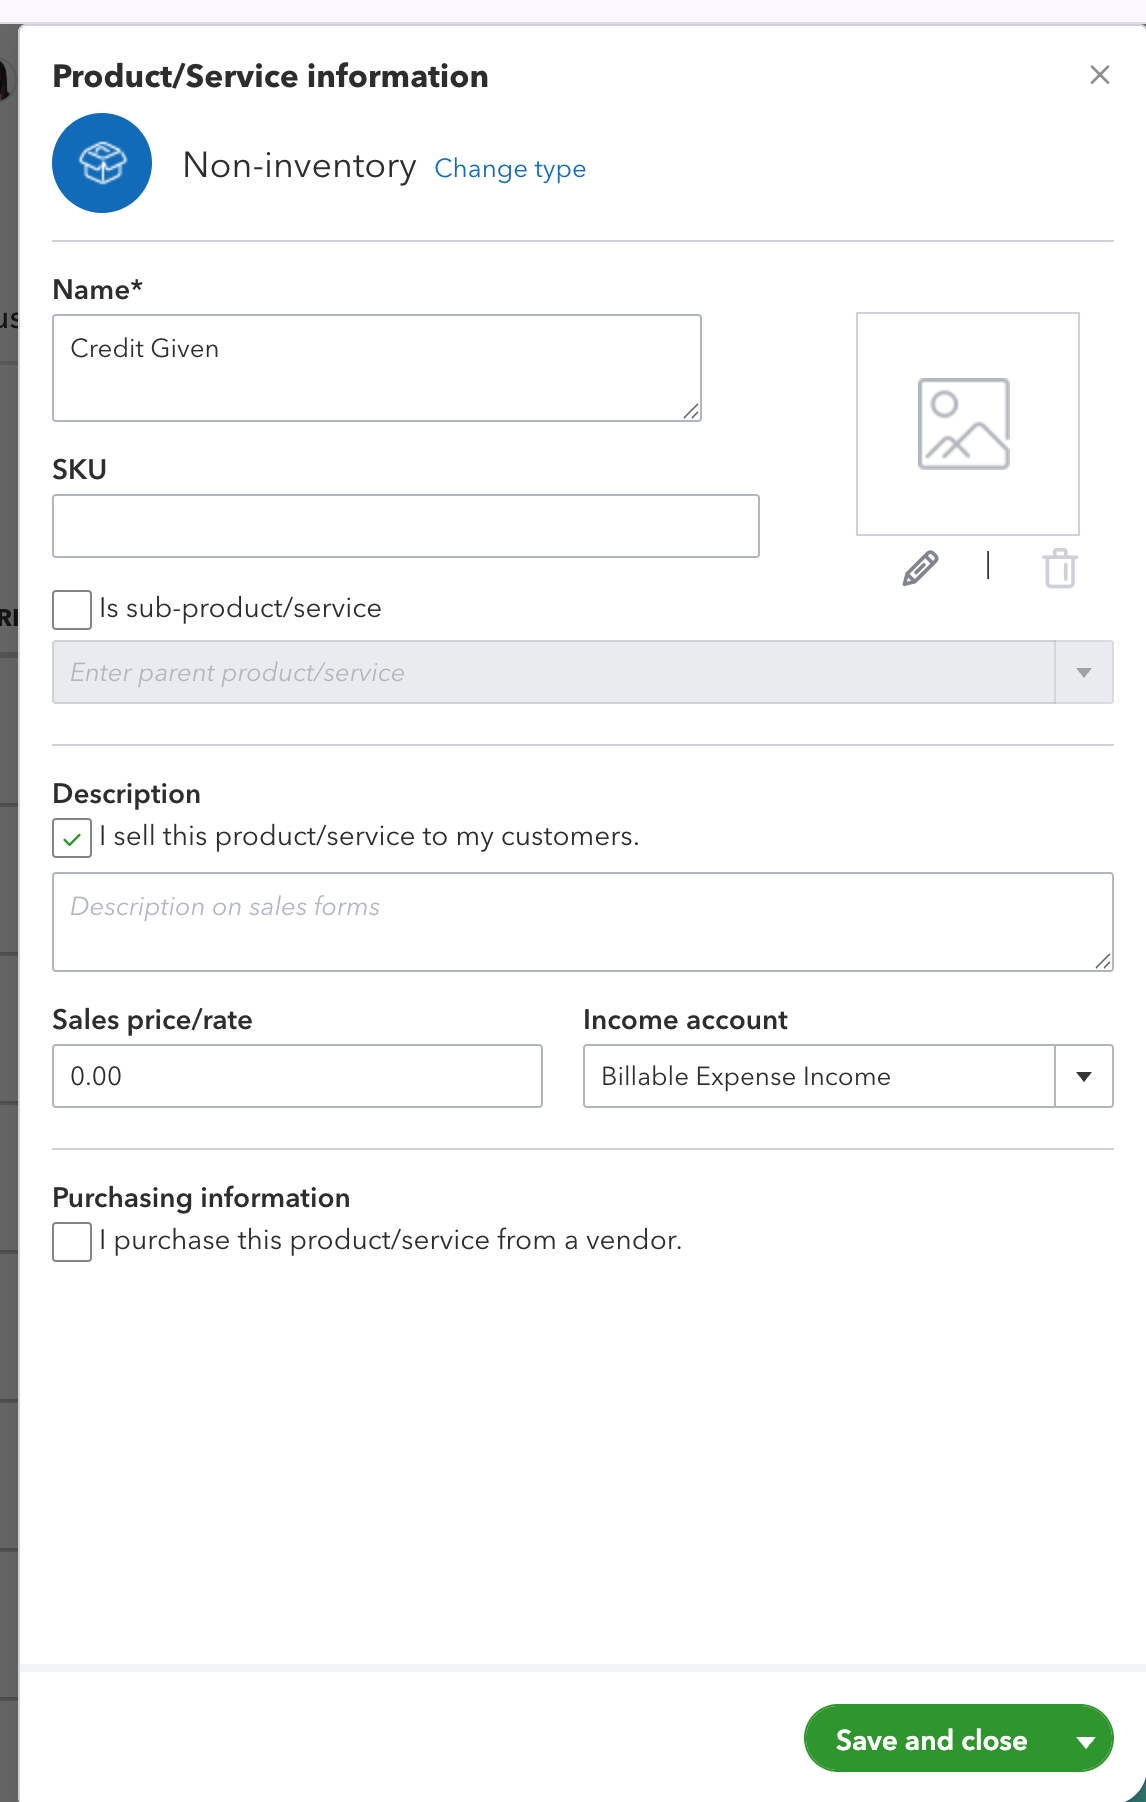
When credit memos are synced from ChargeOver to QuickBooks Online, a new credit memo object will be created with the credit memo item set as the line item.
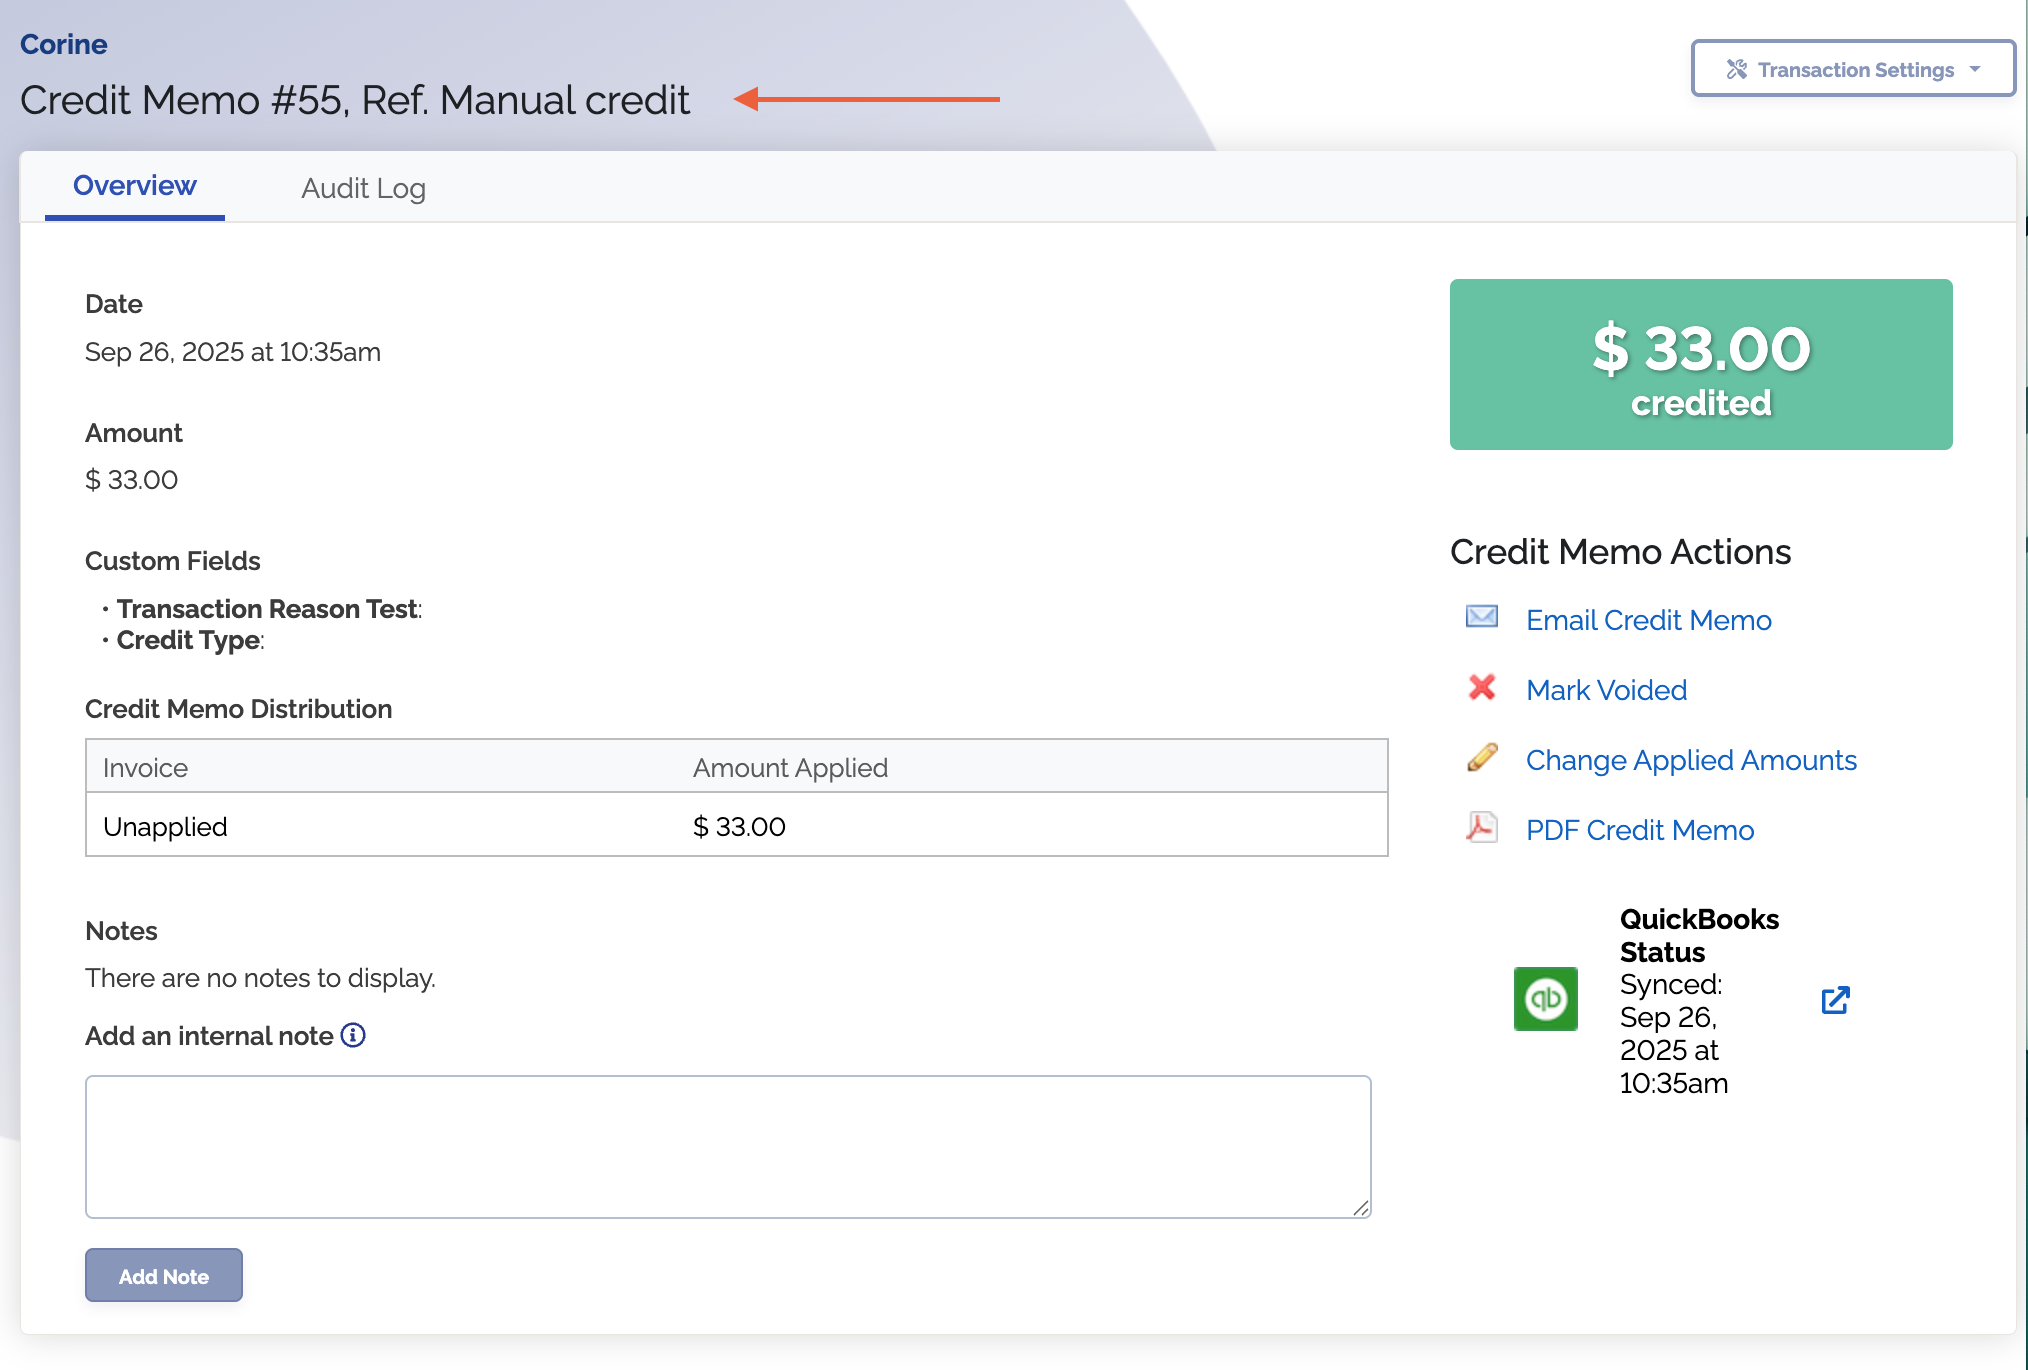

When you apply the credit memo to single or multiple invoices, a new payment will be created in QuickBooks Online.
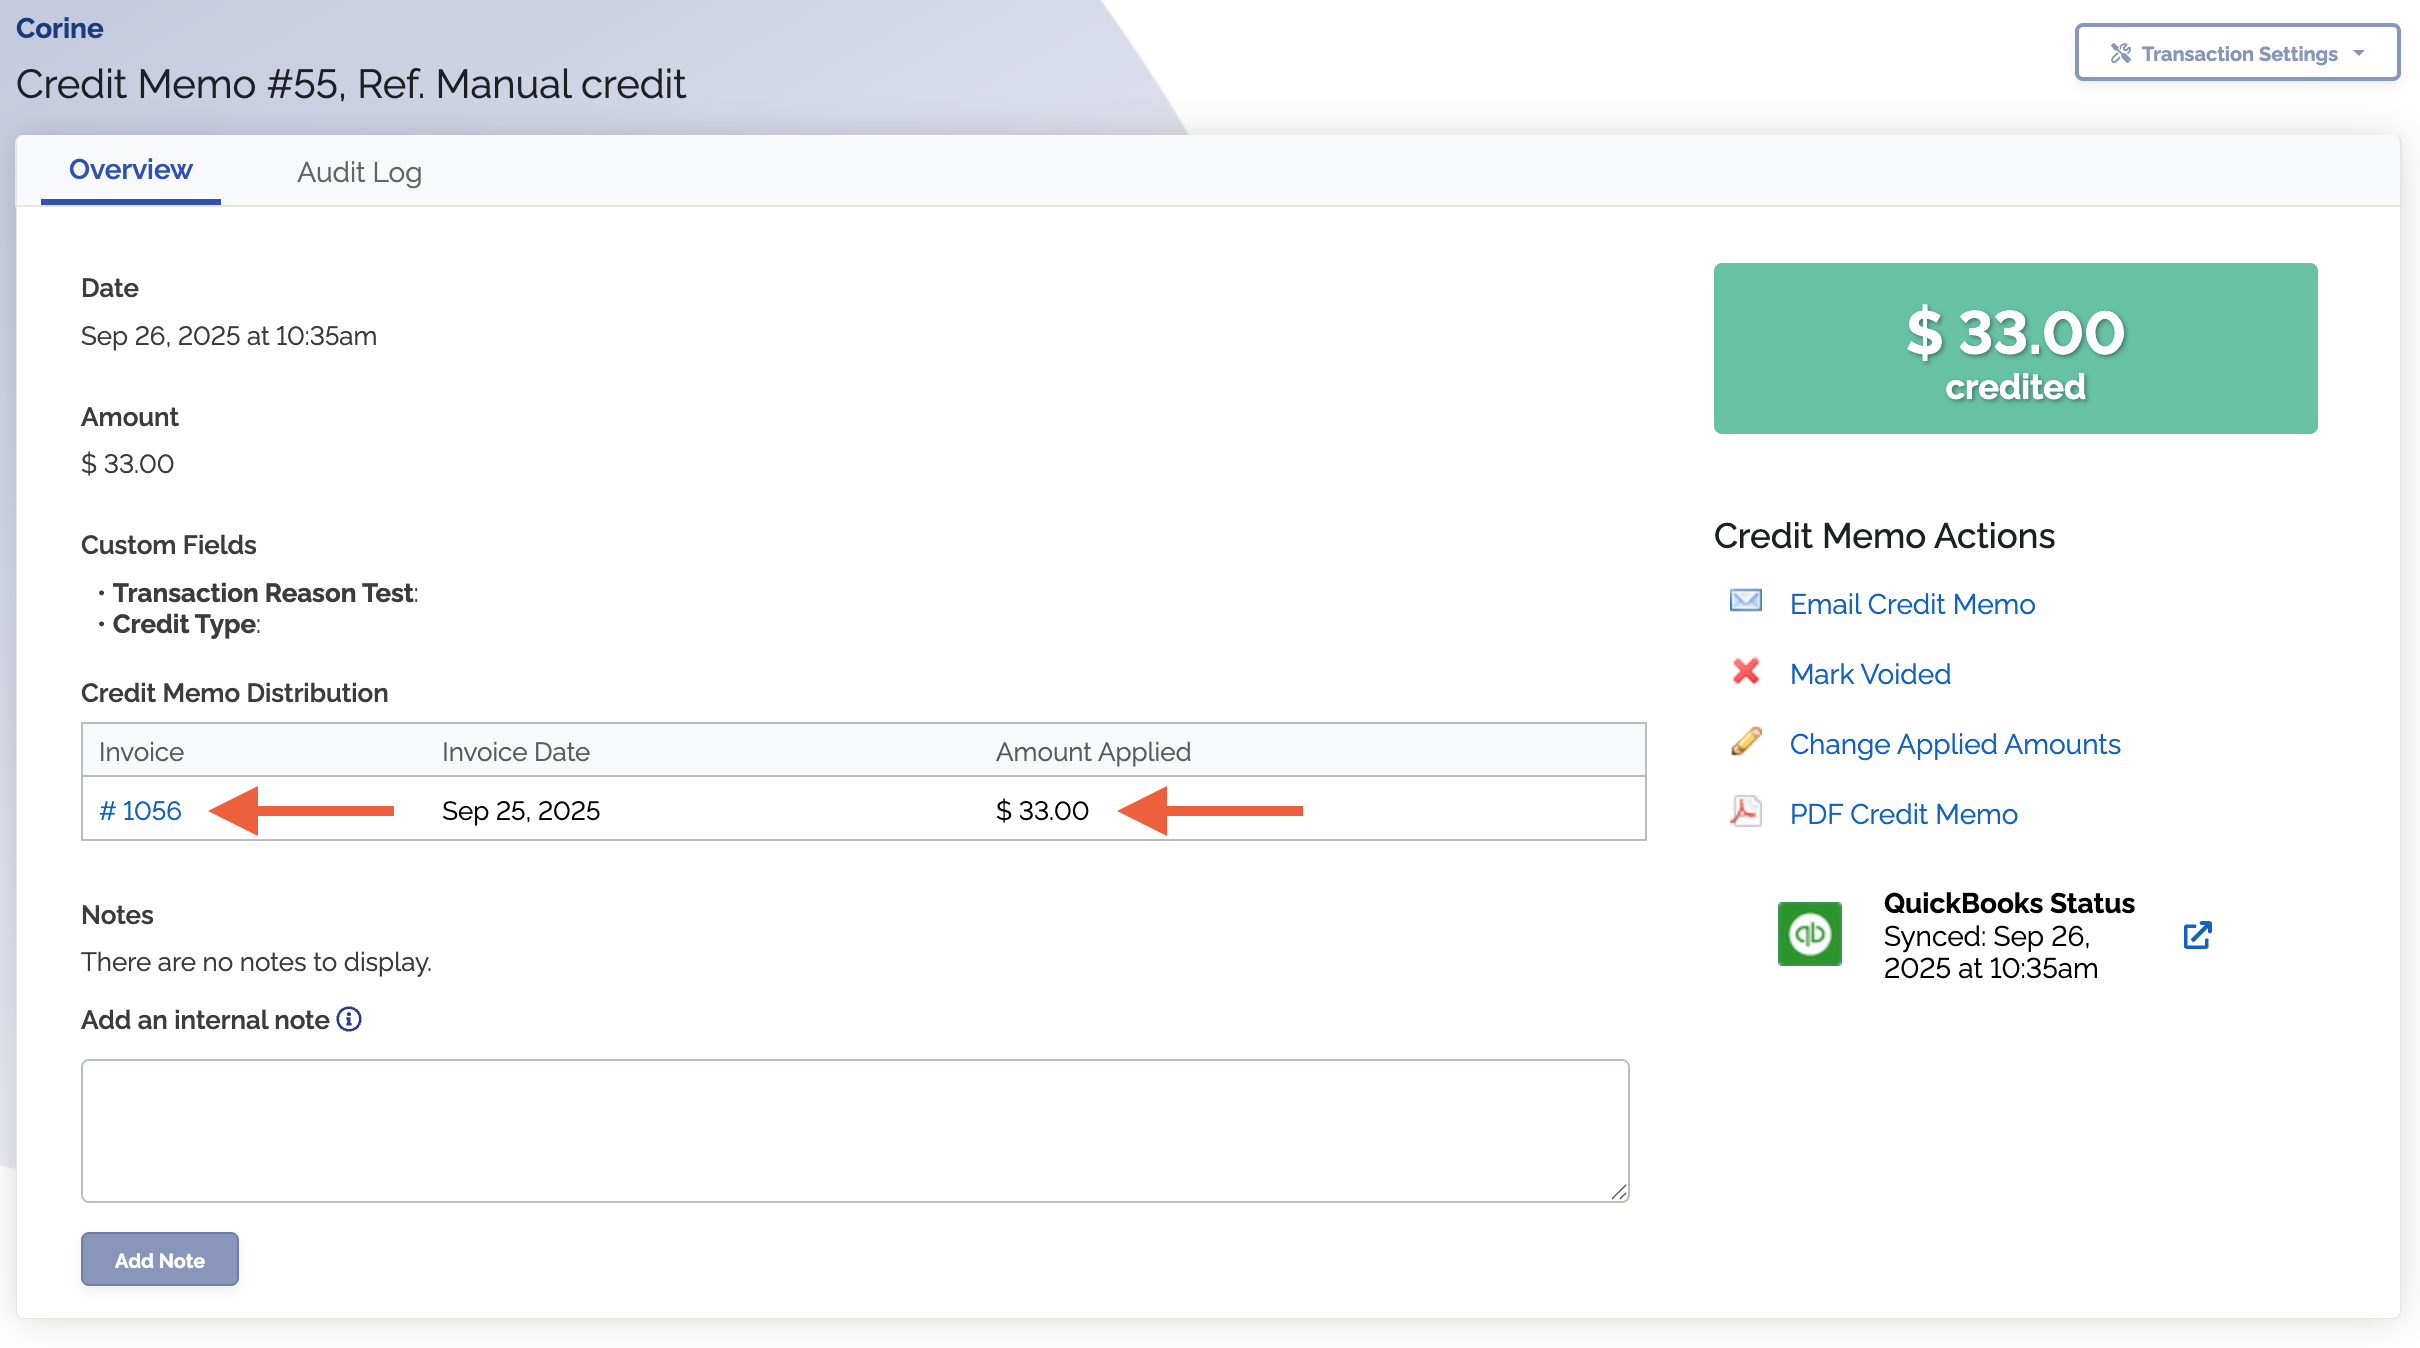

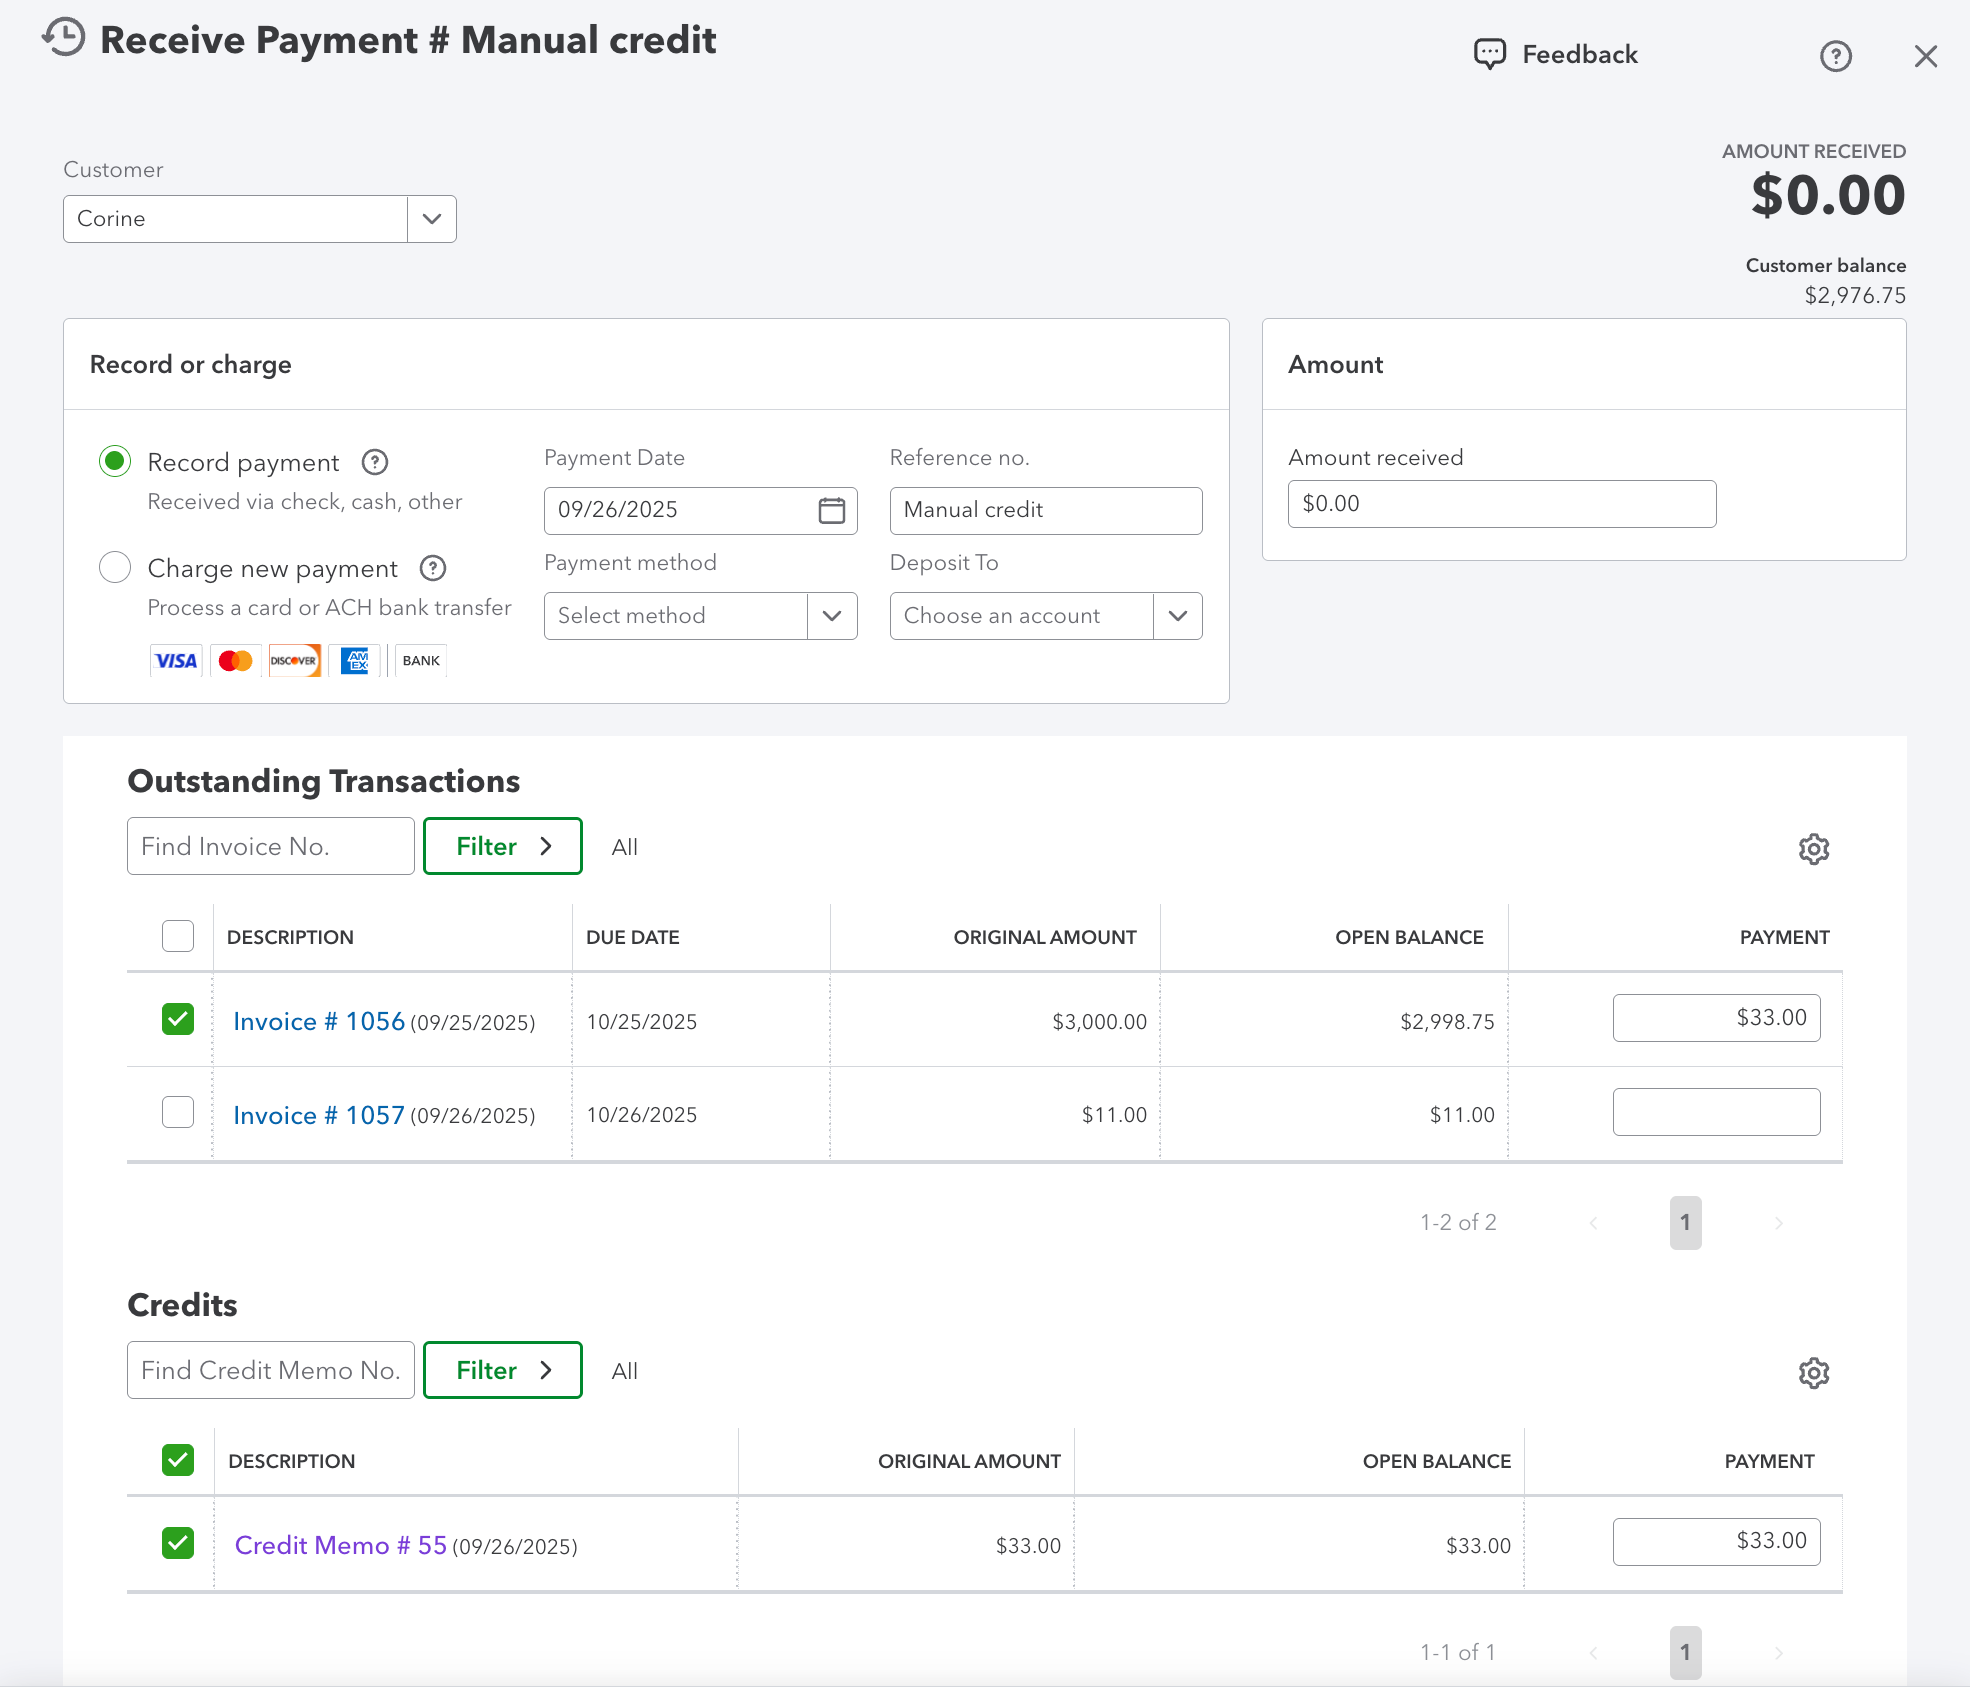
If you unapply the credit memo from an invoice, the payment will not be deleted and remain closed. This is because the payment is $0.00 and is not a real payment. If you delete the payment from QuickBooks Online, you should delete the corresponding credit memo in ChargeOver.
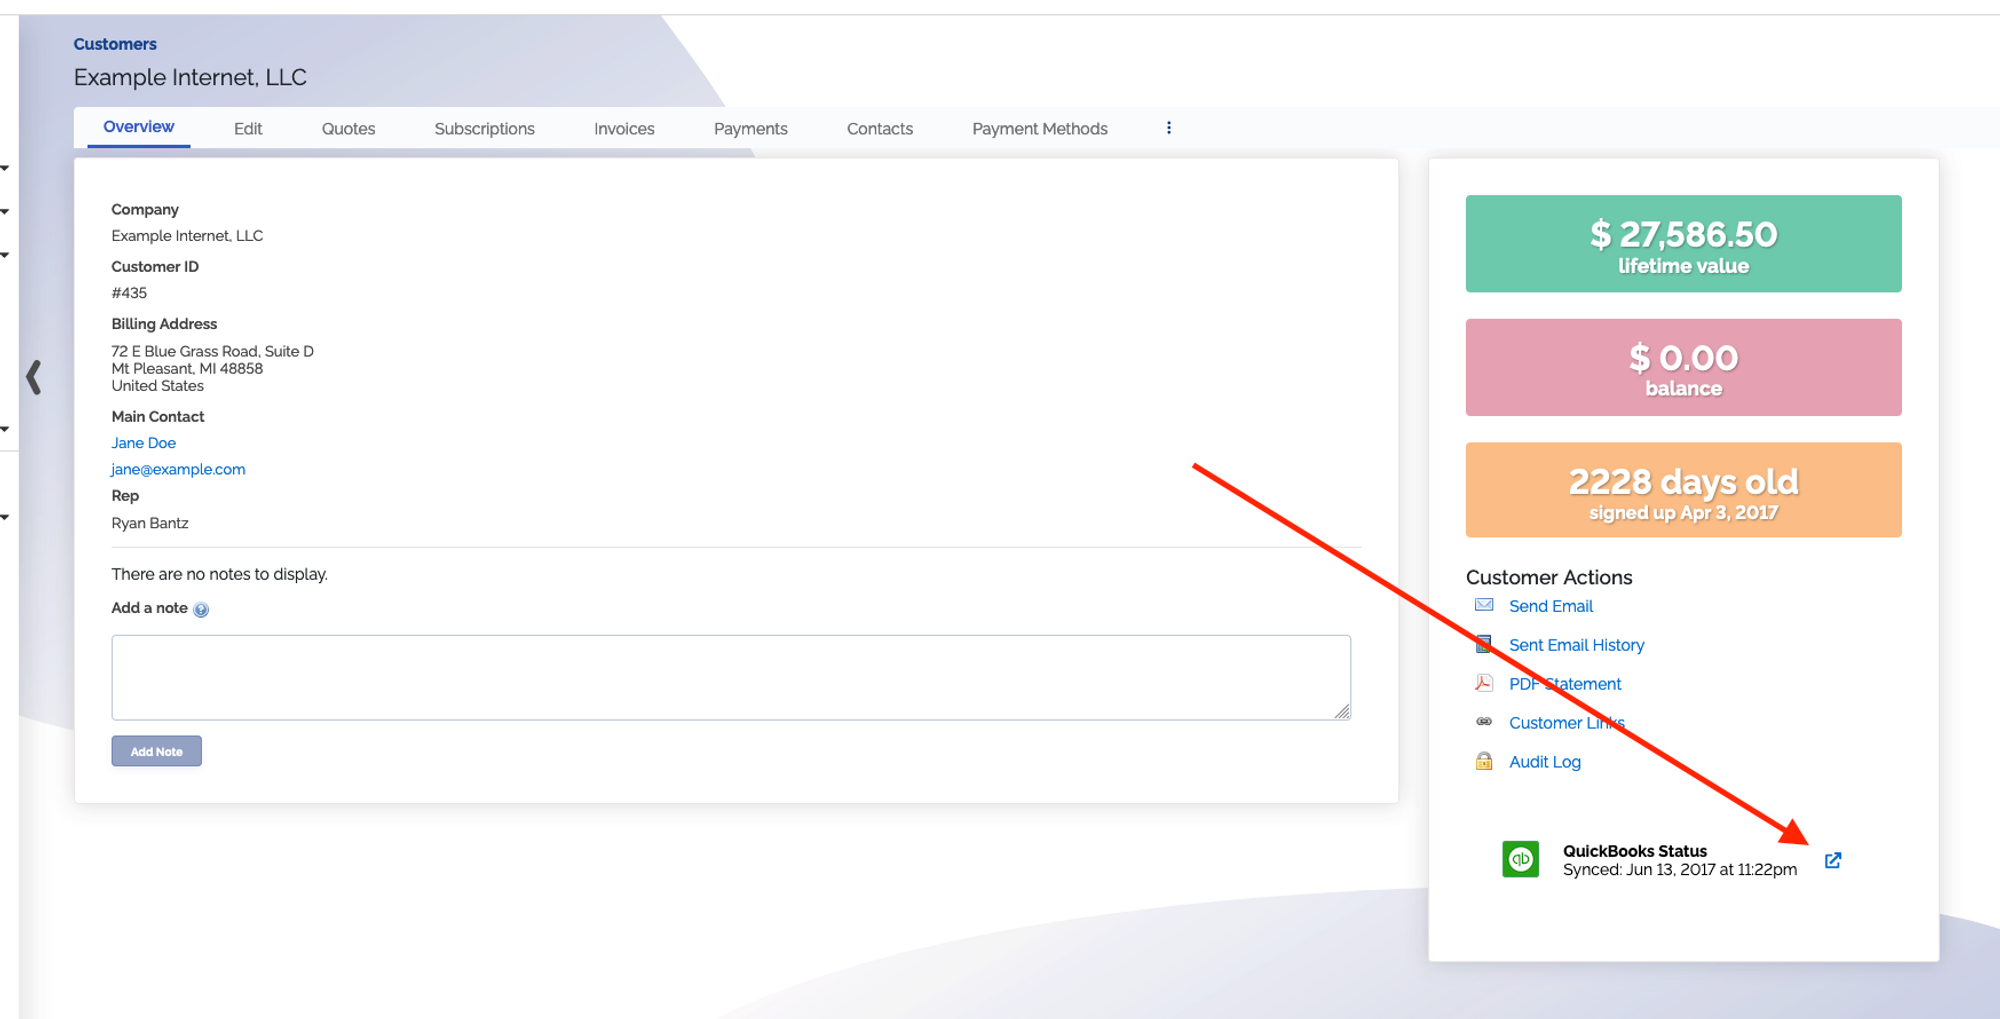
Direct Links Within ChargeOver
There are direct links in ChargeOver that correspond to QuickBooks Onlines customers, invoices and payments.
Go into the Overview of any object and click the blue icon next to QuickBooks Status.
Undeposited Funds
What is my Undeposited Funds account in QuickBooks, and why are my payments going there?
When a payment is pushed from ChargeOver to QuickBooks, by default it will go to "Undeposited Funds".
Undeposited Funds is an internal other current asset account created by QuickBooks Desktop to hold funds until you are ready to deposit them. It serves as the default Deposit To account when you receive payments, use a payment item on an invoice, or enter a sales receipt.
Most accountants/bookkeepers want this because it allows you to match your bank deposits with the actual payments, for reconciliation purposes.
For example, most credit card processors will deposit the funds in your bank 2-3 days after the actual payment, so your bookkeeper can then leave the undeposited payments in undeposited funds until they actually get deposited, and then move them over to the bank account in QuickBooks.
Do you need payments to go somewhere else instead? Contact our support team and we can send payments to another account in QuickBooks.
Other Resources
Understanding How the Undeposited Funds Account Works
Matching Sales Tax Rates and Codes to QuickBooks Online
For U.S. Based Companies
ChargeOver can match sales tax rates and codes to QuickBooks Online.
First you will need to enable taxes in QuickBooks.
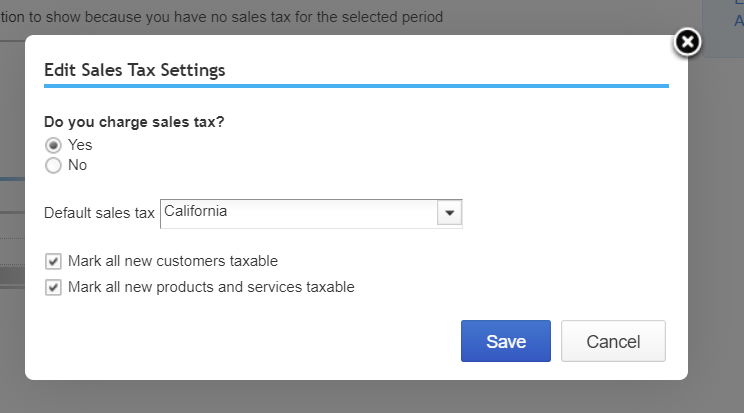
Enable Taxes in QuickBooks
- Go to Taxes then click
Edit Sales Tax Settings in the "Related Tasks" menu
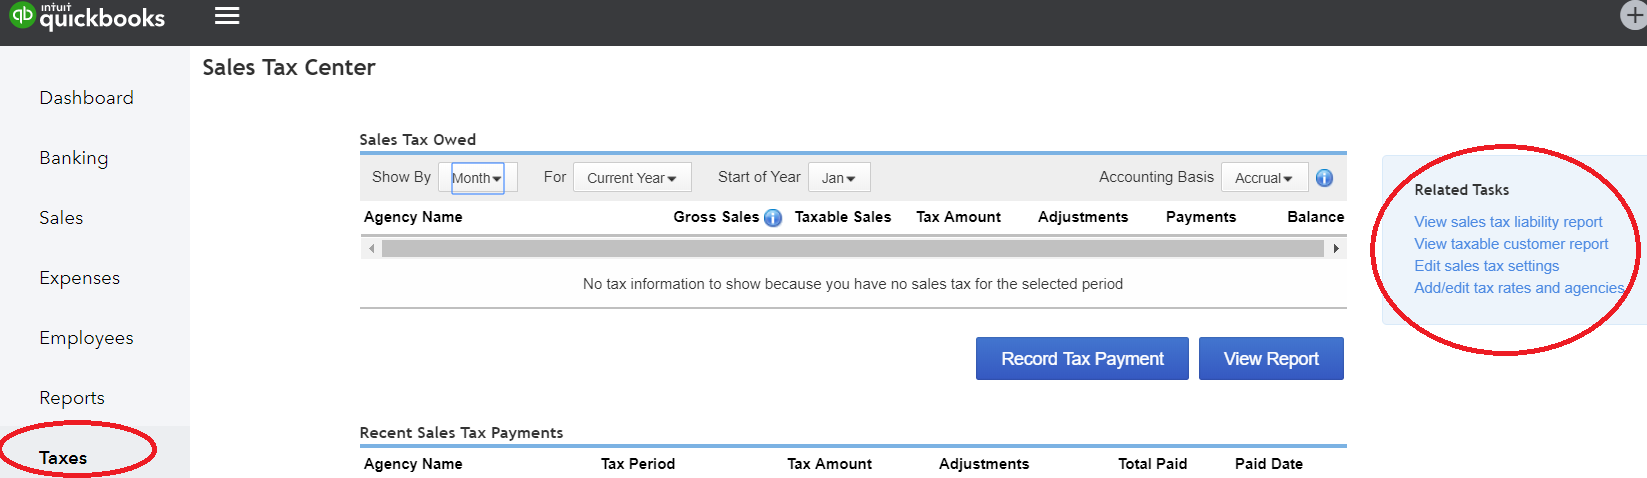
- Once you've done this, you can set up your tax rates in QuickBooks by clicking Add/edit tax rates and agencies in the "Related Tasks" menu
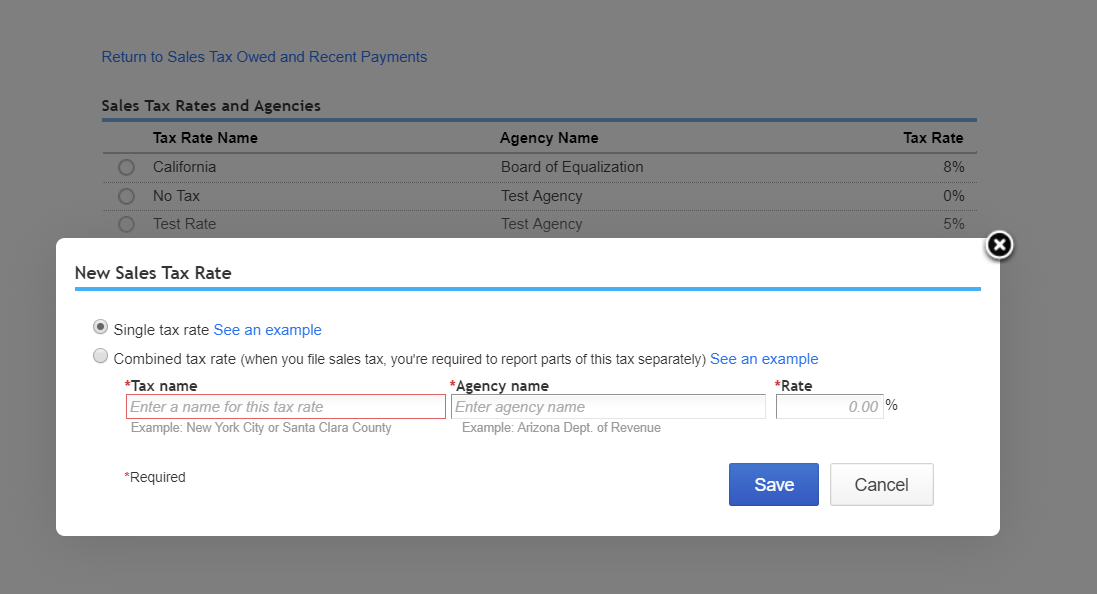
Save your changes
Refer to our help article to learn how to set up your corresponding tax rates in ChargeOver.
TAXABLE or NON-TAXABLE
Once you have set your tax rates up in QuickBooks and in ChargeOver, for every line item on a ChargeOver invoice, ChargeOver decides whether it is TAXABLE or NON-TAXABLE according to your ChargeOver sales tax settings.
You can view your sales tax settings for a ChargeOver product by going to

For Taxable Line Items
ChargeOver will set the line item to TAX in QuickBooks (the equivalent of marking it taxable).
For Non-Taxable Line Items
ChargeOver will set the line item to NON in QuickBooks (the equivalent of marking it non-taxable).
If the Invoice is Taxable
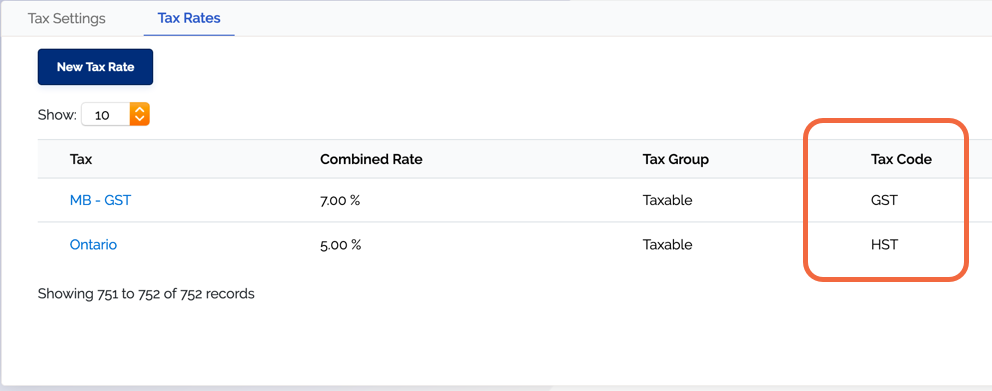
ChargeOver looks at the sales tax rates linked to the taxable sales tax codes in QuickBooks. ChargeOver will mark the invoice as taxable in QuickBooks and link it to the corresponding tax rate in QuickBooks.
For Non U.S. or International Companies
ChargeOver can match sales tax rates and codes in ChargeOver to those in your QuickBooks Online account.
ChargeOver does not create sales tax rates in QuickBooks for you. You will need to enable sales tax in your QuickBooks account yourself as well as create the sales tax rates in QuickBooks.
For each line item on the ChargeOver invoice, ChargeOver looks at the Accounting Tax Code field for the applicable tax rate.
This means that the accounting tax code field in ChargeOver must have a corresponding tax code in QuickBooks.
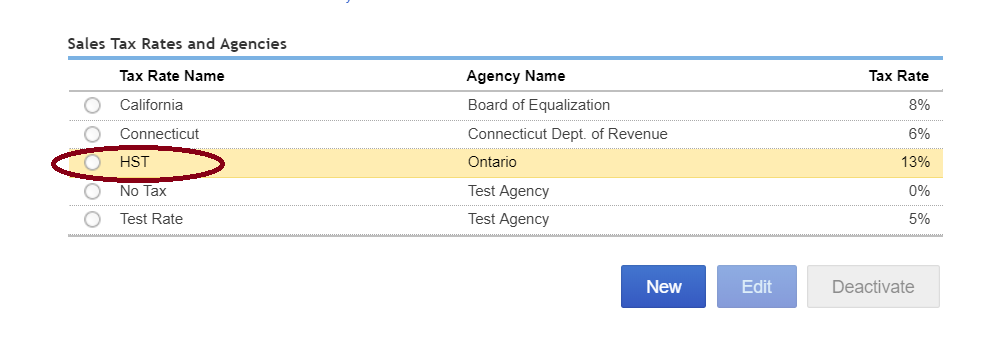
For example, a common scenario for Canada.
You set up a tax rate in ChargeOver.
Name: Ontario Sales Tax Accounting Tax Code: HST
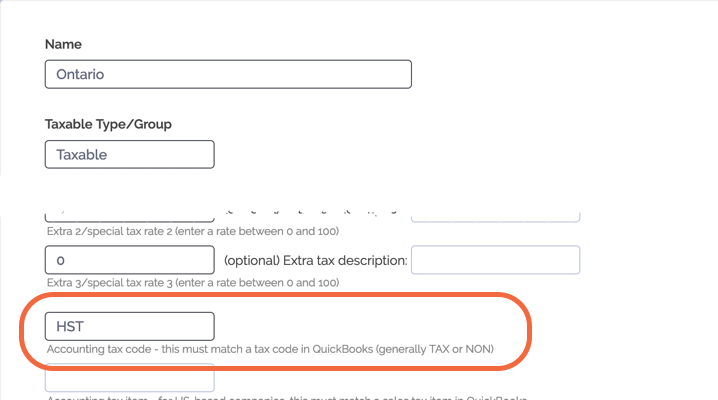
Then when ChargeOver pushes a line item with this tax rate to QBO, it looks for a tax code in QuickBooks named "HST" to match ChargeOver's accounting tax code.
If you have some products that are NOT taxable, you MUST have a non-taxable tax code in QuickBooks named one of the following.
- Exempt
- GST Free Exports
ChargeOver will look for one of those tax codes when it pushes non-taxable line items to QuickBooks Online.
Mapping products to income accounts
Overview
QuickBooks attaches every Product to an Income account. The Income account
is sort of like a way to categorize the income, so you can see where your money
is coming from.
So for example, say your business offers these products.
- Bronze subscription
- Silver subscription
- Gold subscription
- Alarm service
- VoIP service
At some point, you're going to want to be able to answer questions like
- How much money did I make on subscriptions vs. on other services?
- What percentage of my income is from metered services, vs. flat-rate subscriptions I offer?
This is where the Income account in QuickBooks comes in. You categorize each
of your products in QuickBooks like below.
- Bronze subscription,
Income account = Subscriptions - Silver subscription,
Income account = Subscriptions - Gold subscription,
Income account = Subscriptions - Alarm service,
Income account = Services - VoIP service,
Income account = Services
Now, you can go into QuickBooks and run a report that shows you the totals of
how much money you made on Subscriptions income vs. Services income.
Where Mapping Can Happen
New Products
If ChargeOver ever needs to create a product that doesn't exist in QuickBooks yet, ChargeOver uses the default set here
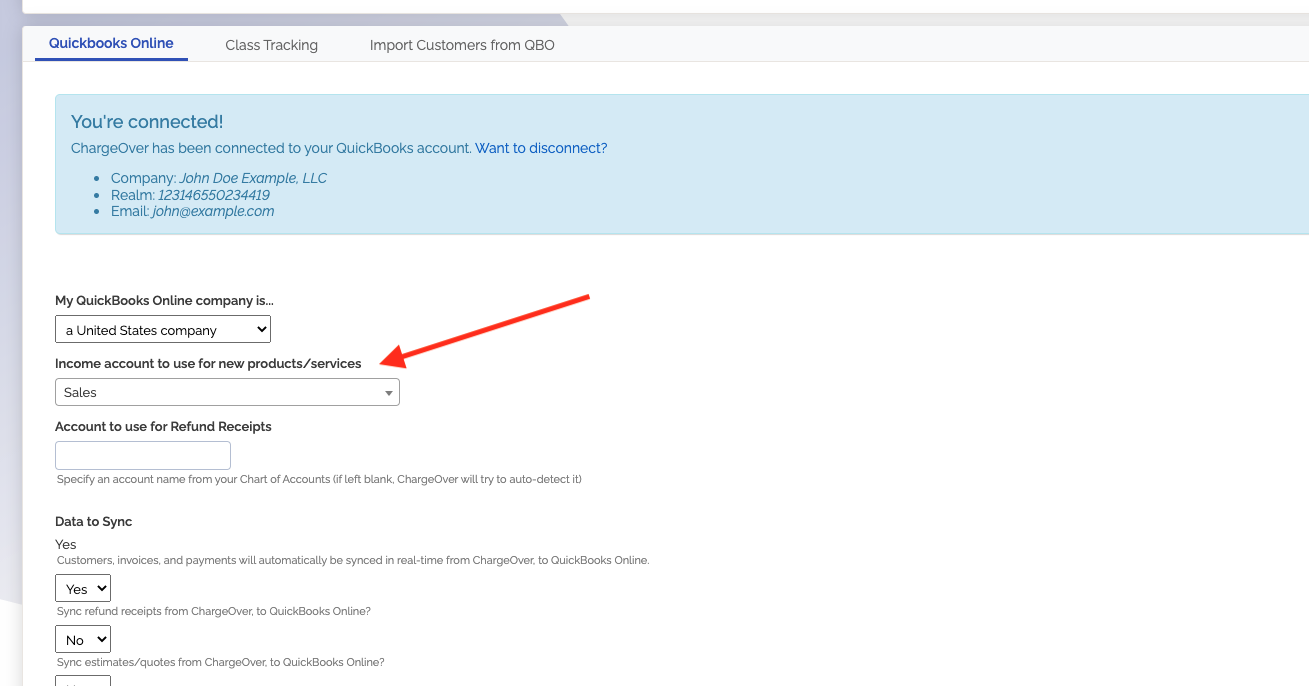
This is usually set to something like Sales or Services.
Another common default is Uncategorized Income, which makes sure that any
product you forget to categorize ends up in an uncategorized account, which you
can then see on your Profit and Loss Report and know to go fix.
Already Existing Products
For any already existing products in QuickBooks, you'll want to change this in QuickBooks.
QuickBooks will also give you the choice to either change this only for new sales going forward, or to change this for historical sales as well.
Troubleshooting
An item in this transaction is set up as a category instead of a product or service
The error message An item in this transaction is set up as a category instead of a product or service means that you
have a product in ChargeOver, that is mapped to a category in QuickBooks (instead of to a product or service).
In ChargeOver, for each product or service on the invoice, go to Products and then Products again, and check the QuickBooks or Xero Item Name mapping for the product. It should reference a QuickBooks product name, not a QuickBooks category name.
Error message 3200
Anytime you see something like 3200: [message=AuthenticationFailed; errorCode=003200; statusCode=401, ] from QuickBooks, it means you are not connected to QuickBooks.
You will need to disconnect and reconnect to QuickBooks and that should solve your issue.
Enter a service date for the revenue recognition line item.
This message occurs when you are using QuickBooks Online Advanced and have enabled revenue recognition.
We recommend using ChargeOver's revenue recognition reporting instead of QuickBooks - it's more accurate, and more flexible.
If you opt to instead use QuickBooks Online Advanced's revenue recognition functionality,
you'll need to enable service dates.
Common Reasons Why You Might Disconnect from QuickBooks
- QuickBooks was down - QuickBooks reports their downtime issues here: https://status.quickbooks.intuit.com/
- Someone disconnected ChargeOver either from within QuickBooks, or from within ChargeOver
- The QuickBooks user who connected ChargeOver, was removed or had their permissions changed inside of QuickBooks