Zapier
Overview
ChargeOver has a rich integration with Zapier to allow you to respond to triggers and make actions happen within ChargeOver.
Steps to Connect
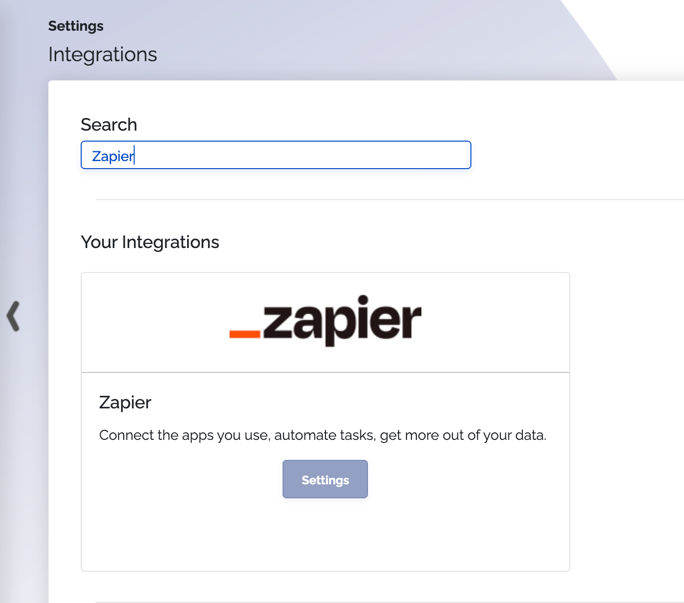
In ChargeOver, go to your Settings and select
Integrations from the left menu. Then chooseMore Integrations Search for Zapier and select
Get Started
On the next page, ChargeOver will display the credentials you'll need to enter in Zapier
Click the
Configure your Zaps button to go to Zapier. A new window will appear and will prompt you to enter the details/credentials from ChargeOver
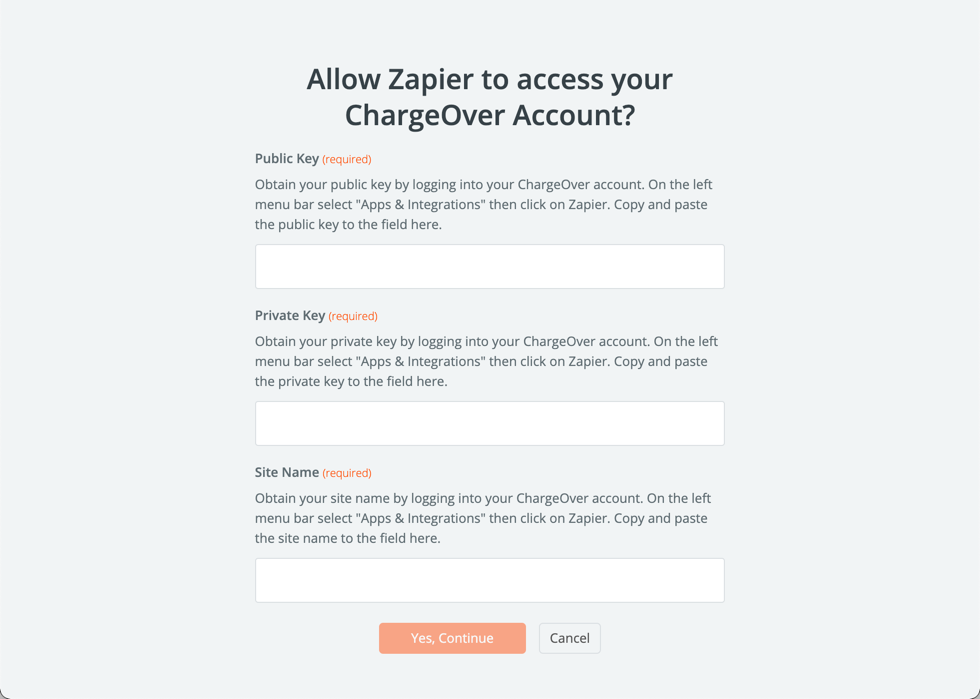
- Once you've entered the details from ChargeOver, click
Yes, Continue
Generate a New API Key
You might need a new Zapier API Private key if you're changing to another Zapier profile, updating to the latest version of Zapier, or maybe you just need a fresh start! Whatever the reason, here's how you generate a new API key for Zapier...
- Start by heading to your Settings, selecting Developer from the left
menu, then selecting REST API
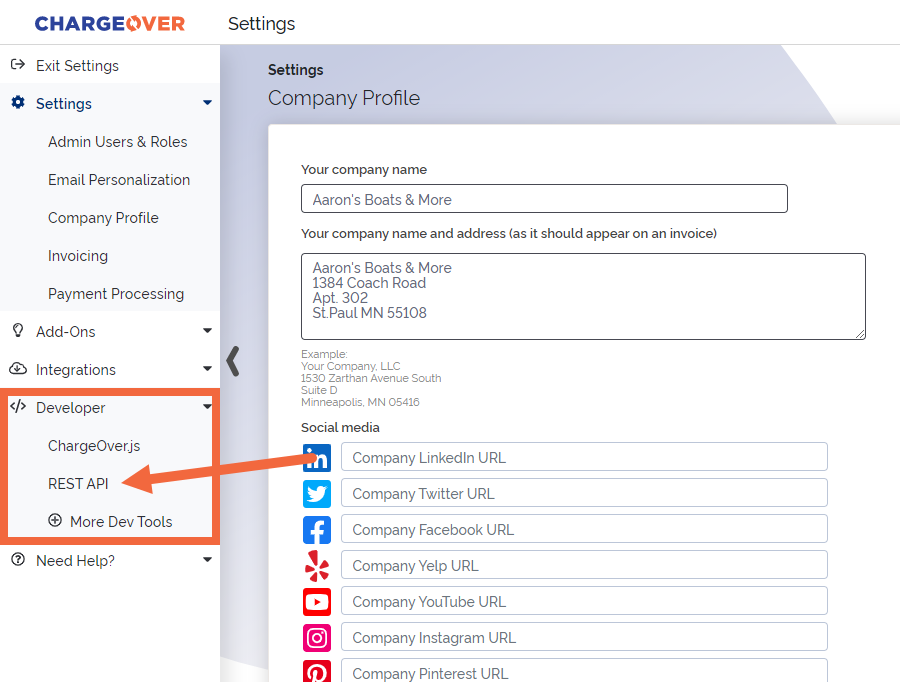
- Click
Manage your credentials - Click
Generate new credentials - Then select
Configure your Zaps
Populate a Spreadsheet When a Payment is Created in ChargeOver
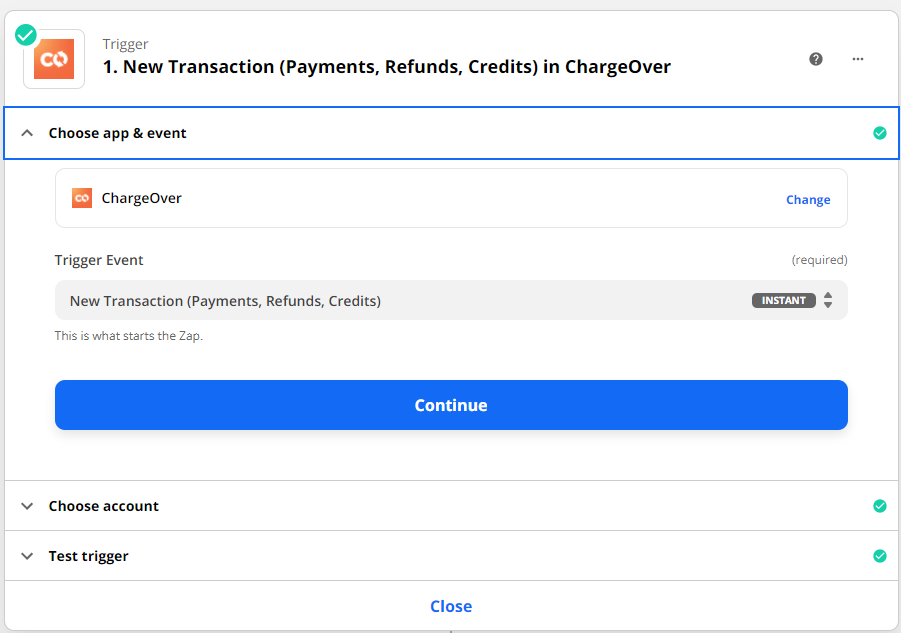
Step #1 - Set Up Trigger in Zapier
Since we're going to be pulling payment data, we'll want to set the trigger to be every time there's a new transaction created in ChargeOver.
- Select ChargeOver from the list of apps
- From the Trigger Event dropdown, select New Transaction
- Select your account from the dropdown and test the trigger.
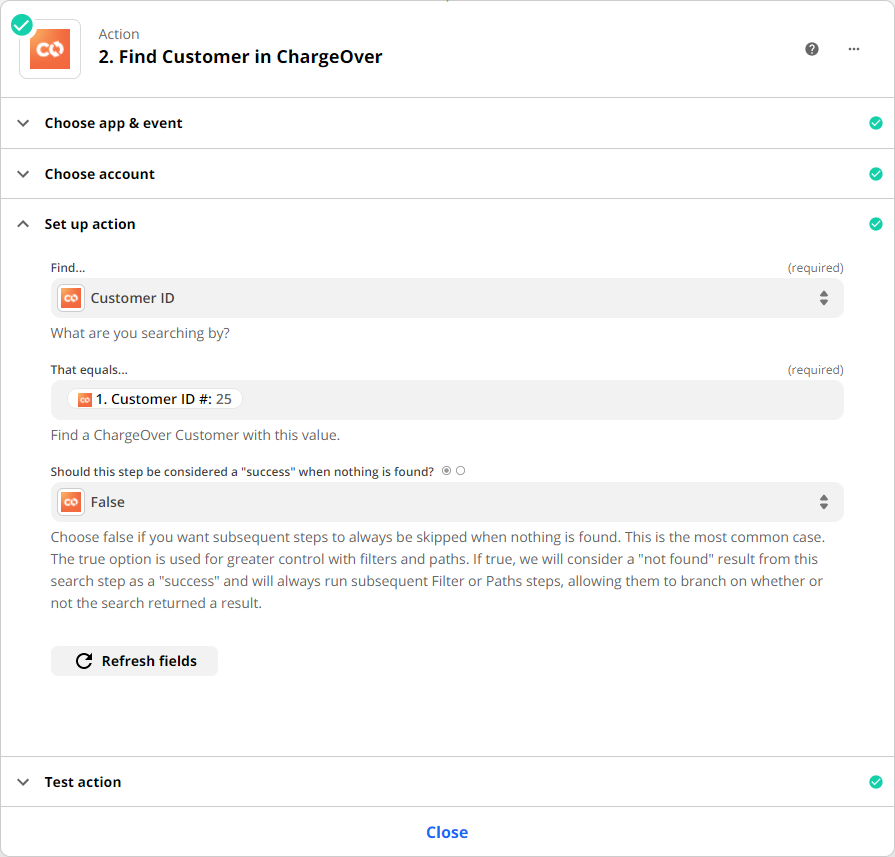
Step #2 - Find Customer
Next, we're going to add an action to find the customer related to this transaction. This will allow us to pull even more information about the customer's payment.
- Select ChargeOver from the list of apps
- From the Action Event dropdown, select Find Customer
- Choose your account
- To set up the action...
- In the Find... dropdown, choose Customer ID as the value
- Under That Equals... search for Customer ID. This will link the customer ID to the transaction.
- When done, click Continue
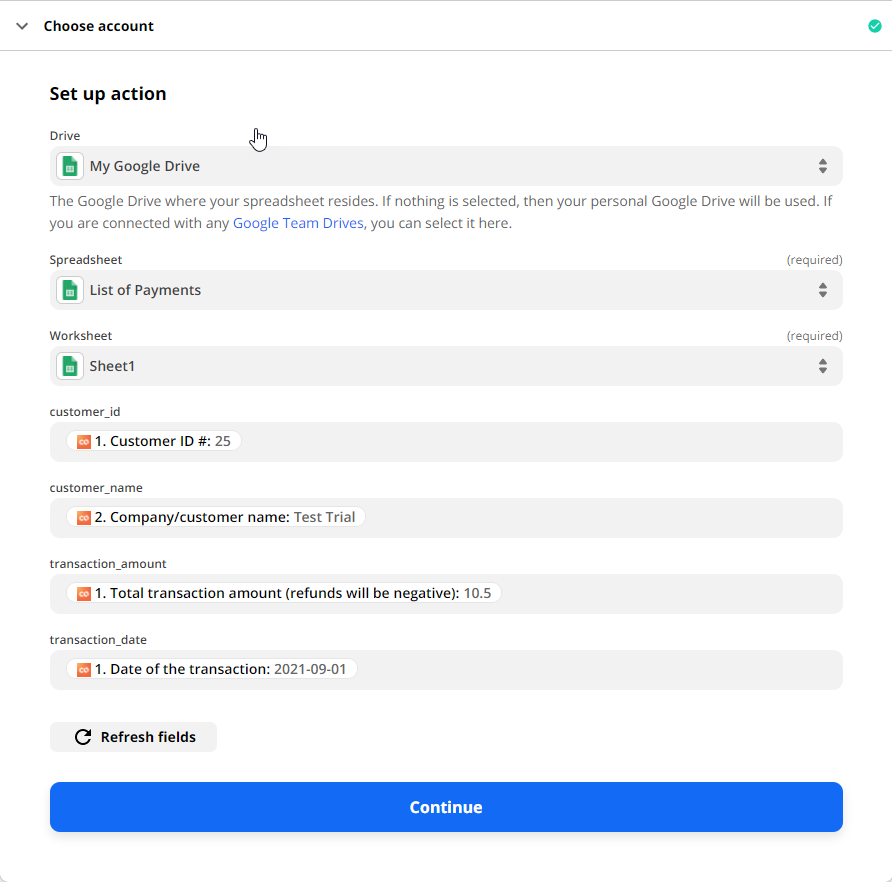
Step#3 - Create Spreadsheet Row
Last, we'll add our action to push all of this data to your spreadsheet. For this example, we're going to use Google Sheets.
- Create a new action and select Google Sheets from the app list.
- Under Action Event selectCreate Spreadsheet Row.** Click continue.
- Choose the account, Drive folder, Spreadsheet, and Worksheet you will want to use.
- Once you've selected your worksheet, a list of headers will appear. For this
example, we're using the following headers on our google sheet...
- customer_id
- customer_name
- transaction_amount
- transaction_date
- Select the data from either the transaction or the customer you want to populate in the columns related to the header. Once you've linked the data fields to the headers, click Continue.
- Test your sheet and you're all set to turn on your Zap!
Use Google Sheets with Zapier
Create New Customer
For this tutorial, we'll use Google Sheets to create a new customer in ChargeOver. This is a great tool if you are using Google Sheets to keep track of your list of customers outside of ChargeOver or if you wanted to import a large list of customers.
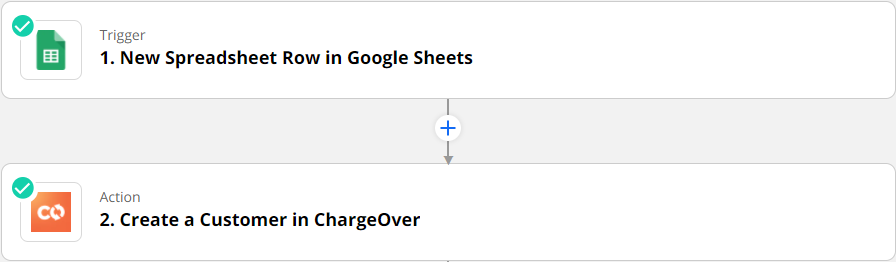
Step #1 - Set Up Trigger in Zapier
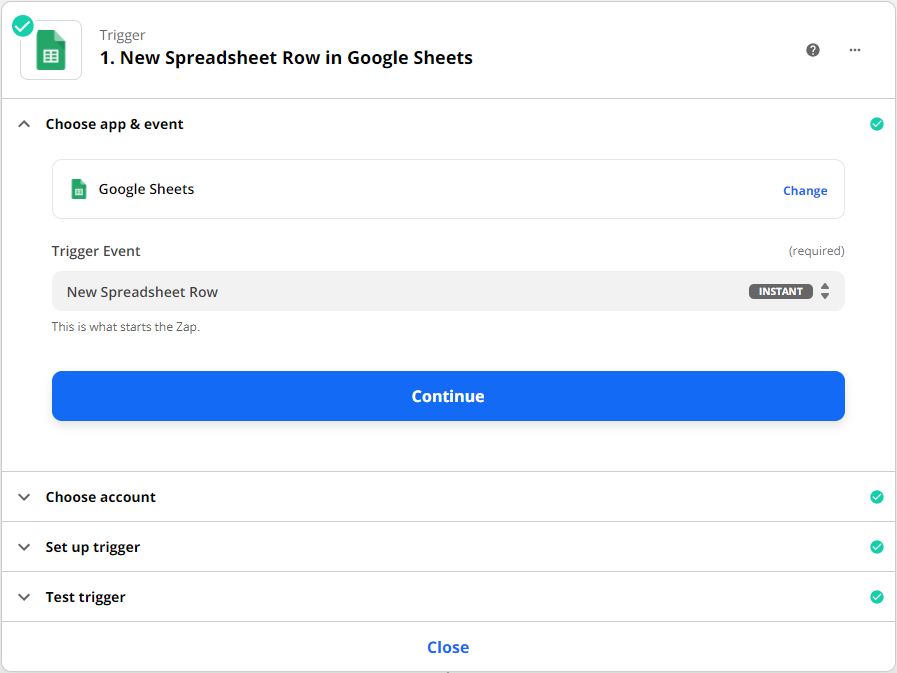
- Select Google Sheets from the list of apps.
- For the Trigger Event, set it to "New Spreadsheet Row"
- Next, select your Google account and which Spreadsheet you'll be working
with. If the spreadsheet has multiple worksheets, select the intended
worksheet as well.
- Your sheet must have column headers. You can name them whatever you want as you'll be linking them to objects in ChargeOver

Step #2 - Add Action Step
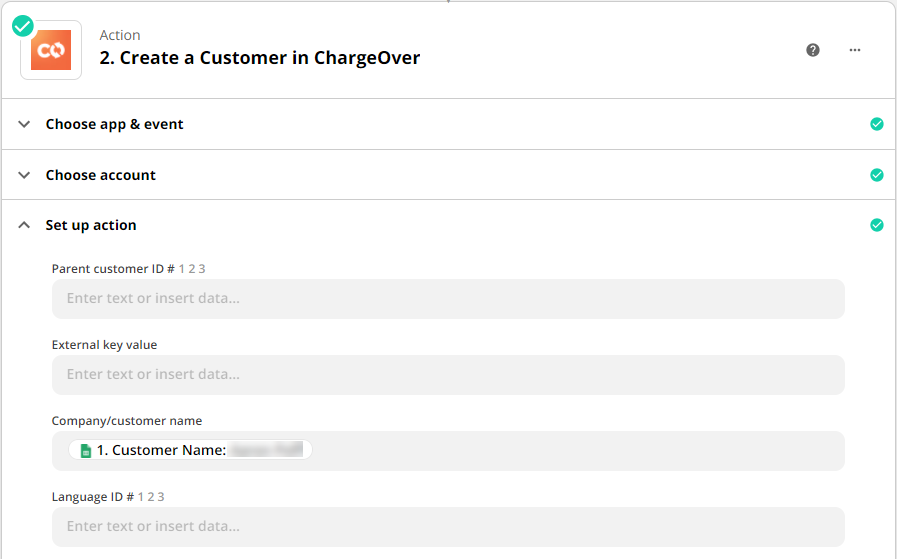
- Choose ChargeOver from the list of apps and set the action event to Create a customer
- Choose your ChargeOver account.
- Next, we'll set up the action. This is where we'll link the columns in your
Google Sheet to the objects/fields in ChargeOver.
- Some of the common ones you'll want to look out for are
- Company/Customer Name
- Main Contact email address
- Main Contact Name (full name)
- Billing Address (line 1, city, state, zip code)
- Some of the common ones you'll want to look out for are
Once you have the trigger and action set up, every time you add a row to the sheet, a new customer will be created in ChargeOver.
Create a Subscription
For this tutorial, we'll use Google Sheets to create a new Subscription in ChargeOver. This can be very helpful if you're managing new subscription signups outside of ChargeOver or if you need to import a large amount of new subscriptions into ChargeOver.
Setting Up Your Google Sheet
Before we begin, you'll need to make sure your google sheet is properly set up. There are a few columns that are required and some that may be helpful when creating the subscription.
The following columns are required
- Customer ID#
- Item ID#
- Item Quantity
- Item Rate
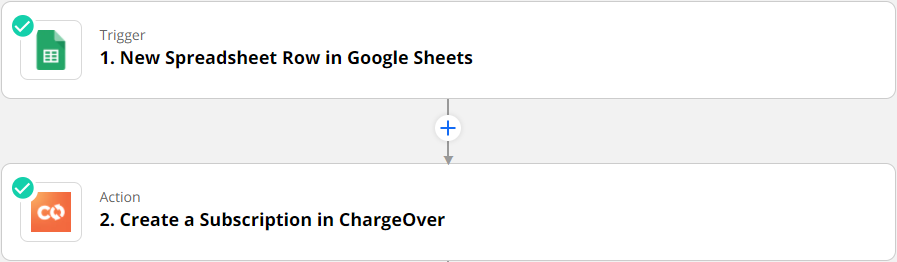
Step #1 - Set Up Trigger in Zapier
- Select Google Sheets from the list of apps.
- For the Trigger Event, set it to "New Spreadsheet Row"
- Next, select your Google account and which Spreadsheet you'll be working
with. If the spreadsheet has multiple worksheets, select the intended
worksheet as well.
- Your sheet must have column headers. You can name them whatever you want as you'll be linking them to objects in ChargeOver.
- Make sure you have columns for the required fields mentioned above.
Step #2 - Add Action Step
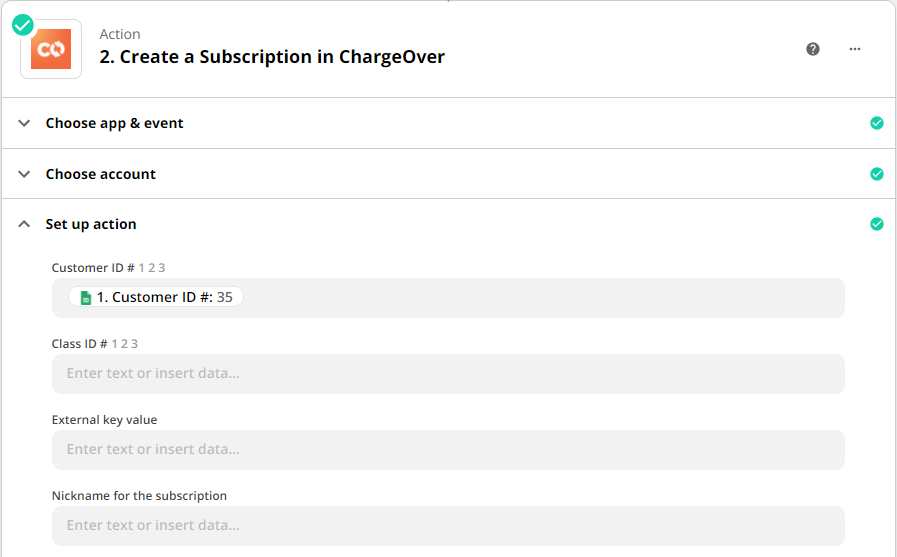
- Choose ChargeOver from the list of apps and set the action event to Create a Subscription
- Choose your ChargeOver account
- Next, we'll set up the action. This is where we'll link the columns in your Google Sheet to the objects/fields in ChargeOver
- Make sure you set your required fields mentioned above, otherwise the action will fail

Once you have the trigger and action set up, every time you add a row to the sheet, a new subscription will be created in ChargeOver.
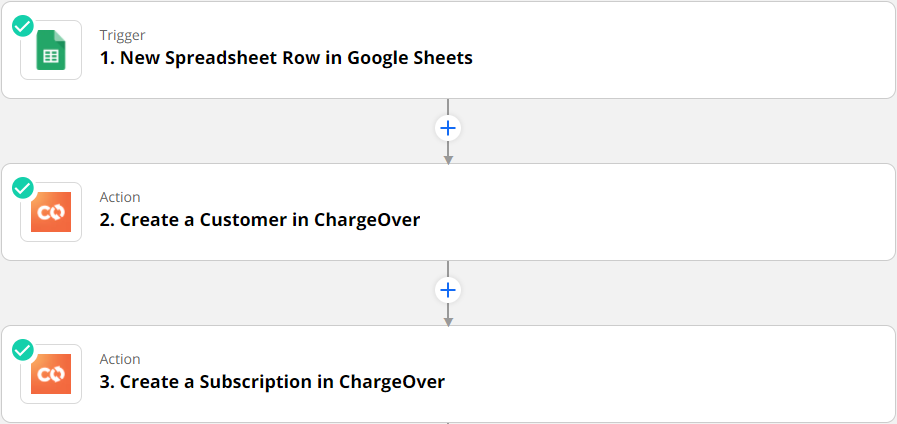
Create New Customer and New Subscription
For this tutorial, we'll use Google Sheets to create a new customer and a new subscription in ChargeOver.
This can be very helpful if you're managing new signups outside of ChargeOver or if you need to import a large amount of new customers and subscriptions into ChargeOver.
You will be taking advantage of Zapier multi-step process to create a customer, then a subscription all in one Zap.
Setting Up Your Google Sheet
Before we begin, you'll need to make sure your google sheet is properly set up. There are a few columns that are required when creating the subscription.
The best way to set up your sheet headers would be to use field names that already exist in ChargeOver.
The following columns are required
- Company/Customer Name
- Item ID#
- Item Quantity
- Item Rate
Step #1 - Set Up Trigger in Zapier
- Select Google Sheets from the list of apps.
- For the Trigger Event, set it to "New Spreadsheet Row"
- Next, select your Google account and which Spreadsheet you'll be working
with. If the spreadsheet has multiple worksheets, select the intended
worksheet as well.
- Your sheet must have column headers. You can name them whatever you want as you'll be linking them to objects in ChargeOver. Best practice is to name them after the existing fields in ChargeOver
- Make sure you have columns for the required fields mentioned above.

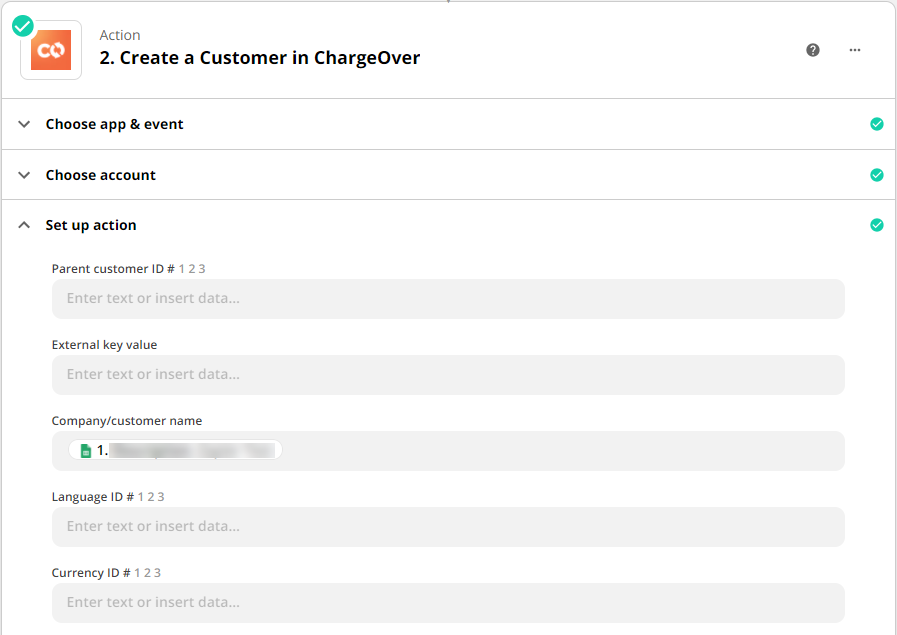
Step #2 - Set Up Action to Create Customer
- Choose ChargeOver from the list of apps and set the action event to Create a Customer
- Choose your ChargeOver account
- Next, we'll set up the action. This is where we'll link the columns in your
Google Sheet to the objects/fields in ChargeOver
- Some of the common ones you'll want to look out for are
- Company/Customer Name
- Main Contact email address
- Main Contact Name (full name)
- Billing Address (line 1, city, state, zip code)
- Some of the common ones you'll want to look out for are
- When you're finished assigning the columns to the customer fields, test your trigger and add a new step
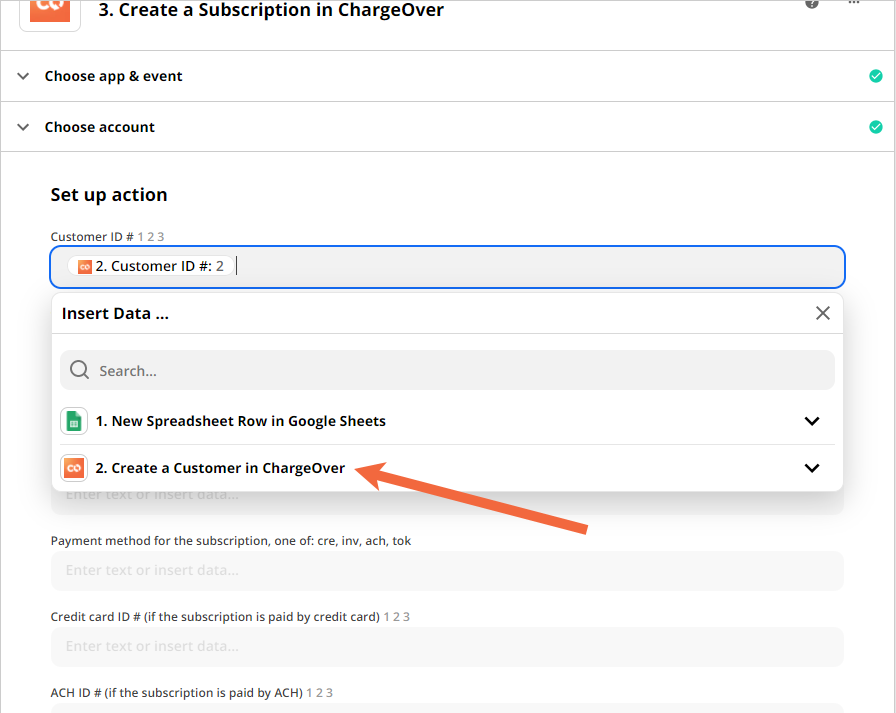
Step #3 - Set Up Action to Create Subscription
- Choose ChargeOver from the list of apps and set the action event to Create a Subscription
- Choose your ChargeOver account
- Next, we'll set up the action. This is where we'll link the columns in your
Google Sheet to the objects/fields in ChargeOver
- To link it to the customer created in the previous action, in the "Customer ID" field, select the "Create a customer in ChargeOver" instead of the Google Sheets option. Search for "Customer ID", make sure it has the ChargeOver logo next to it
- Make sure you have the required columns mentioned above as well
- Test your action and make sure you don't have any errors
If the test is successful, you're all set to enable the Zap.

Once you've completed the above steps, you'll be able to create customers and subscriptions at the same time using a single zap.
Create Multi-Line Invoices or Subscriptions
Step #1 - Setting Up Trigger in Zapier
Like with any other Zap, you'll need to start with a trigger. The trigger could be anything from a new line item on a google sheet or creating a new customer in ChargeOver. For the purpose of this help article, it doesn't matter what you select. The next step is most important.
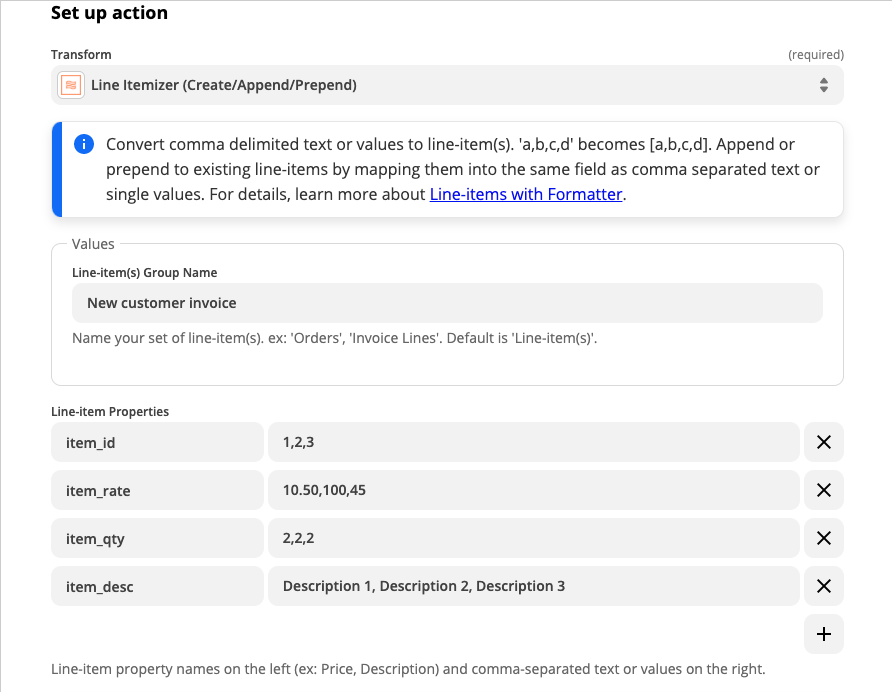
Step #2 - Add Format Step
We are going to use the Utility action to create a package of the line items we want to add on the invoice or subscription.
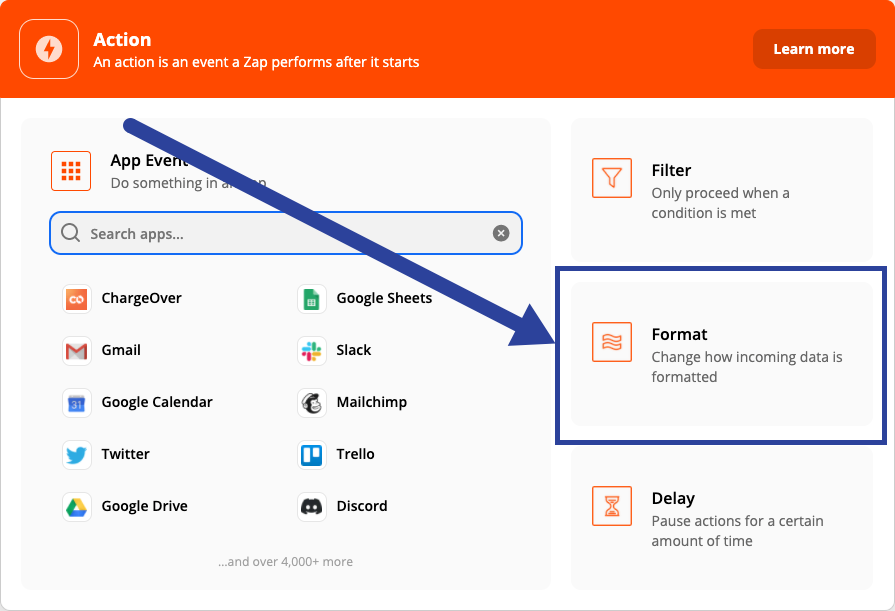
- Start by adding a new action and choose Format
- Next, under Action Event select Utilities from the dropdown. Select
Continue - From the Transform dropdown, select Line Itemizer
- Next, we're going to fill out the fields needed...
- Group Name - Naming the group of line items This can be anything but make sure it's memorable and readable... we'll need it later
- We're going add 4 fields to the Line-item Properties section named
- item_id
- item_qty
- item_rate
- item_desc
- In the line item properties fields, fill in the values as comma separated
values (e.g. "10,20,30" or "15.45,56,34.45") You'll be manually typing
these out, so make sure not to select any of the fields from your Trigger
- If you have multiple item_ids but they're all the same rate, you can enter 1 rate. Same applies to qty as well
- Not sure how to find your item_id? Click here for a guide on how to find your item_id
- The rest of the fields do not need to be configured. Only the Group Name and Line Item Properties need to be configured
- Once your action is setup, click Continue and don't forget to test the step
At the end of the steps, your format utility should look something like this.
Step #3 - Add Action Step to Create New Invoice
Last, we're going to set up the action step to create the new invoice or subscription.
First we will set the app to ChargeOver and set the Action Event to Create an Invoice or Create a Subscription, then hit Continue
Choose the correct ChargeOver account then hit Continue
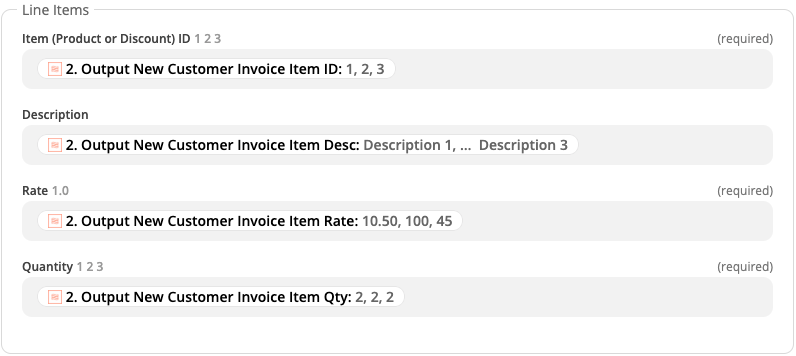
Once we're on the Setup Action section, we'll want to scroll all the way to the bottom of the list until we reach the Line Items box. This is where we're going to pull in all of the different fields we created
Click into each of the dropdown and select Utilities which will reveal the 4 fields associated with that Utility we just created
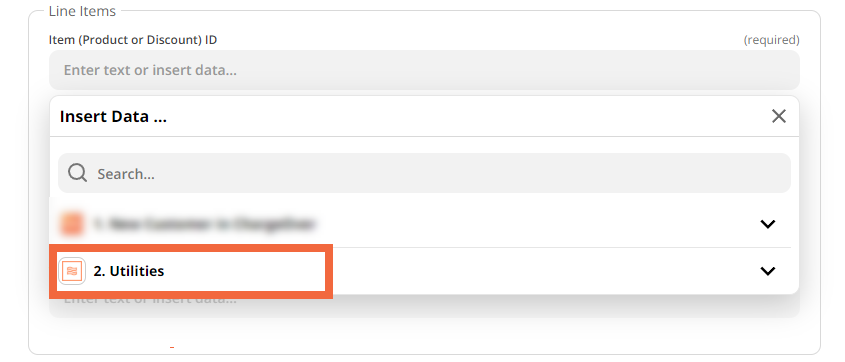
Match up the different line_item properties with the different Utilities fields
- Item ID --> item_id
- Description --> item_desc
- Rate --> item_rate
- Quantity --> item_qty
Once you've got those fields entered, you are all set to start creating multi-line invoices or subscriptions
The Format step in Zapier is key to creating a new invoice or subscription with multiple line items.
Action for When a Customer Subscribes to a Specific Product
Although ChargeOver's native integration with Zapier does not send you the specific line item on a subscription yet, you can still accomplish this with a little trickery in Zapier.
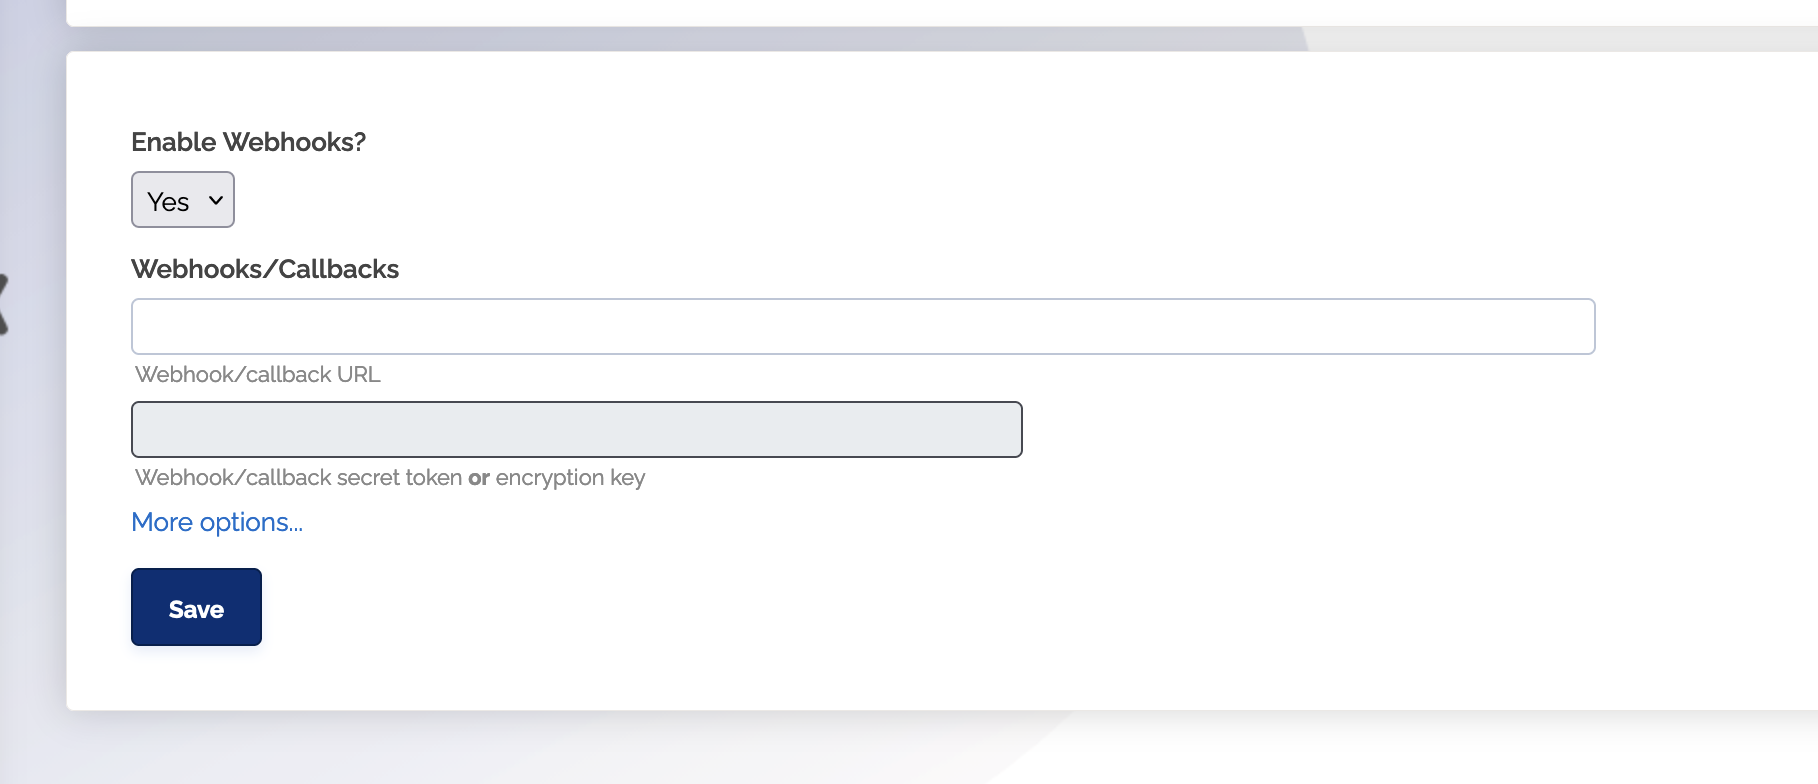
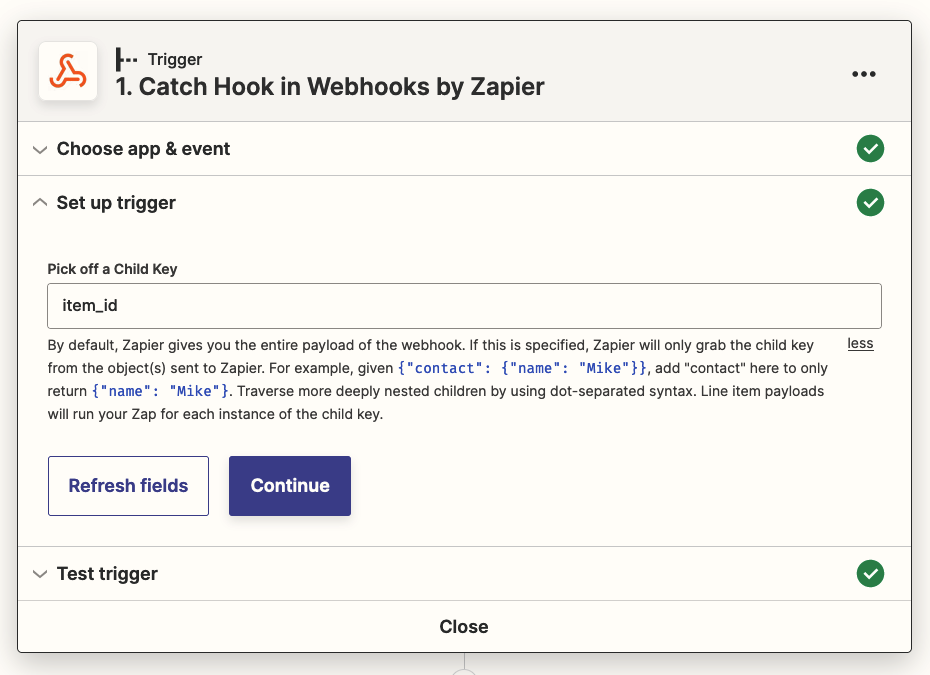
- Use the Webhooks by Zapier tool
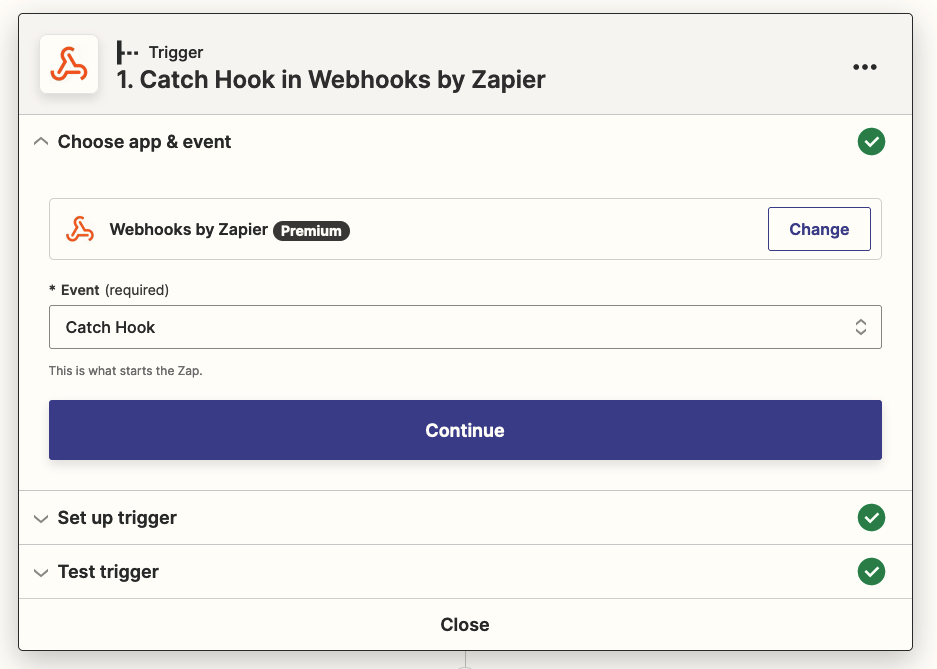
- In ChargeOver, use the URL from Zapier as a webhook URL
- Pick off the item_id field
You could also pick off item_name or item_external_key if that's easier for you to work with.
- Use the URL provided by Zapier as your ChargeOver Webhook URL
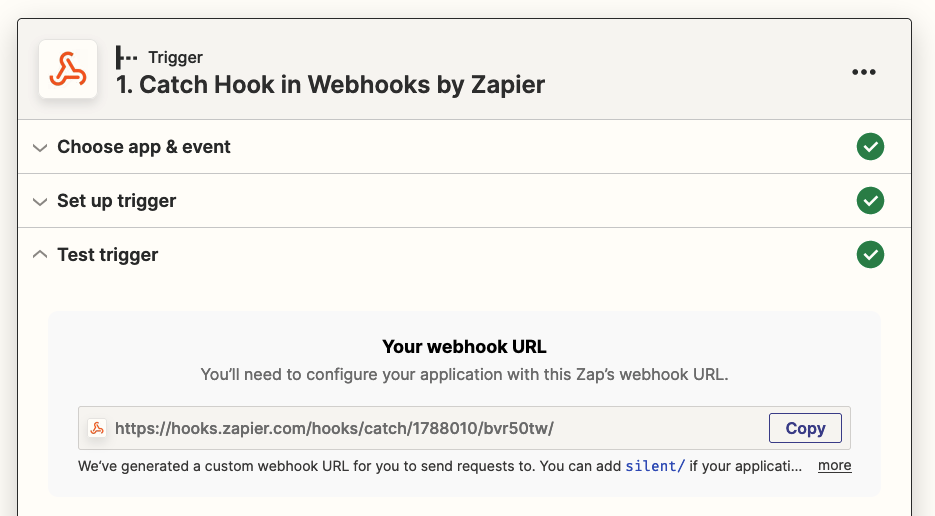
Zapier will fire your Zap with data about each line item on the subscription, and you can then build the rest of your Zap from there.