Getting Paid
How can I get paid?
Before we go through the different payment options available in ChargeOver, it might be helpful to know that when a customer makes any payment, ChargeOver automatically saves the payment method information for future use. This stored payment information can be found under the payment methods tab under the customer in ChargeOver.
If a customer pays an invoice generated from a subscription, ChargeOver's default behavior is to not only save the payment method details in ChargeOver, but the software also automatically attaches the payment method to the subscription. When new invoices are created from that subscription, they are auto-paid using the connected payment method.
So, how can you get paid in ChargeOver? There are a few different options. You can use pay links in your email templates, auto-pay, payment schedules, dunning and reminders or hosted sign up pages. For example, your customer can make a payment themselves from the payment links in emails they receive, the payment could be automatically ran or it could be following a payment schedule, the payment could be automatically retried through your dunning and reminder settings, or the customer could pay through a hosted sign up page. There are lots of options and paths you can take to make sure you are getting paid.
Pay links in email templates
This is one of the most common ways people usually receive their first payment from a customer. Our email templates have secure links embedded in them that makes it easy for the customer to click into and pay their invoice.
Most times, the invoice due email template is selected to automatically send out when the invoice is created and no successful payment has been made yet. To learn more, check out our documentation about the email personalization tab.
Auto-pay
By default, your customers are always opted into auto pay when they make their first successful payment in ChargeOver.
If you want to set up auto-pay for the customer yourself, you can do that as well. If you do not want your customers opted into auto pay or you want to make a manual payment for a customer, you can do so.
Manually set up auto-pay for a customer
Manually setting up a customer to be on auto-pay allows for you to assign different payment methods to different subscriptions for a customer. It also allows you to take automatic payments for a subscription instead of charging the customer manually for any created invoices, or having to wait for your customer to use one of the pay links so that their payment method details can be saved.
This is how you would manually setup a customer to be on auto-pay in ChargeOver.
- Go to the customer and click their subscriptions tab
- Hover over the box on the right-hand side of your screen, where it says 'Payment Method'
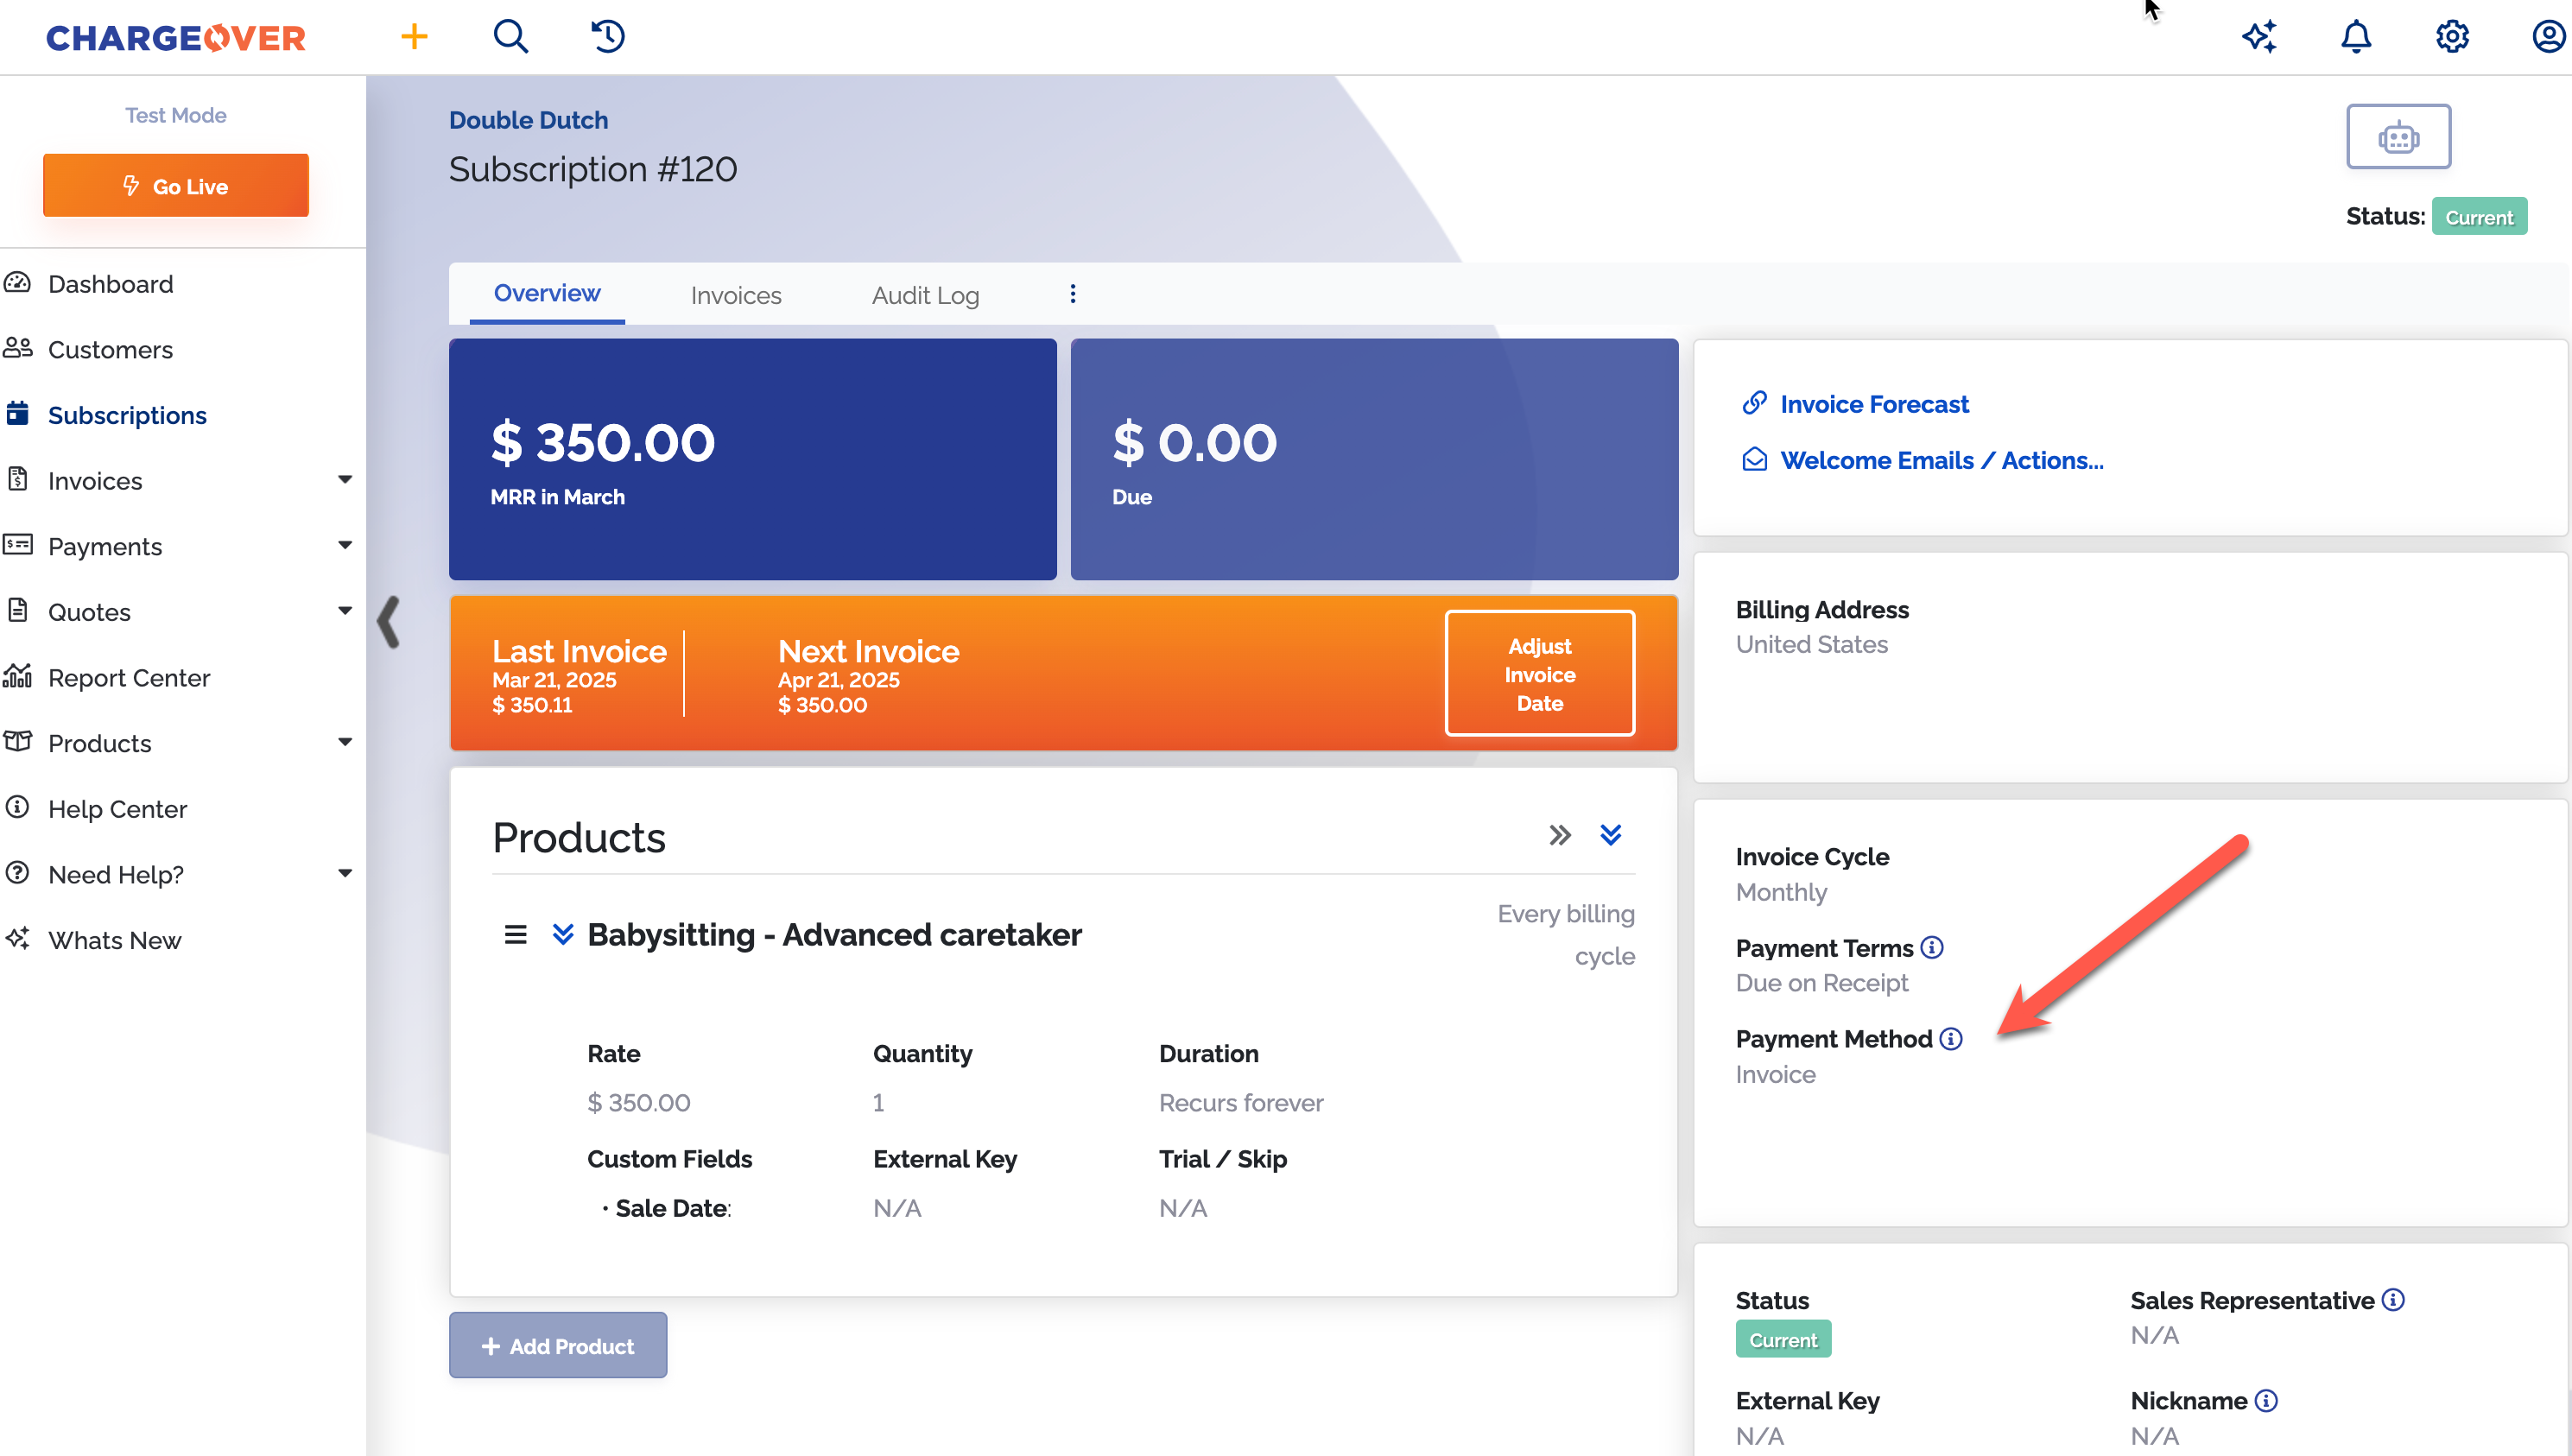
- Click the
Edit button that appears - Select an existing payment method that should be used to pay the subscription or enter in a new payment method
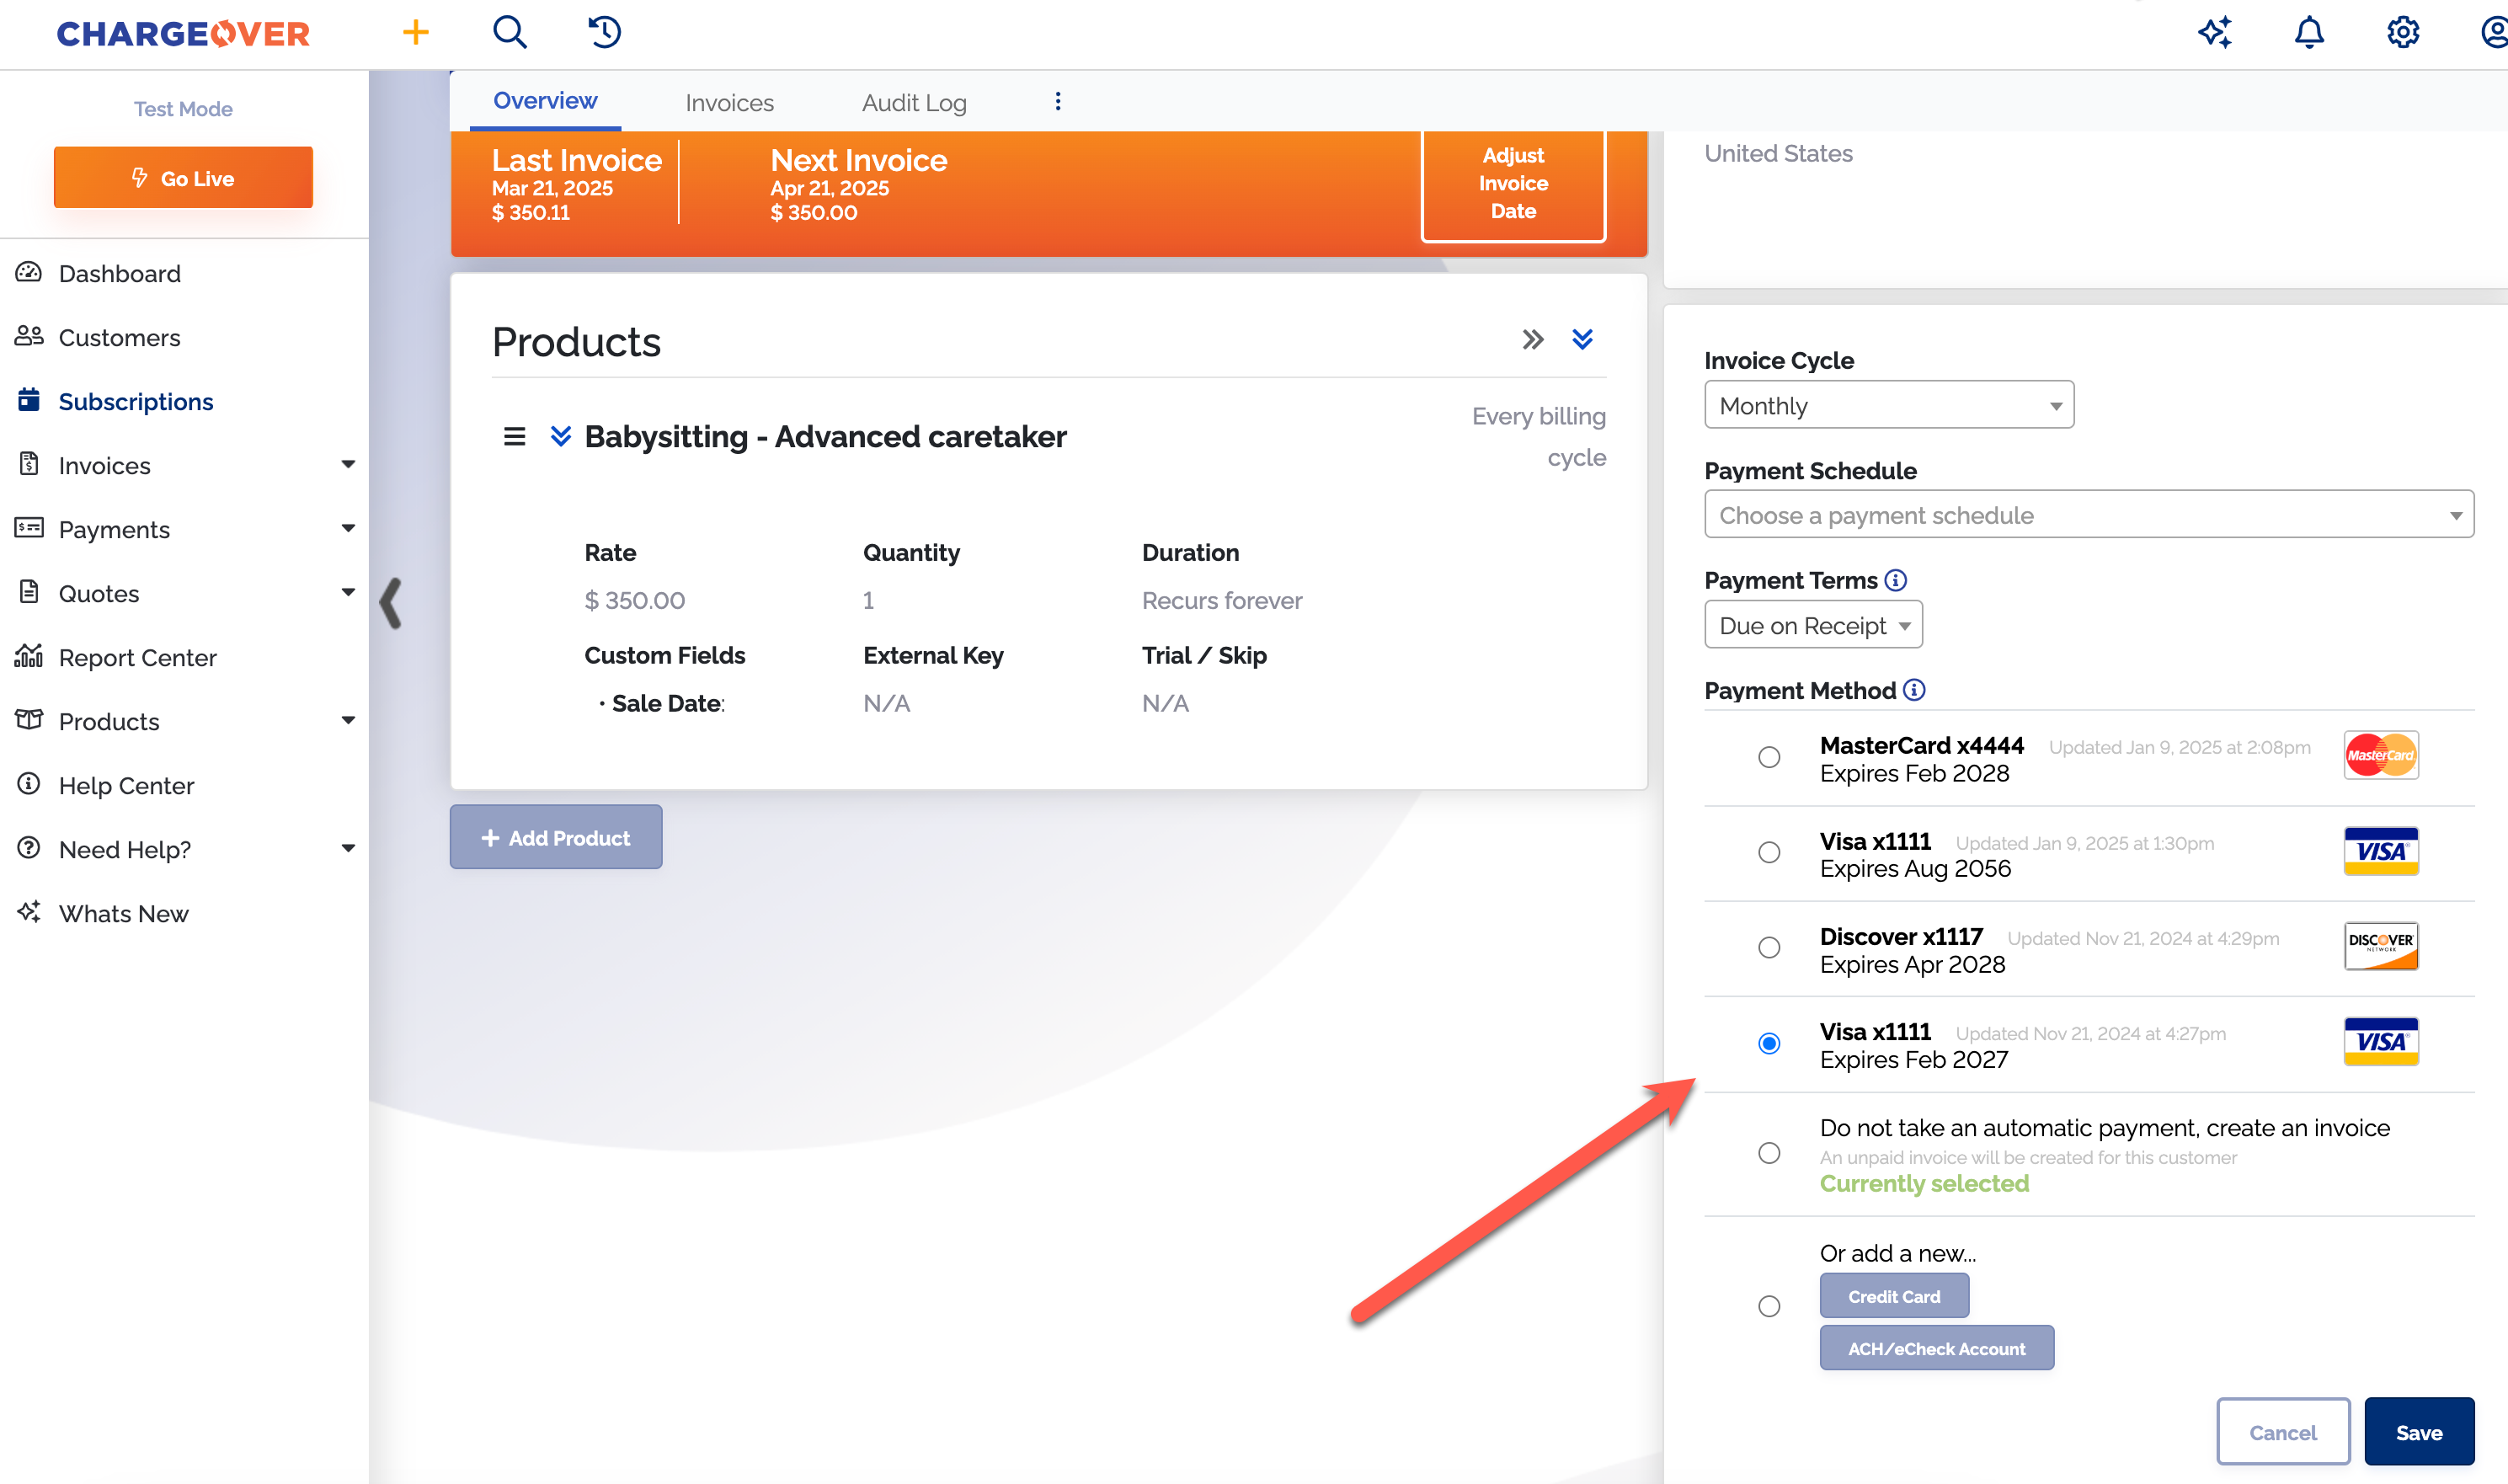
Save your changes
Now you have set up the customer's subscription to auto-pay! If you ever want to take a subscription off of auto-pay, you can follow the steps here to switch the payment method to invoice only.
Payment schedules
Using the payment schedules settings, you can configure the default behavior for collecting payments automatically when an invoice is sent for a subscription.
If you want to learn more about payment schedules you can go here.
Dunning and reminders
Dunning is an automated process that is usually used for follow-ups for late, overdue, or declined payments. If you want to avoid the headache of manually keeping track of who hasn't paid you yet and having to follow up with those customers to ask for payment, you should use dunning and reminders. With dunning and reminders in ChargeOver, we give you more ways to customize and set up your dunning groups. For example, if you wanted an email to be sent to the customer when the invoice is created and then send a follow up email asking for payment once the invoice became overdue, you could do so.
You can check out our help video for more information about dunning and reminders here.
Hosted sign up pages
ChargeOver provides hosted sign up pages or checkout forms for each of your plans and products. The main point of hosted sign up pages is to sign up new customers through a secure page and gather as much information on them as possible. Depending on what information you decide to collect from the customer, you can automatically create the customer, subscription, first invoice, first payment and contact info all in ChargeOver at once.
When there is a successful transaction from a hosted sign up page, ChargeOver will save the customer's payment method.
For more information on hosted sign up pages, you can click here.
Adding a payment processor
You will need to be connected to a payment processor to take payments in ChargeOver from your customers. When your customers make payments through ChargeOver, ChargeOver sends the payment to your payment processor and they communicate the payment status back to us. They let us know whether or not they approved or declined the payment.
To connect your payment processor account to ChargeOver, follow the steps below.
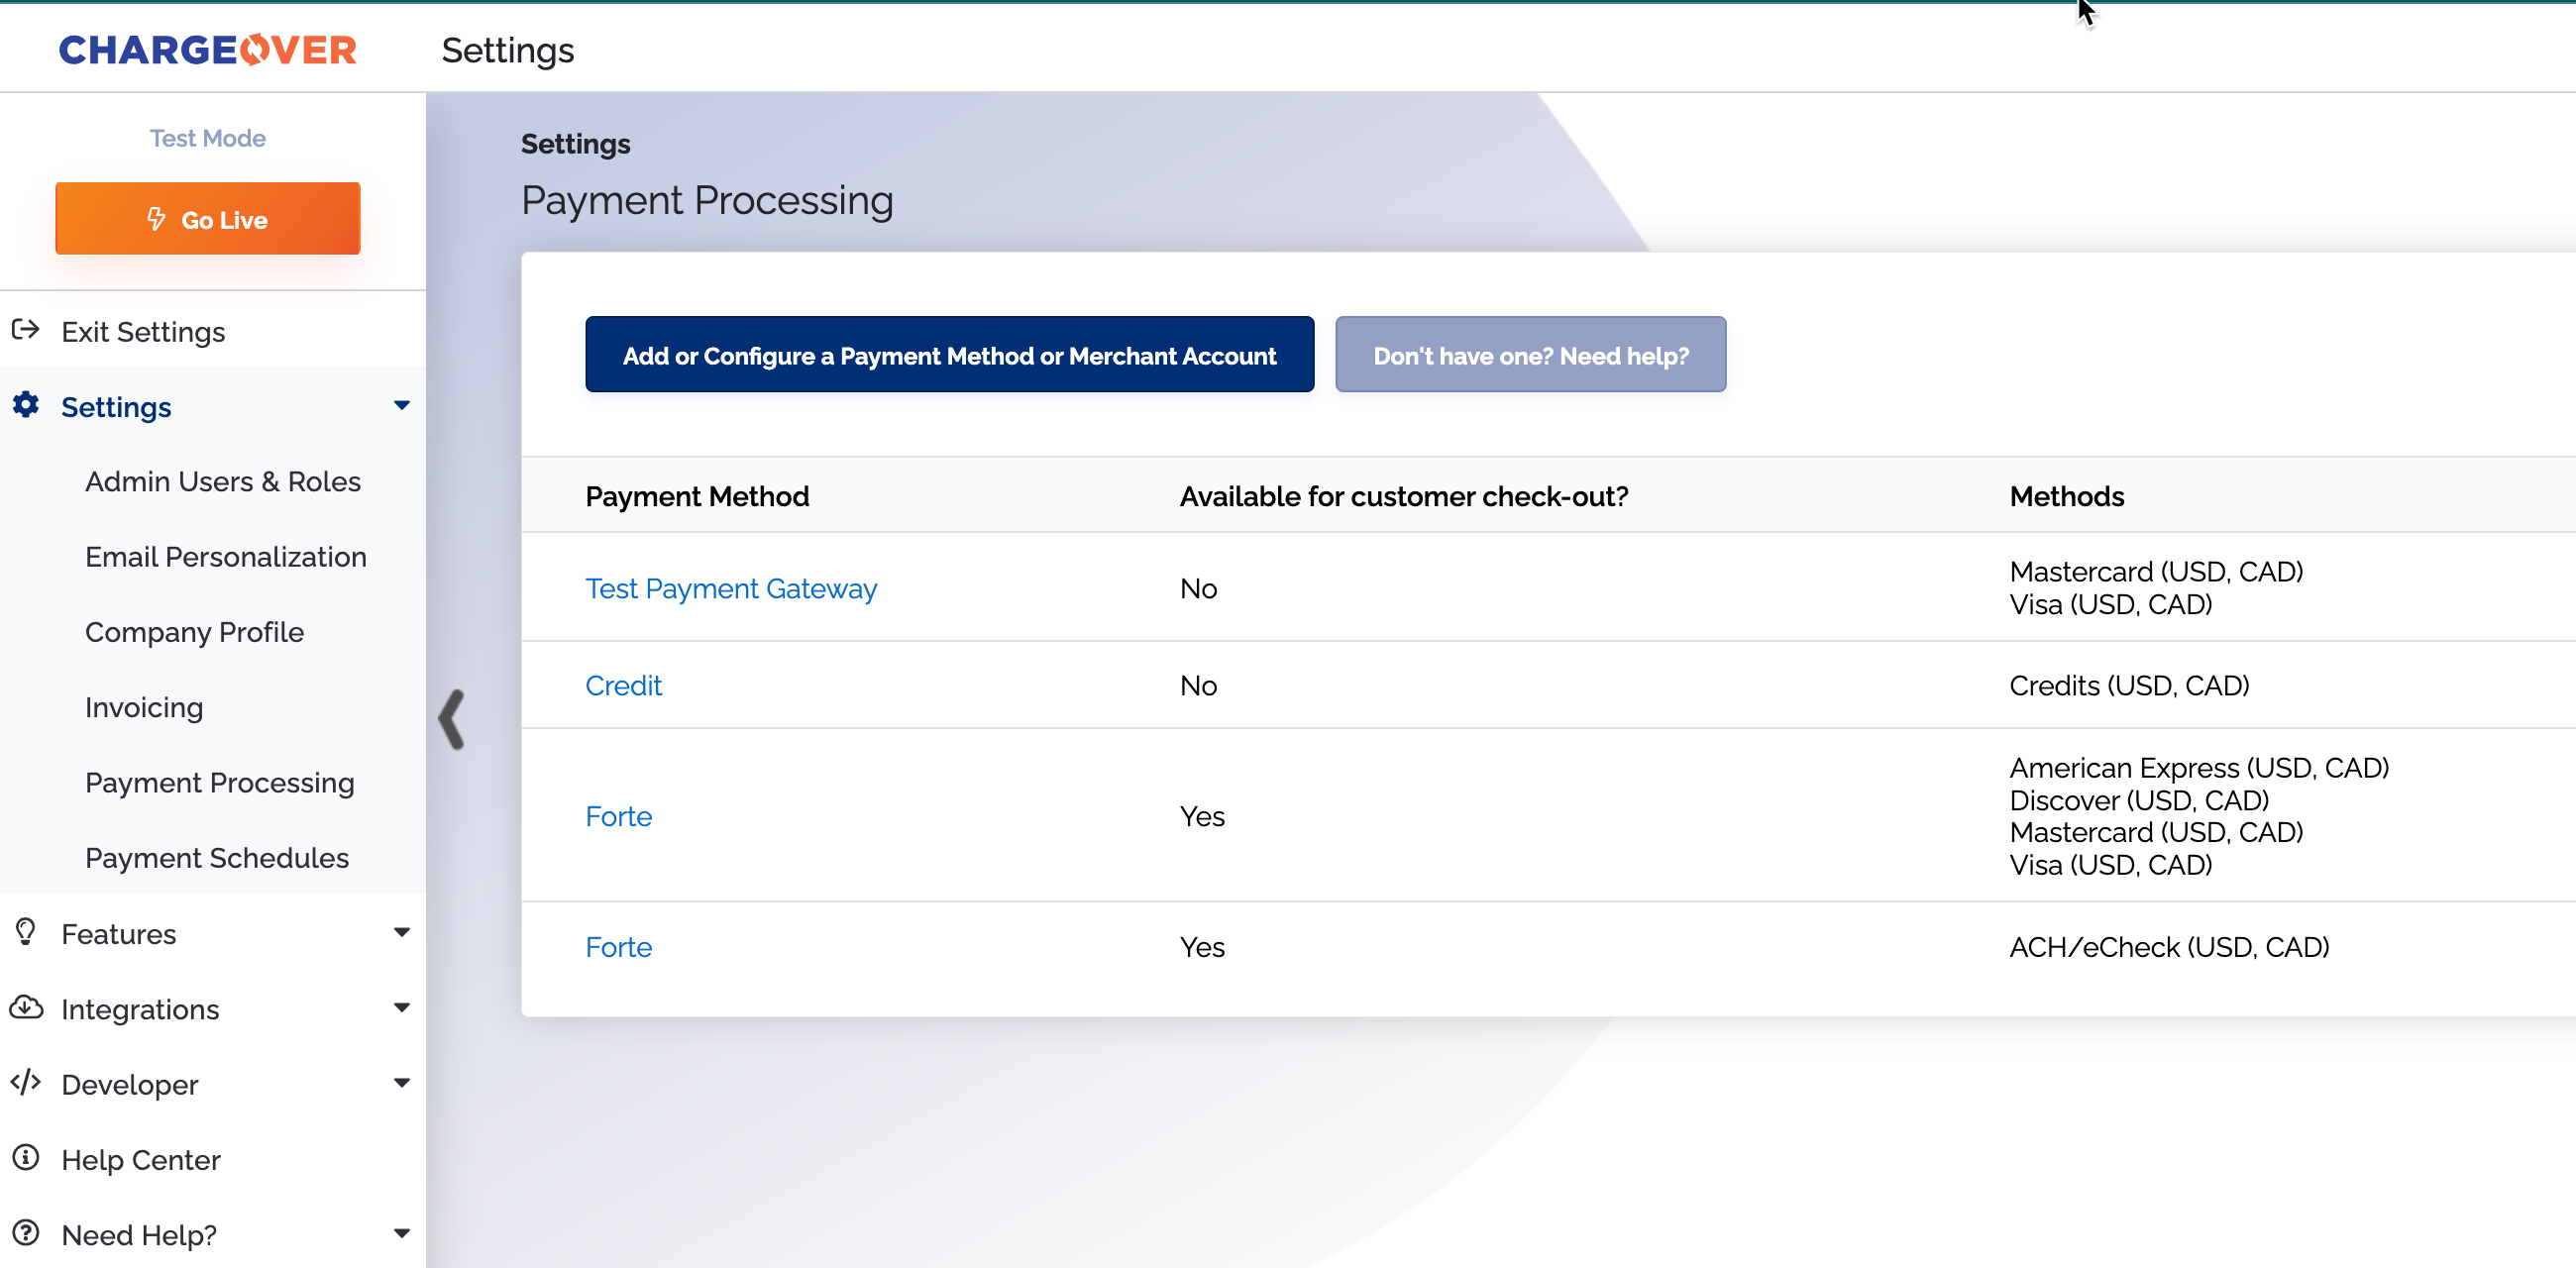
- Go to your Settings, then the
Payment Processing tab - Click
Add or configure payment method or merchant account - Search for your processor you want to connect to and connect to them
- To make a payment method available to use, you have to check the checkboxes by each one and select currencies as well, if you process more than one currency
- Select from the drop down under 'available for customer checkout?' to either yes or no
- Yes, allows customers to use the payment method upon checkout
- No, allows you to submit payments for your customers using the payment method, but not your customers
Save your changes
Multi-currency
ChargeOver supports a wide variety of currencies. Multiple currencies can be used at once, within the same ChargeOver account, as well. Different payment gateways can be assigned to different currencies as well.
Add multiple currencies
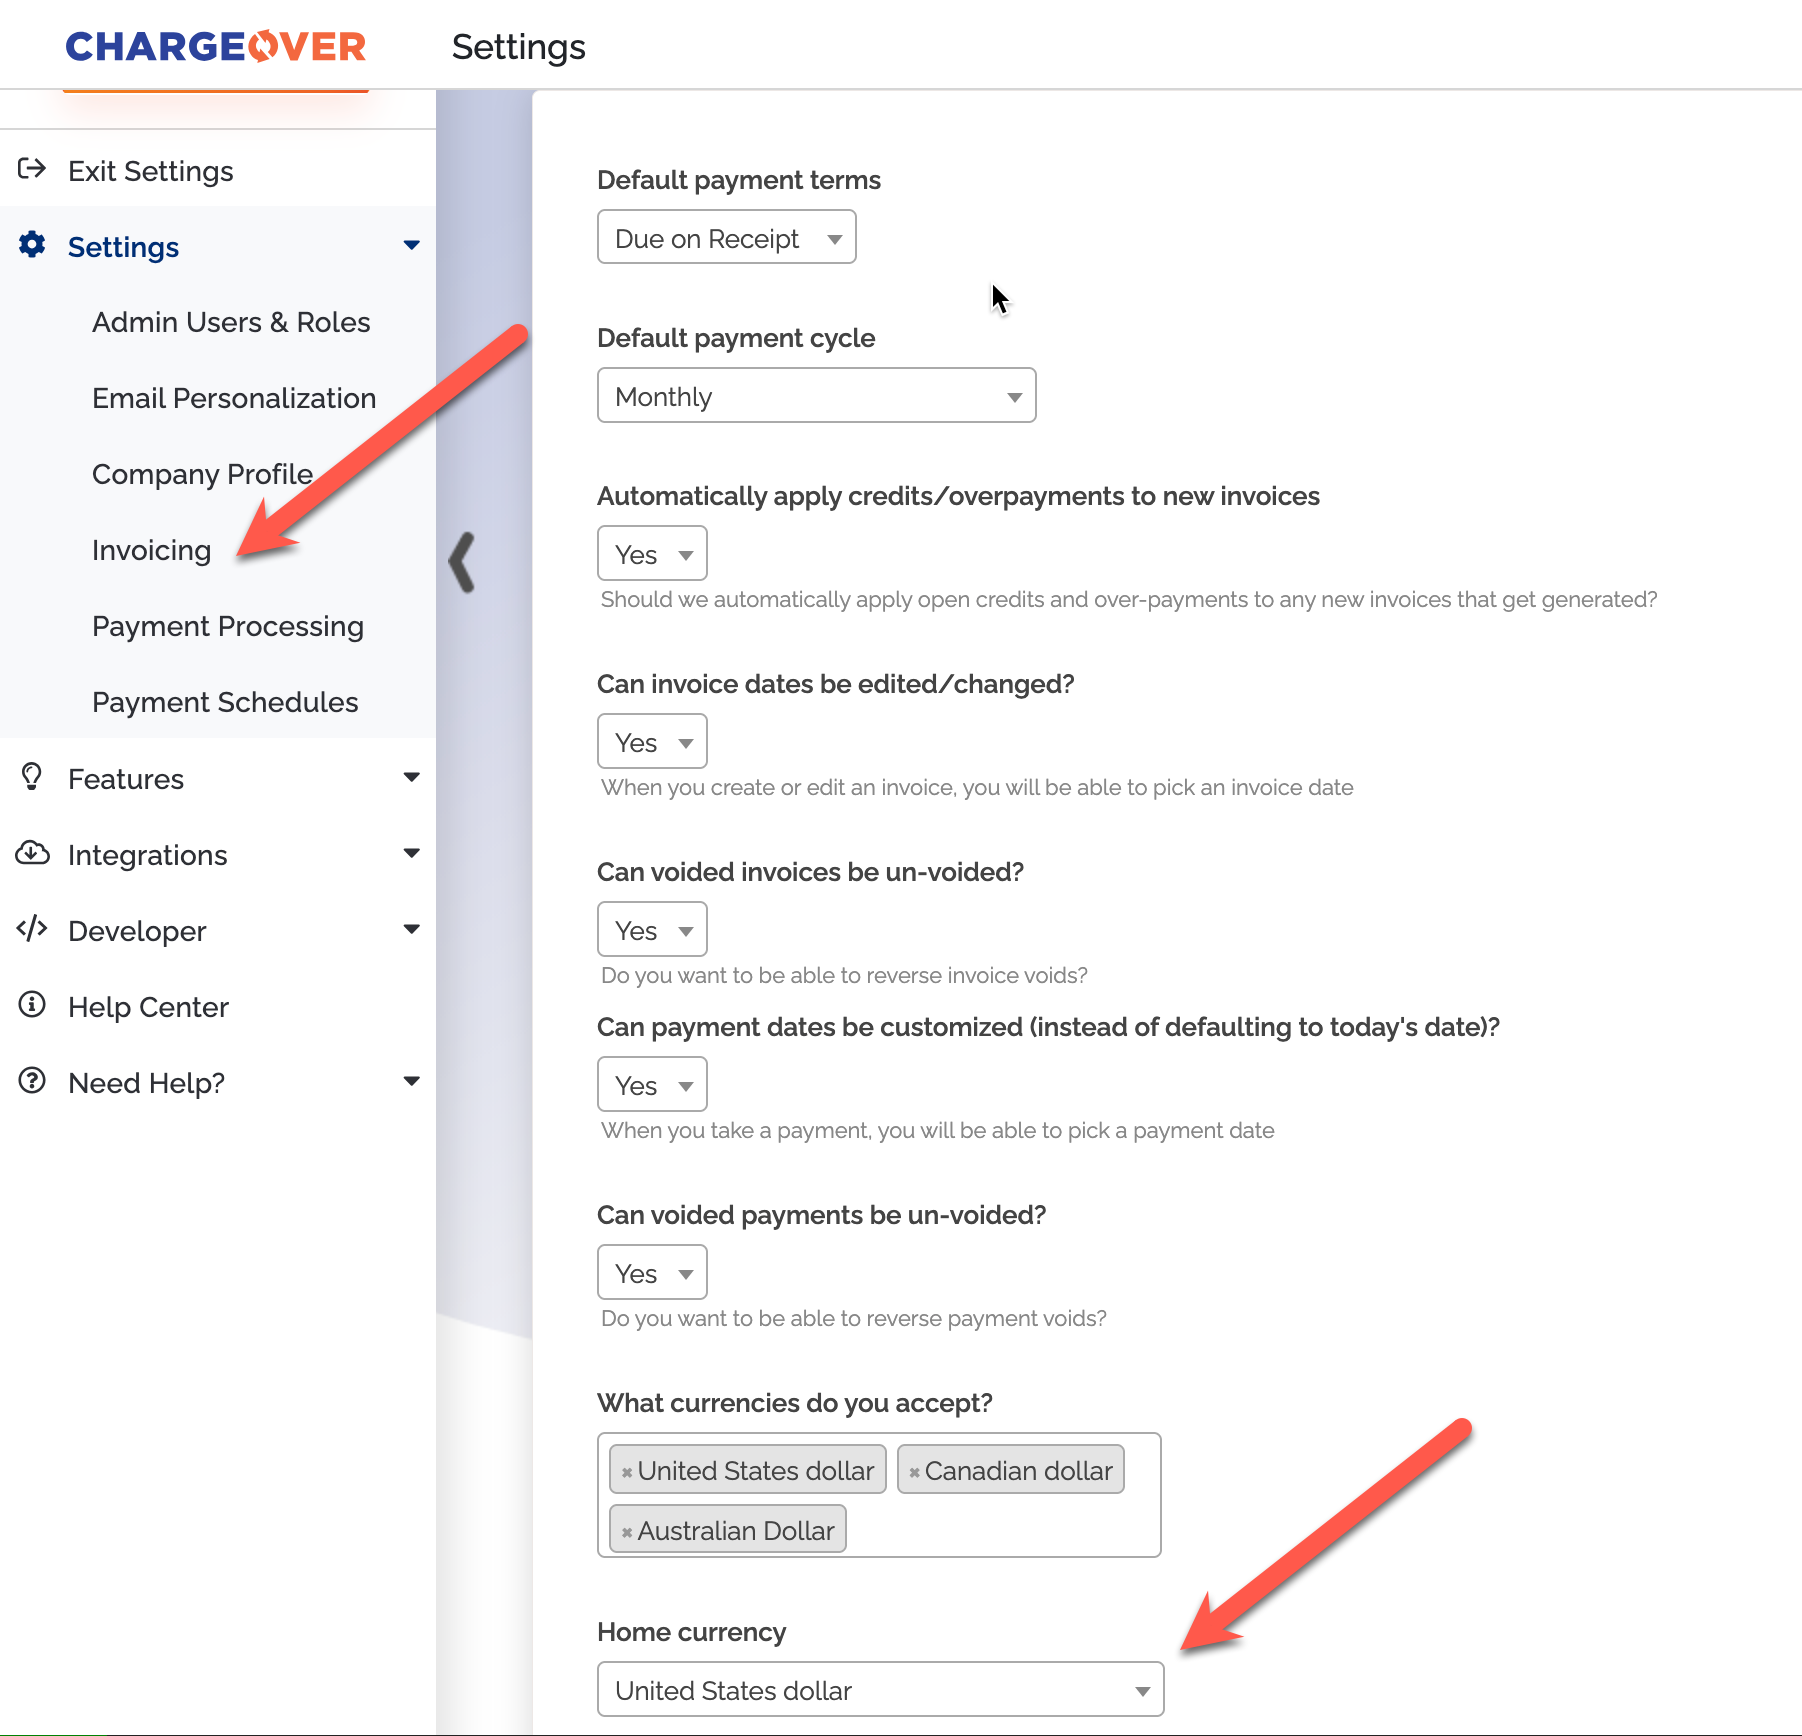
- Go to your Settings
- Choose the
Invoicing tab - Scroll down and type in which currency you wish to collect payments from. You can change the default currency you want your new customers to have at any time.
In ChargeOver, you can find it under the dropdown called
Home currency
If you don’t see the currency you are looking for, contact us.
For more information on the specifics of how payments work in ChargeOver, you can go here.